> ## Documentation Index
> Fetch the complete documentation index at: https://docs.macstadium.com/llms.txt
> Use this file to discover all available pages before exploring further.
# Azure Networking Setup
> Set up a policy-based IPsec VPN between Azure and MacStadium. Covers virtual network gateway, local network gateway, and connection configuration.
To establish a stable, persistent connection between a Microsoft Azure private cloud and your MacStadium private cloud, you need to configure a policy-based IPsec site-to-site VPN between the two clouds.
Currently, Azure lets you create a site-to-site VPN with one tunnel. To ensure minimal downtime (up to a minute or minute and a half), the Azure VPN gateway consists of two instances in an active-standby configuration. The standby instance automatically takes over when an issue with the active instance occurs.
For information about how to enable higher availability, see Azure Documentation: Highly Available Cross-Premises Connectivity.
To create a site-to-site VPN from your Azure private cloud to your MacStadium private cloud, you need to go through the following high-level steps:
## Log into Azure
1. Log in to the Azure portal with your credentials.
2. In the top right corner of the screen, make sure that you're working in the correct account and organization.
## Create an Azure virtual network
If you already have an Azure virtual network configured, you can skip this step.
Azure virtual networks let you manage connectivity for your Azure cloud resources. Any Azure virtual machines that you want to connect to from MacStadium must be on the Azure virtual network that sits at the Azure end of your VPN connection.
For more information about virtual networks, see [Azure Documentation: What is Azure Virtual Network?](https://docs.microsoft.com/en-us/azure/virtual-network/virtual-networks-overview)
1. Verify that you have a resource group in Azure.
2. In the search box at the top of the screen, type Virtual networks and select the respective entry in the filtered search results. Azure filters results as you type.\\
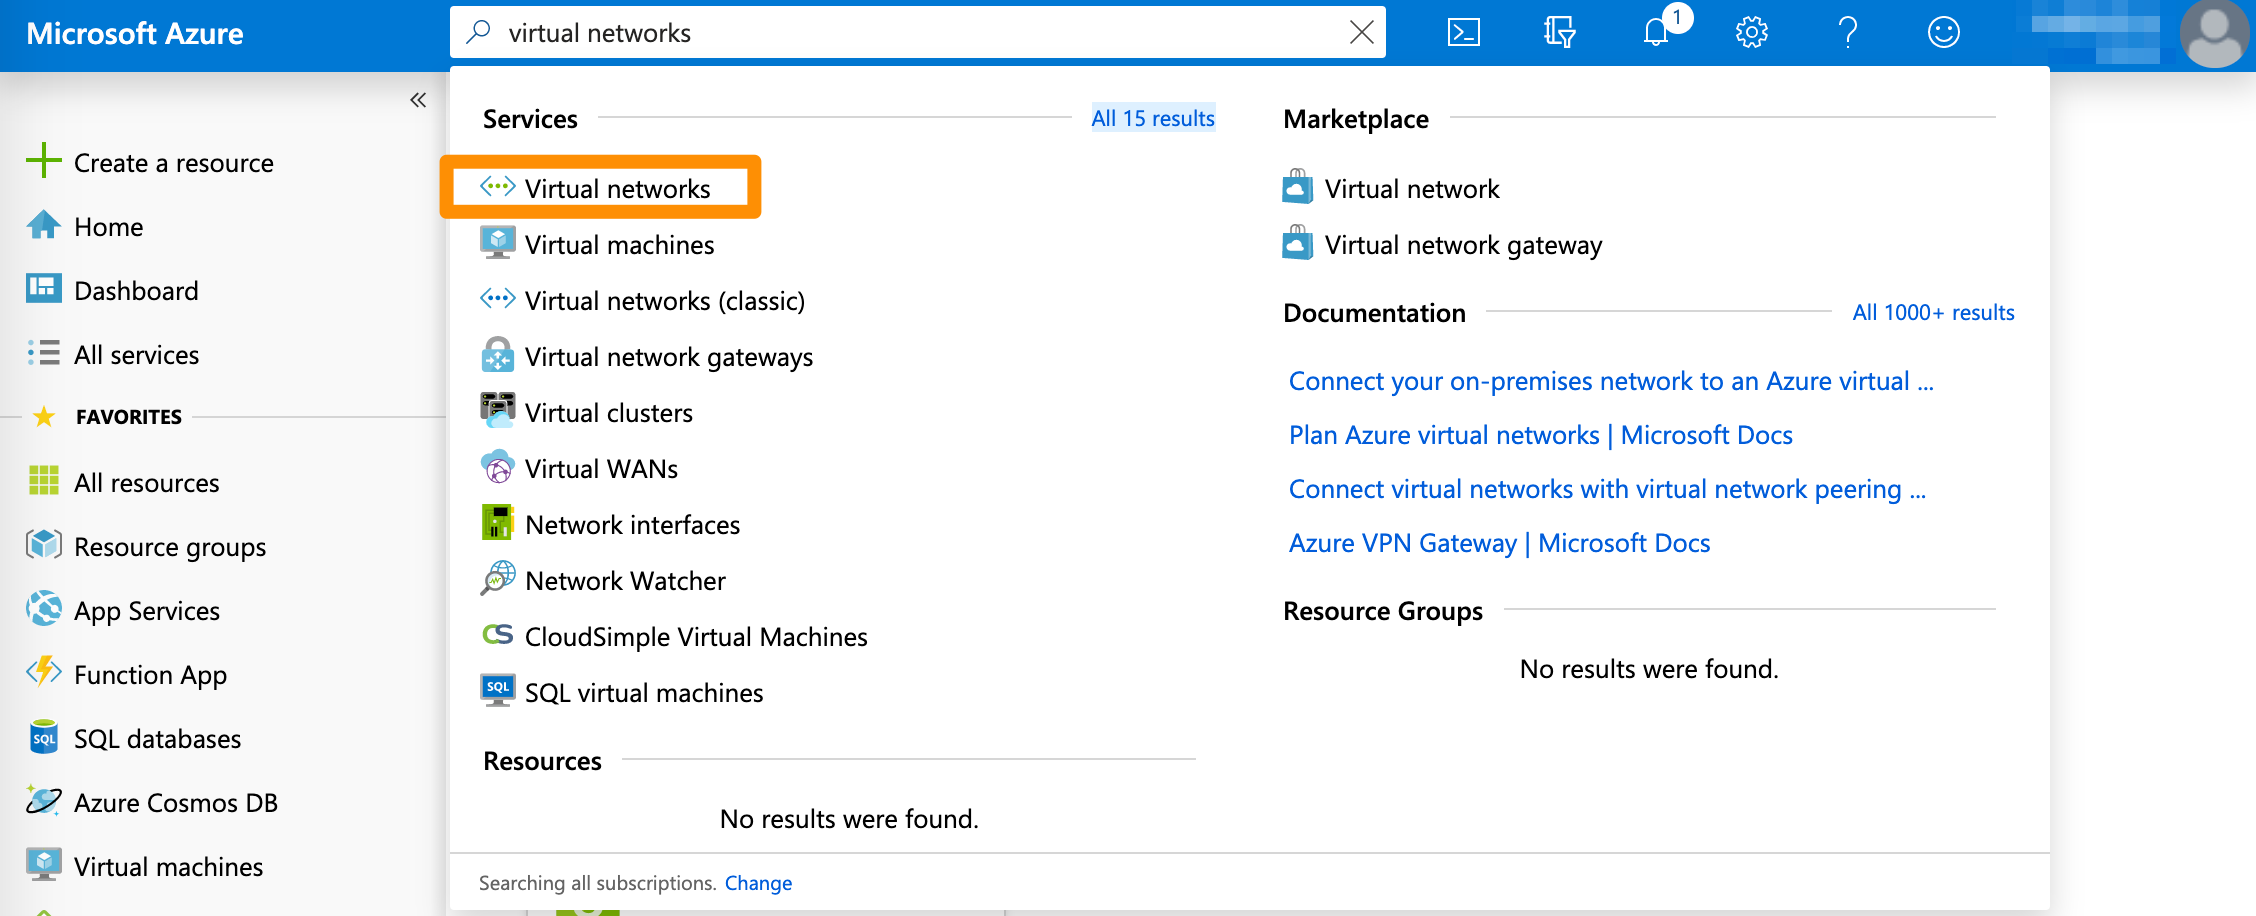 3. On the Virtual networks screen, click + Add.
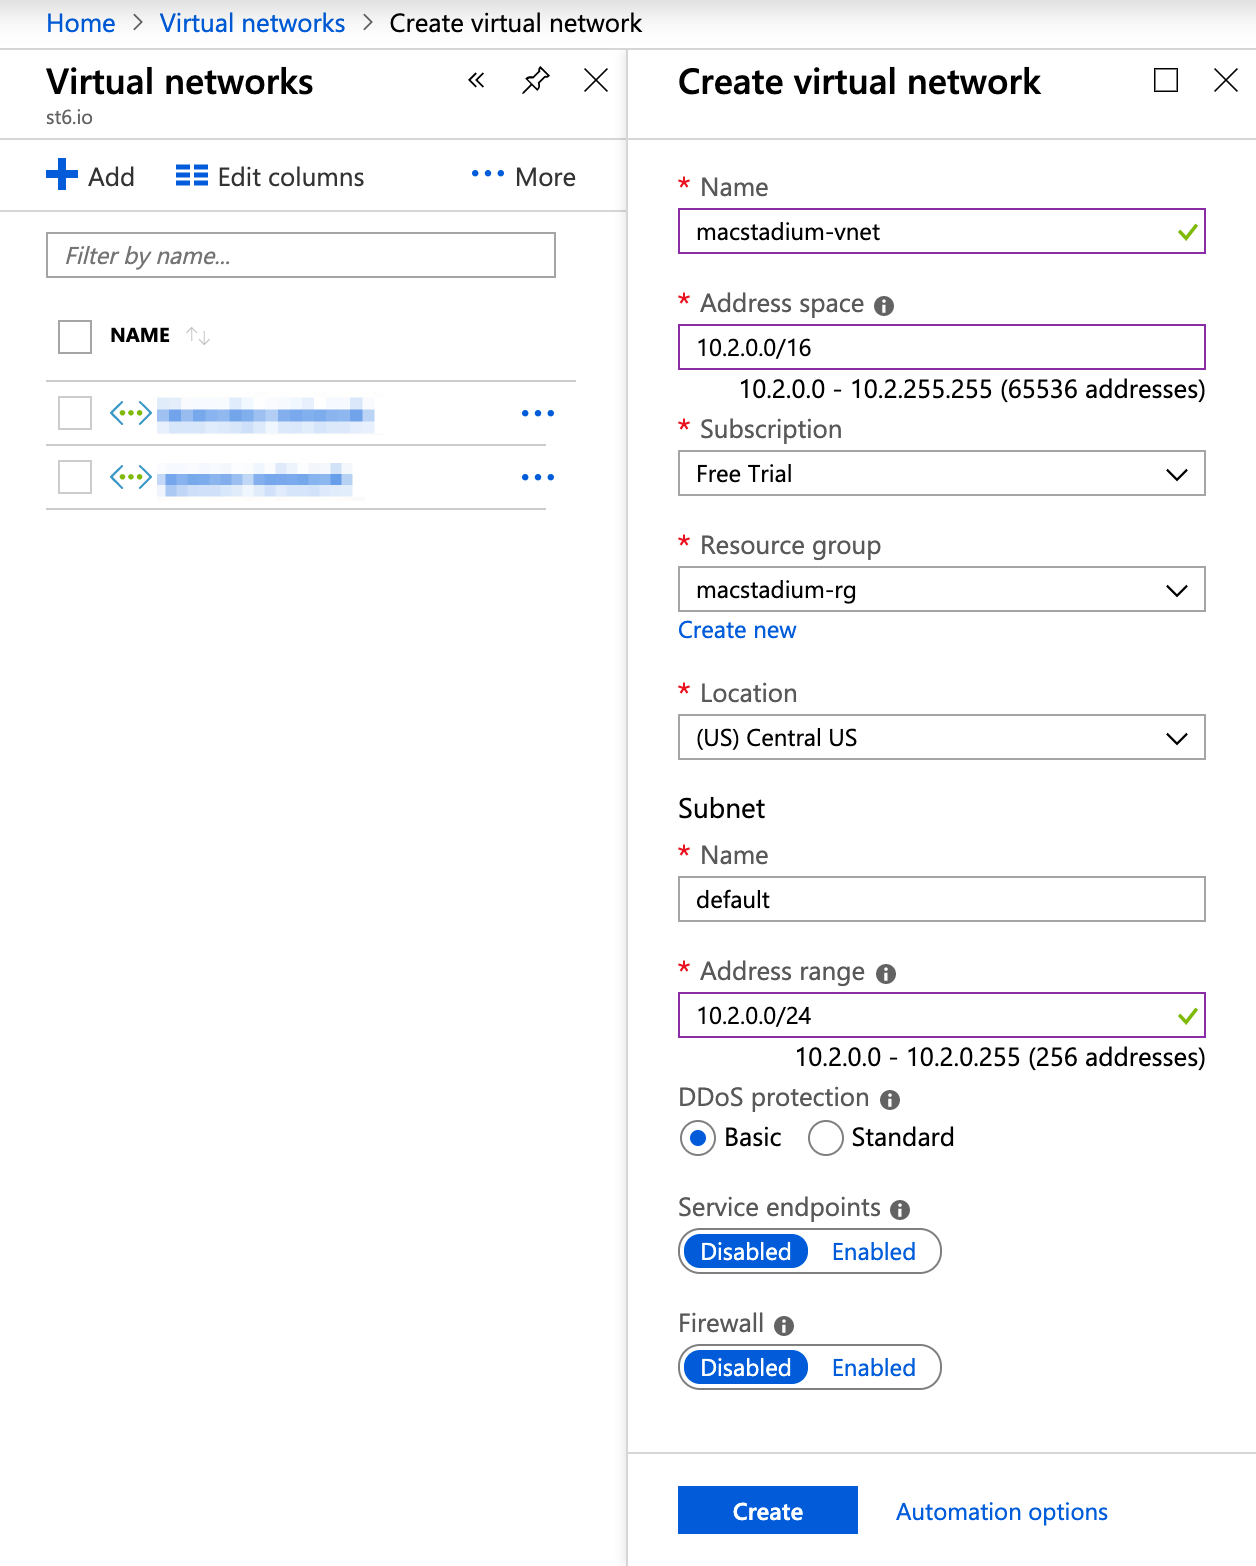
4. Provide a Name.
5. For Address space, provide a range of IP addresses in the CIDR notation that can be used within the network. You must provide an IP range reserved for private use. For more information about the private IP range requirement, see [Azure Documentation: Designing networking for Microsoft Azure IaaS](https://docs.microsoft.com/en-us/office365/enterprise/designing-networking-for-microsoft-azure-iaas#step-4-determine-the-address-space-of-the-vnet).
* For more information about CIDR notations, see [Understanding IP Addresses, Subnets, and CIDR Notation for Networking](https://www.digitalocean.com/community/tutorials/understanding-ip-addresses-subnets-and-cidr-notation-for-networking#cidr-notation). You can also use a CIDR calculator such as this [CIDR/Netmask Lookup Tool](https://www.ultratools.com/tools/netMask).
6. Select Subscription, Resource group, and Location.
7. Provide a Subnet > Name or use the pre-filled default value.
8. For Subnet > Name, provide a subset of the Address space in CIDR notation.
9. (Optional) Modify the remaining pre-filled settings to match your requirements.
10. Click Create and wait for the deployment to complete.
* This might take a while. When the deployment is complete, the virtual network becomes listed under All resources.
## Example: Create an Azure virtual network
This image shows a sample Azure virtual network configuration.
3. On the Virtual networks screen, click + Add.
4. Provide a Name.
5. For Address space, provide a range of IP addresses in the CIDR notation that can be used within the network. You must provide an IP range reserved for private use. For more information about the private IP range requirement, see [Azure Documentation: Designing networking for Microsoft Azure IaaS](https://docs.microsoft.com/en-us/office365/enterprise/designing-networking-for-microsoft-azure-iaas#step-4-determine-the-address-space-of-the-vnet).
* For more information about CIDR notations, see [Understanding IP Addresses, Subnets, and CIDR Notation for Networking](https://www.digitalocean.com/community/tutorials/understanding-ip-addresses-subnets-and-cidr-notation-for-networking#cidr-notation). You can also use a CIDR calculator such as this [CIDR/Netmask Lookup Tool](https://www.ultratools.com/tools/netMask).
6. Select Subscription, Resource group, and Location.
7. Provide a Subnet > Name or use the pre-filled default value.
8. For Subnet > Name, provide a subset of the Address space in CIDR notation.
9. (Optional) Modify the remaining pre-filled settings to match your requirements.
10. Click Create and wait for the deployment to complete.
* This might take a while. When the deployment is complete, the virtual network becomes listed under All resources.
## Example: Create an Azure virtual network
This image shows a sample Azure virtual network configuration.
 ## Create a gateway subnet
If you already have a gateway subnet configured for your Azure virtual network, you can skip this step.
After the deployment of your virtual network is complete, you need to create a gateway subnet. The gateway subnet consists of IPs that will be used by the gateway service.
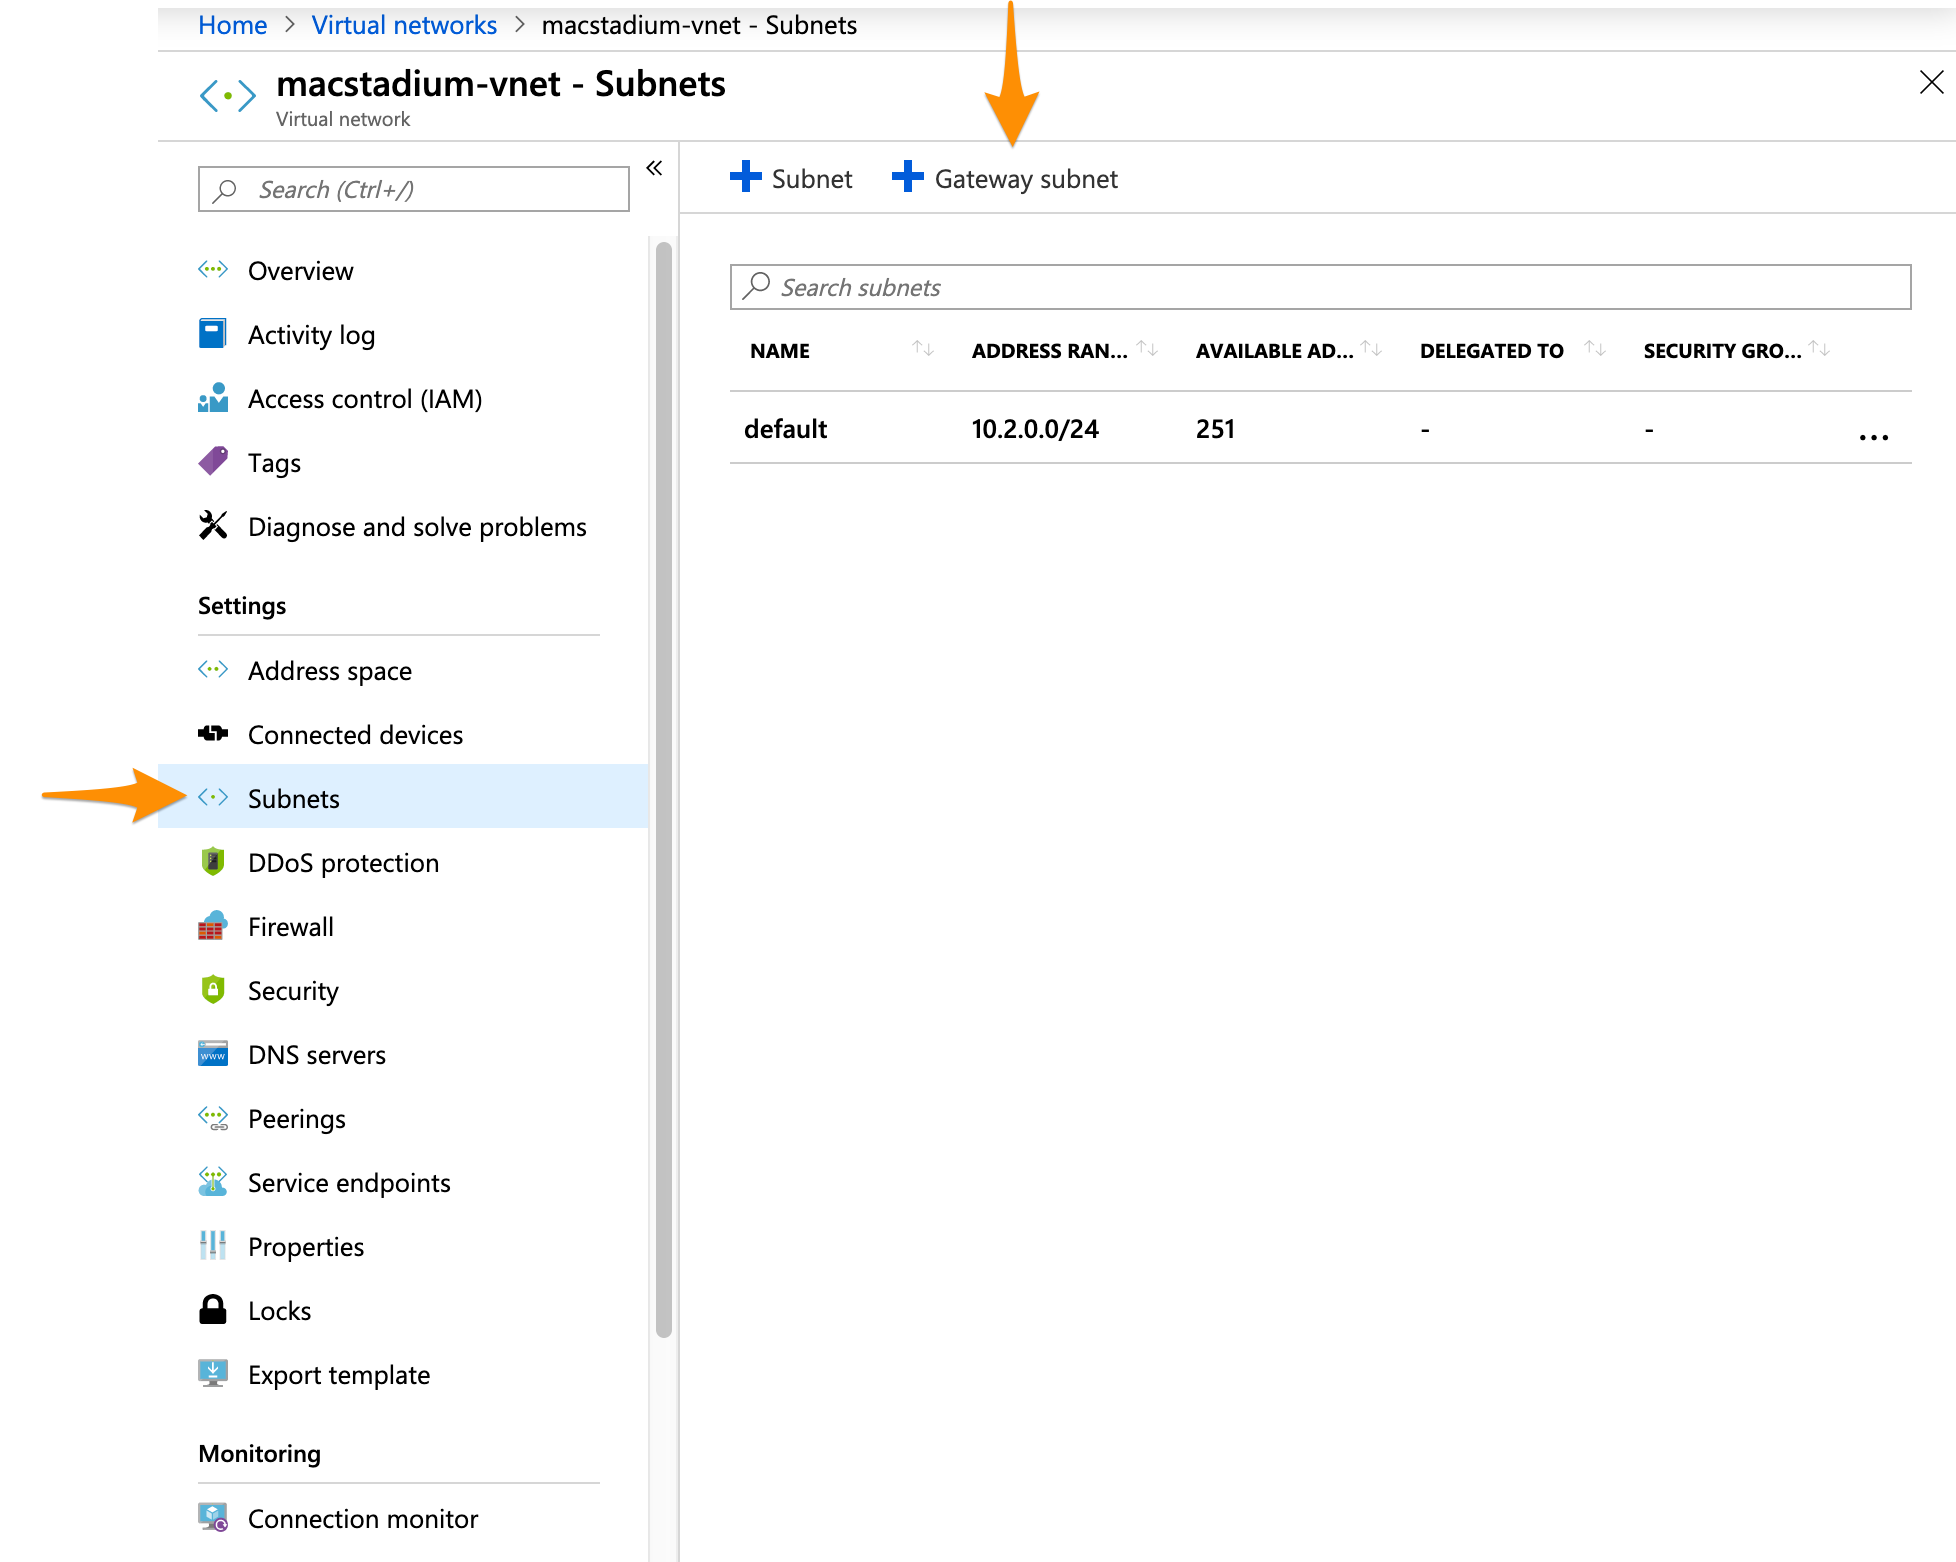
1. On the Virtual Networks screen, select your virtual network, and click Subnets.
2. Click + Gateway subnet.\\
## Create a gateway subnet
If you already have a gateway subnet configured for your Azure virtual network, you can skip this step.
After the deployment of your virtual network is complete, you need to create a gateway subnet. The gateway subnet consists of IPs that will be used by the gateway service.
1. On the Virtual Networks screen, select your virtual network, and click Subnets.
2. Click + Gateway subnet.\\
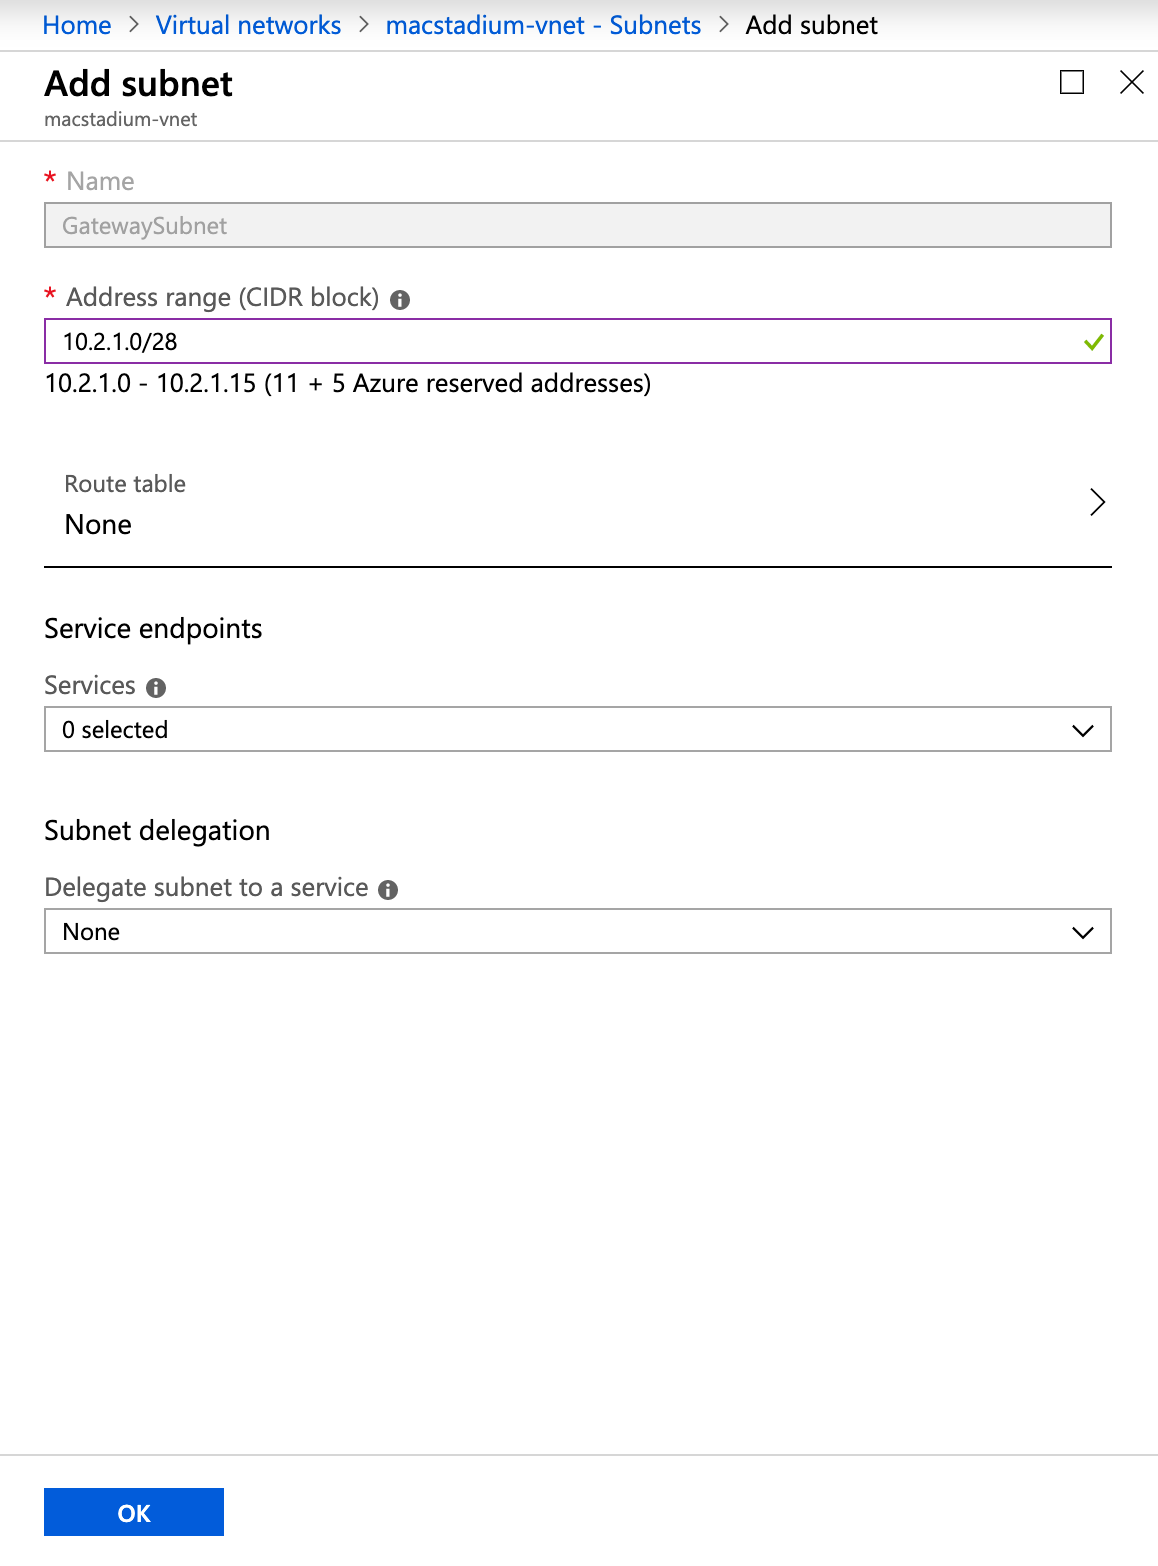
 3. In the Address range text box, provide an IP range for the subnet in the CIDR notation. This IP range must be a subset of the IP range for the virtual network subnet you created earlier.
* For more information about CIDR notations, see [Understanding IP Addresses, Subnets, and CIDR Notation for Networking](https://www.digitalocean.com/community/tutorials/understanding-ip-addresses-subnets-and-cidr-notation-for-networking#cidr-notation). You can also use a [CIDR calculator such as this CIDR/Netmask Lookup Tool](https://www.ultratools.com/tools/netMask).
4. (Optional) Modify the remaining pre-filled settings to match your requirements.
5. Click OK and wait for the deployment to complete.
* This might take a while.
### **Example: Create a gateway subnet**
This image shows a sample configuration for the gateway subnet of an Azure virtual network.
3. In the Address range text box, provide an IP range for the subnet in the CIDR notation. This IP range must be a subset of the IP range for the virtual network subnet you created earlier.
* For more information about CIDR notations, see [Understanding IP Addresses, Subnets, and CIDR Notation for Networking](https://www.digitalocean.com/community/tutorials/understanding-ip-addresses-subnets-and-cidr-notation-for-networking#cidr-notation). You can also use a [CIDR calculator such as this CIDR/Netmask Lookup Tool](https://www.ultratools.com/tools/netMask).
4. (Optional) Modify the remaining pre-filled settings to match your requirements.
5. Click OK and wait for the deployment to complete.
* This might take a while.
### **Example: Create a gateway subnet**
This image shows a sample configuration for the gateway subnet of an Azure virtual network.
 ## Create a virtual network gateway
In Azure, the virtual network gateway represents the Azure side of your site-to-site VPN tunnel.
1. In the search box at the top of the screen, type Virtual network gateways and select the respective entry in the filtered search results.
* Azure filters results as you type.\\
## Create a virtual network gateway
In Azure, the virtual network gateway represents the Azure side of your site-to-site VPN tunnel.
1. In the search box at the top of the screen, type Virtual network gateways and select the respective entry in the filtered search results.
* Azure filters results as you type.\\
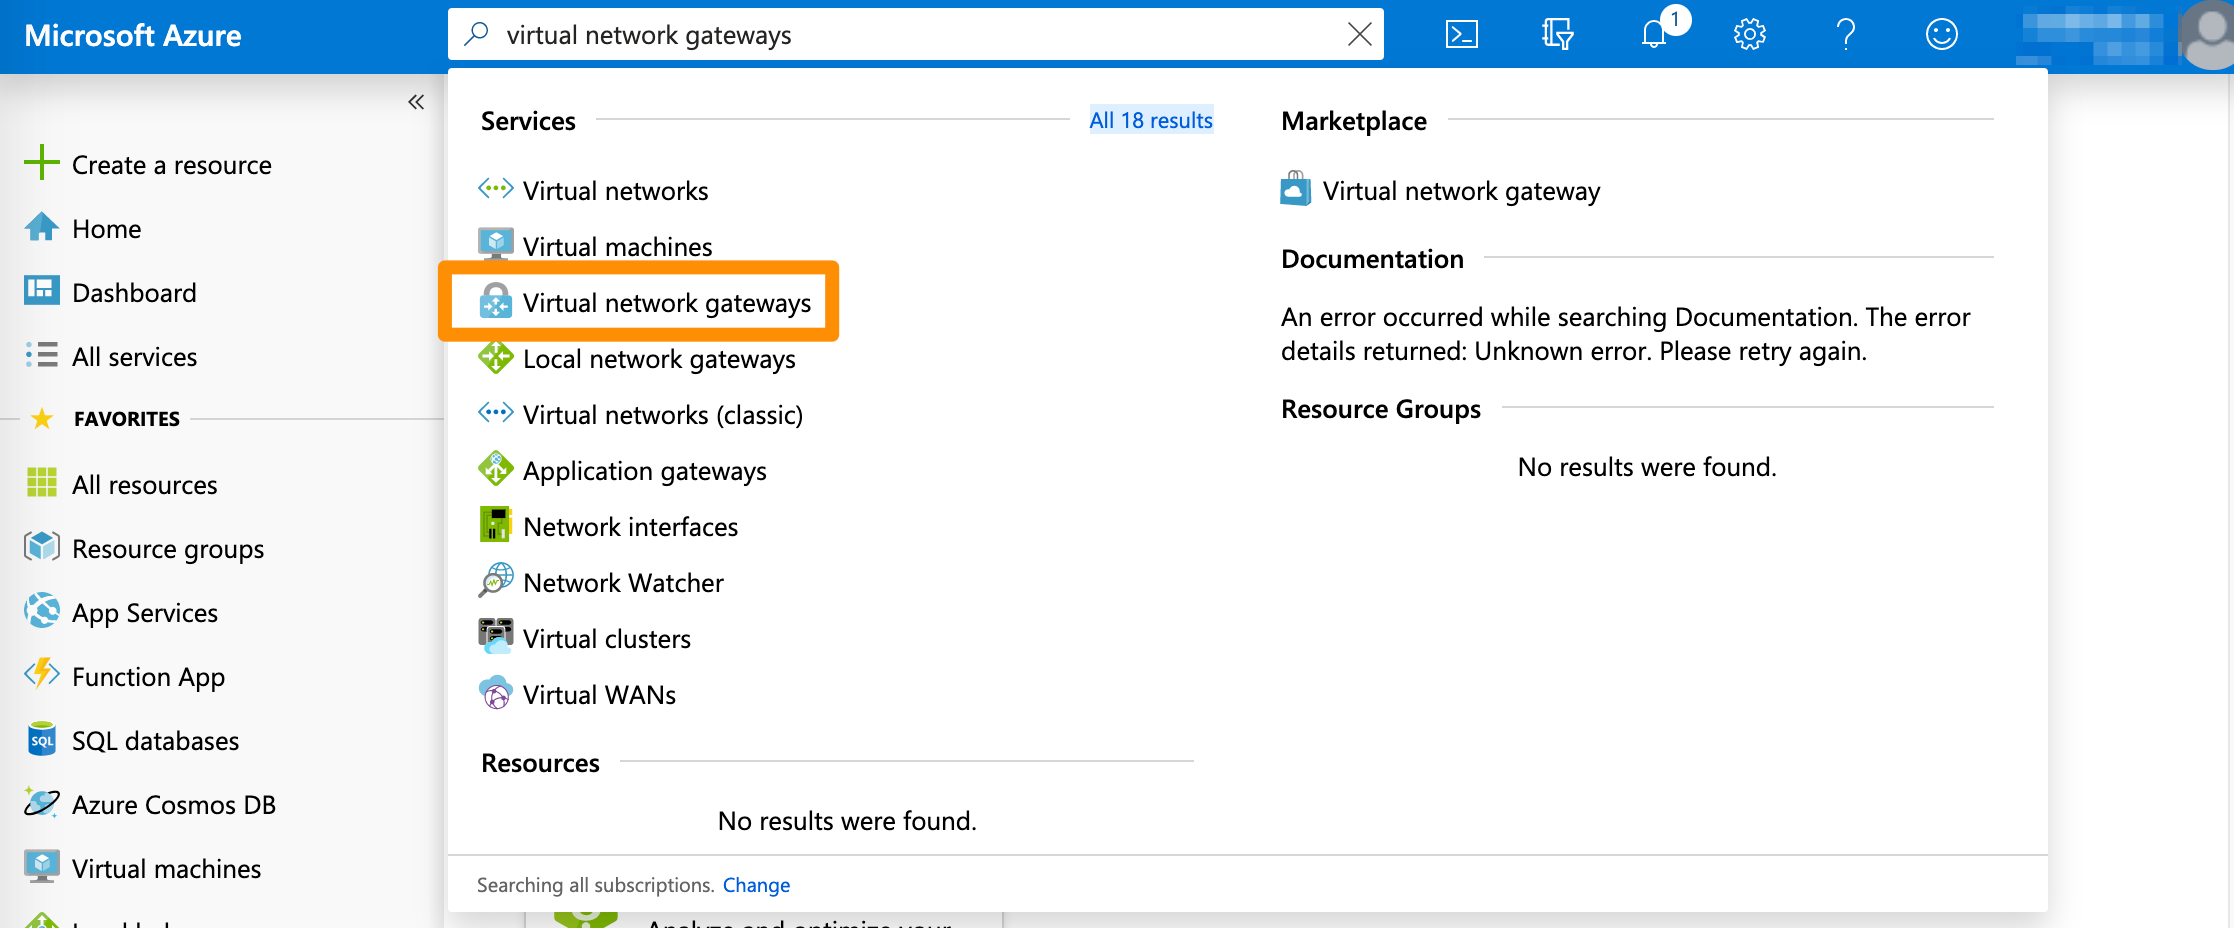 2. On the Virtual network gateways screen, click + Add.
3. Select Subscription.
4. Select Virtual network.
* This action lets Azure pre-fill some of the remaining configuration.
5. Provide Name and select Region.
6. For Gateway type, select VPN.
7. For VPN type, select Policy-based.
8. Select your SKU.
* For more information about the available SKUs, see [Azure Documentation: Gateway SKUs](https://docs.microsoft.com/en-gb/azure/vpn-gateway/vpn-gateway-about-vpngateways#gwsku).
9. For Public IP address, select an existing unused IP address or create a new one.
10. Click Review + create, review the configuration, and click Create.
11. Wait for the deployment to complete.
* This might take a while.
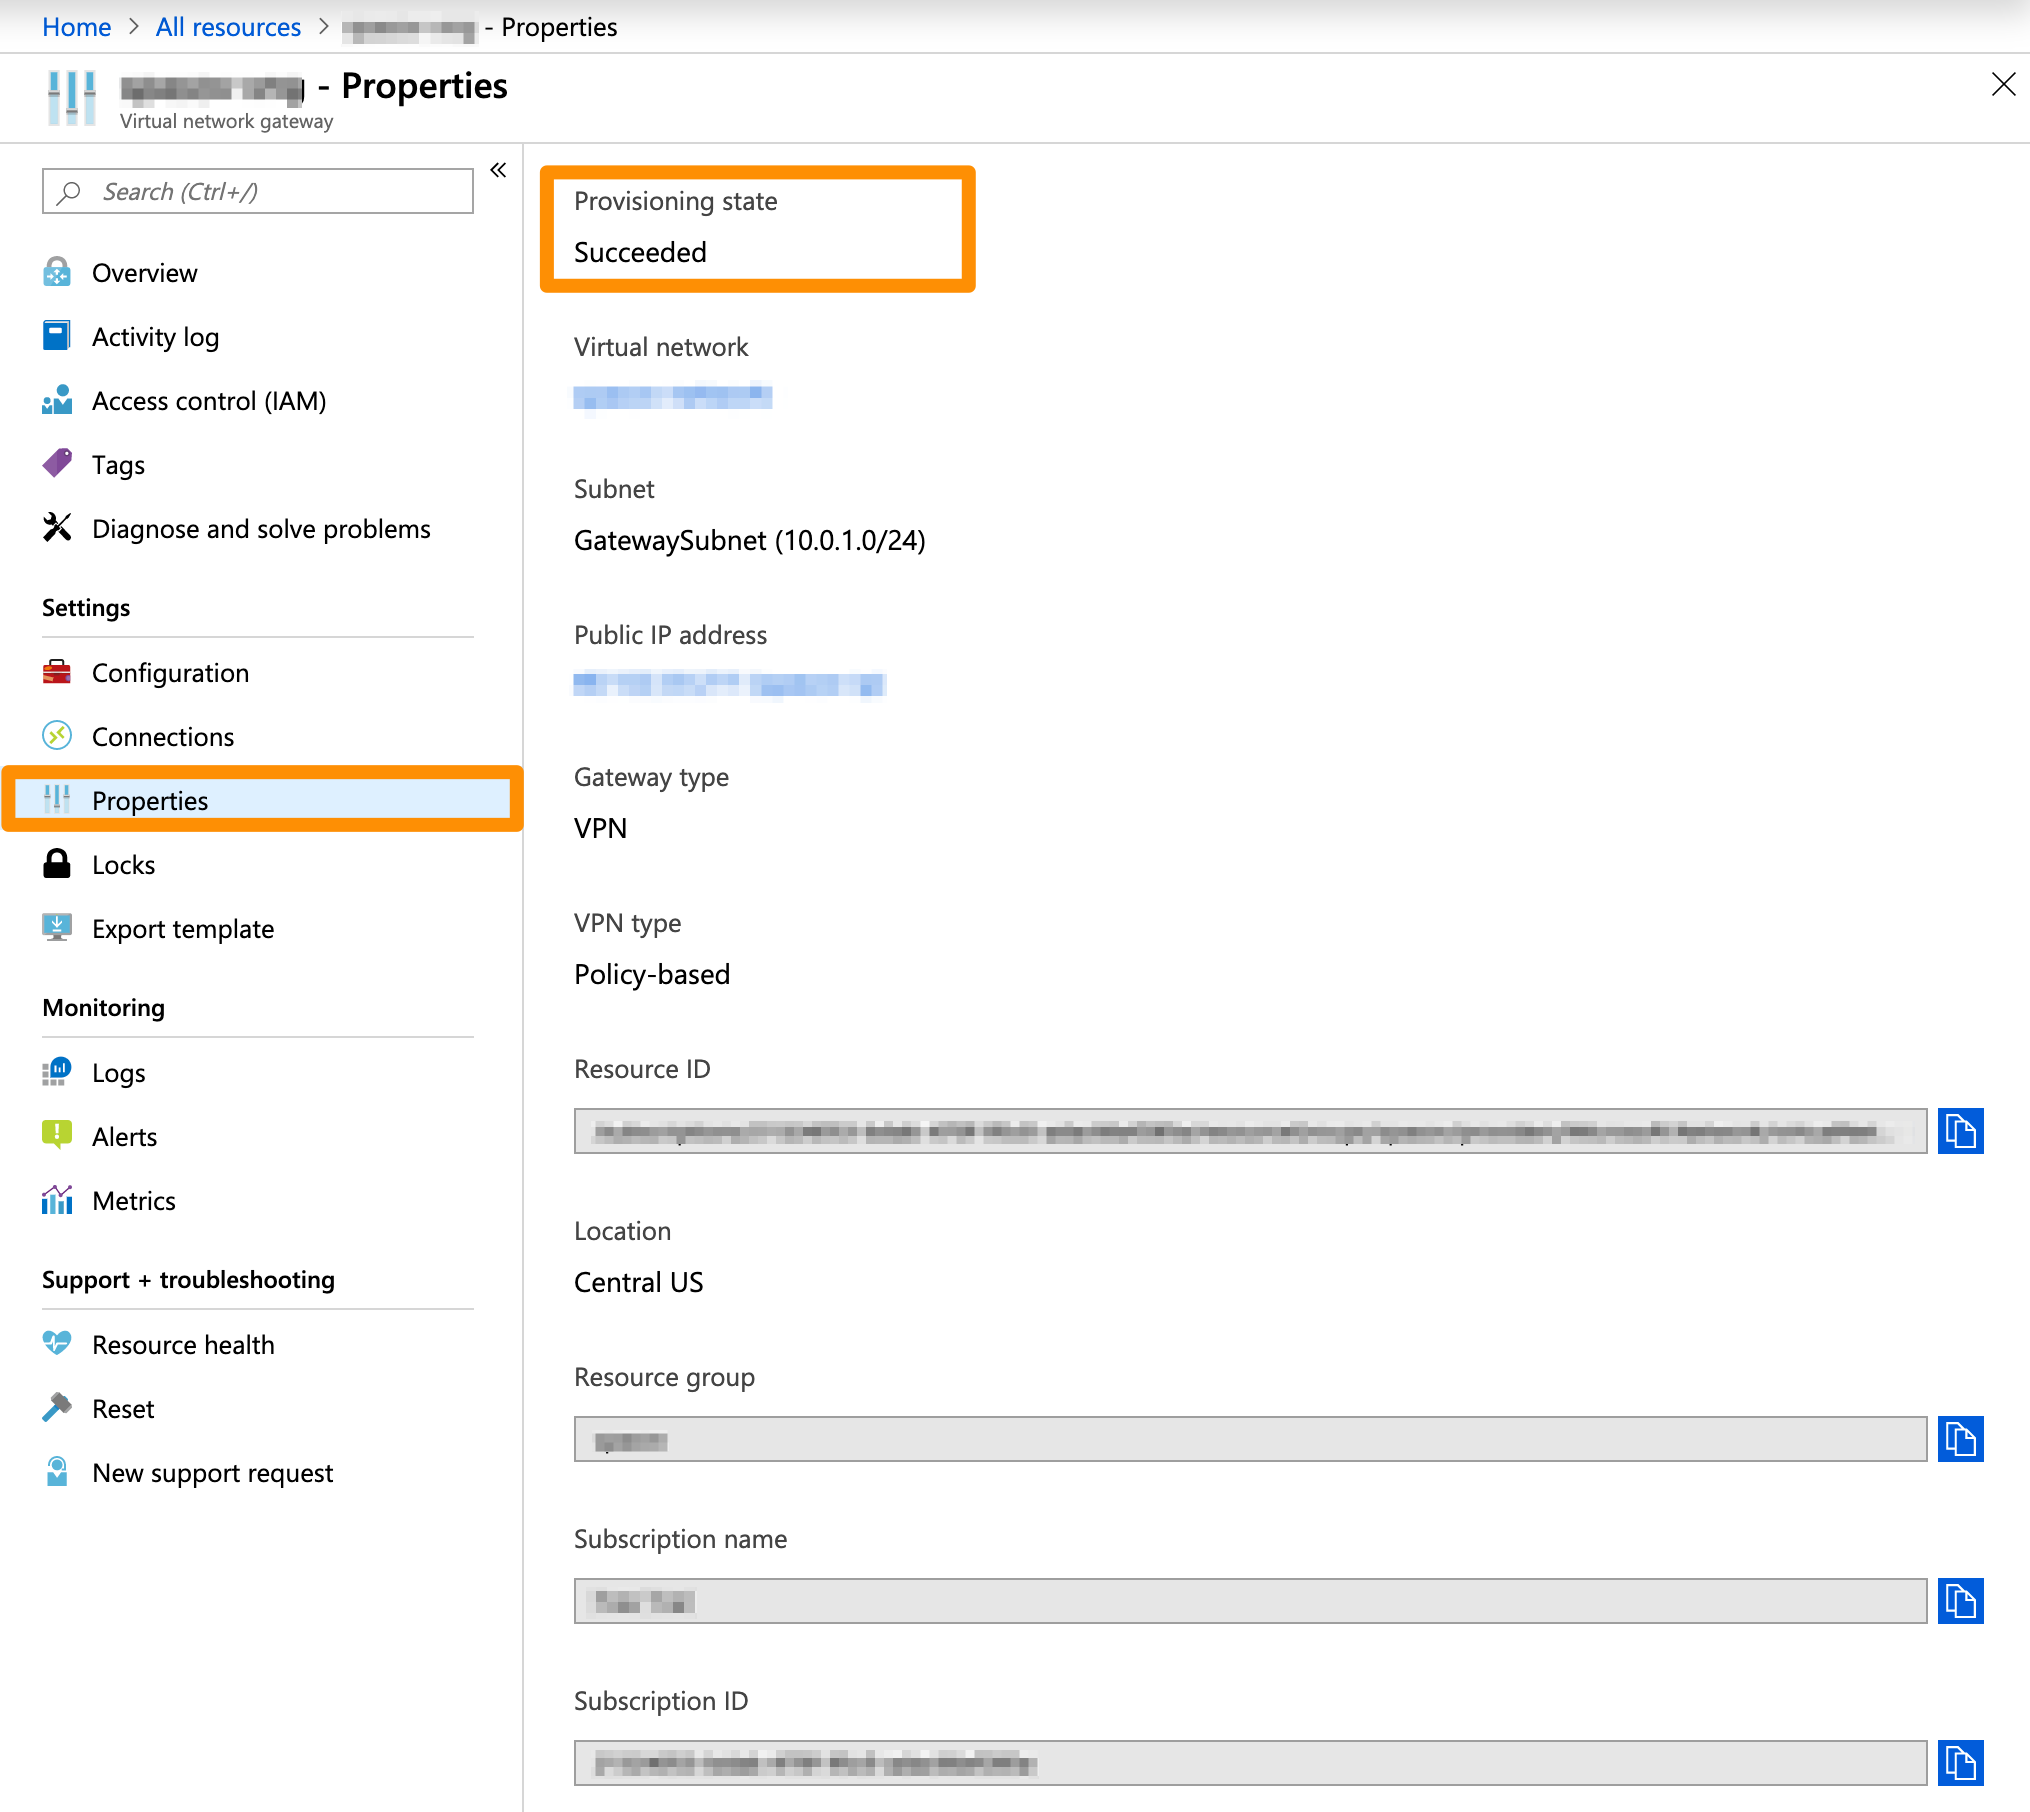
12. Check if the virtual network gateway is deployed successfully.
* On the Virtual network gateways screen, select the virtual network gateway and click Properties.
* Verify that the Provisioning state is `Succeeded`.\\
2. On the Virtual network gateways screen, click + Add.
3. Select Subscription.
4. Select Virtual network.
* This action lets Azure pre-fill some of the remaining configuration.
5. Provide Name and select Region.
6. For Gateway type, select VPN.
7. For VPN type, select Policy-based.
8. Select your SKU.
* For more information about the available SKUs, see [Azure Documentation: Gateway SKUs](https://docs.microsoft.com/en-gb/azure/vpn-gateway/vpn-gateway-about-vpngateways#gwsku).
9. For Public IP address, select an existing unused IP address or create a new one.
10. Click Review + create, review the configuration, and click Create.
11. Wait for the deployment to complete.
* This might take a while.
12. Check if the virtual network gateway is deployed successfully.
* On the Virtual network gateways screen, select the virtual network gateway and click Properties.
* Verify that the Provisioning state is `Succeeded`.\\
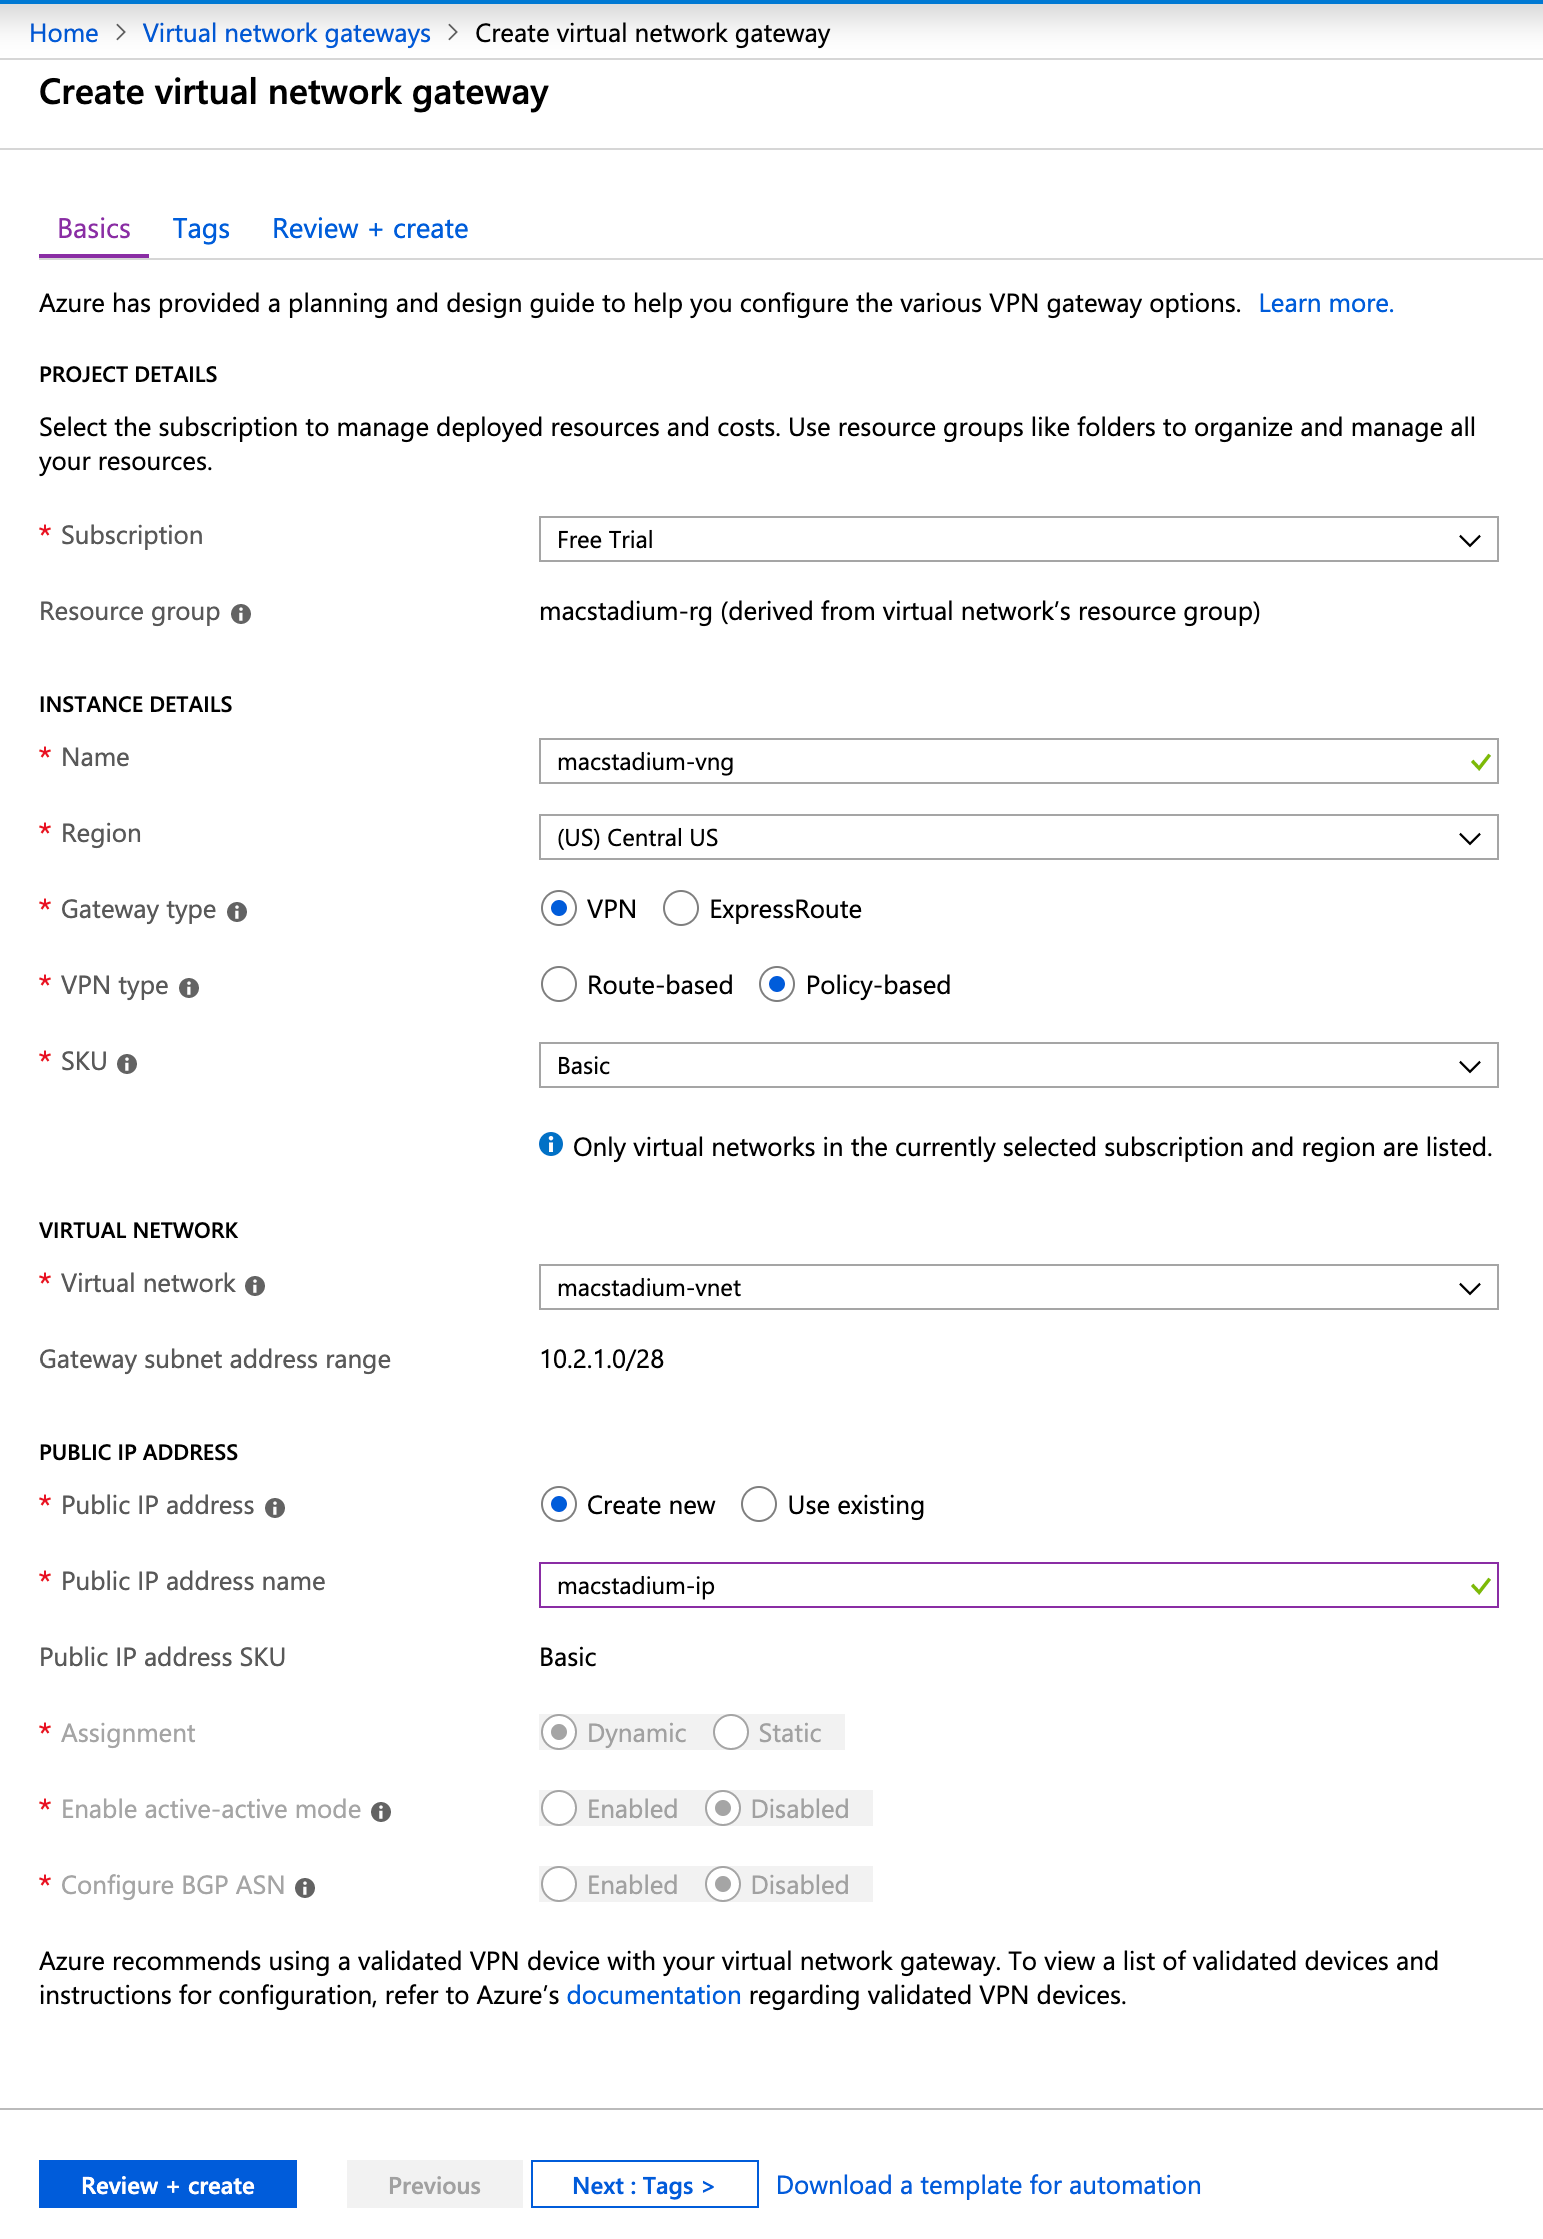
 ### Example: Create a virtual network gateway
This image shows a sample configuration for a virtual network gateway.
### Example: Create a virtual network gateway
This image shows a sample configuration for a virtual network gateway.
 ## Create a local network gateway
In Azure, the local network gateway represents the MacStadium side of your site-to-site VPN tunnel.
1. In the search box at the top of the screen, type Local network gateways and select the respective entry in the filtered search results.
* Azure filters results as you type.\\
## Create a local network gateway
In Azure, the local network gateway represents the MacStadium side of your site-to-site VPN tunnel.
1. In the search box at the top of the screen, type Local network gateways and select the respective entry in the filtered search results.
* Azure filters results as you type.\\
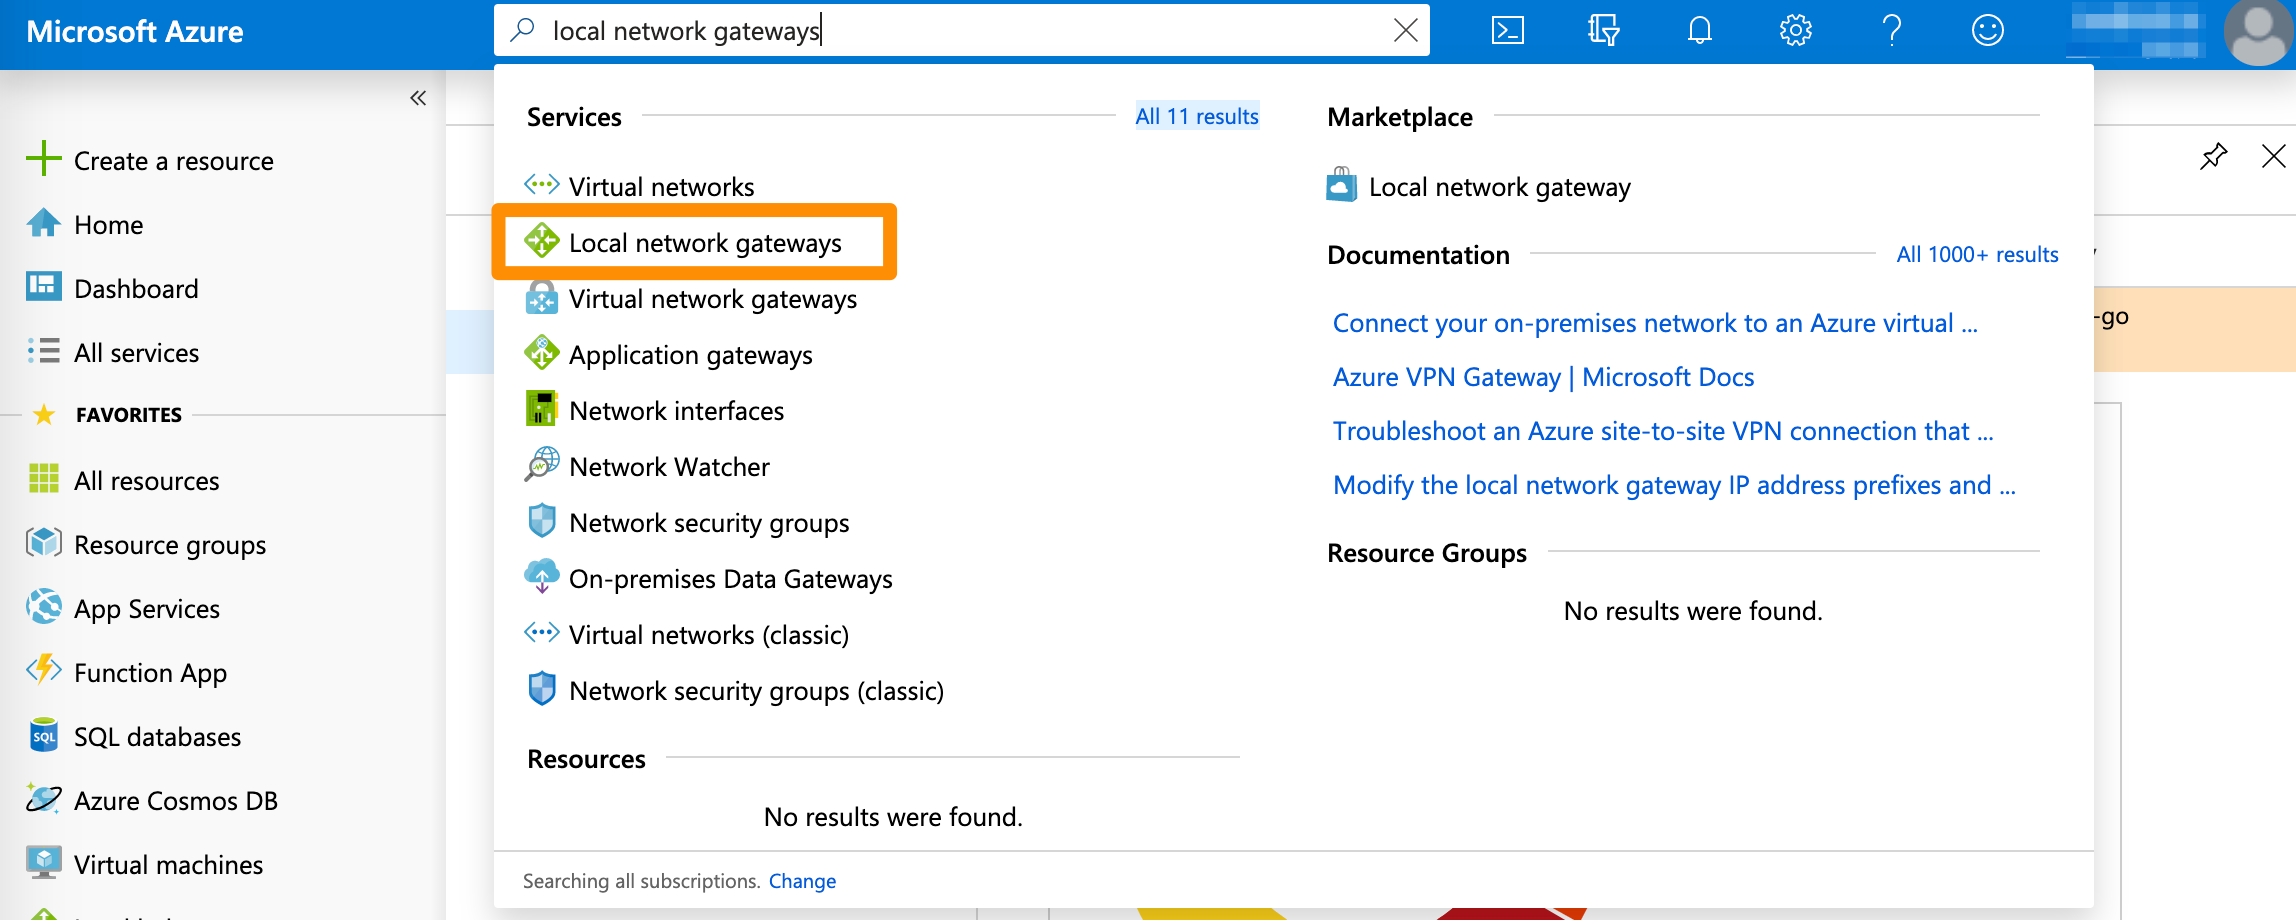 2. On the Local network gateways screen, click + Add.
3. Provide a Name.
4. For IP Address, provide the IP address of the public network listed in Appendix B of the [IP Plan](/macstadium/macstadium-overview/ip-plan).
* By default, this is the `FW1-Outside` network.
5. For Address space, provide the IP range in CIDR notation of the private network listed in Appendix A of the IP Plan.
* By default, this is the `Private-1` network.
* For more information about CIDR notations, see [Understanding IP Addresses, Subnets, and CIDR Notation for Networking](https://www.digitalocean.com/community/tutorials/understanding-ip-addresses-subnets-and-cidr-notation-for-networking#cidr-notation). You can also use a CIDR calculator such as this [CIDR/Netmask Lookup Tool](https://www.ultratools.com/tools/netMask).
6. Leave Configure BGP settings deselected.
7. Select Subscription, Resource group, and Location.
8. Click Create.
9. Wait for the deployment to complete.
* This might take a while.
* When the deployment is complete, the local network gateway becomes listed under All resources.
## Create the VPN connection
With a virtual network gateway and a local network gateway in place, you can create and configure the VPN connection between Azure and your MacStadium private cloud.
1. In the search box at the top of the screen, type Local network gateways and select the respective entry in the filtered search results.
* Azure filters results as you type.
2. On the Local network gateways screen, click + Add.
3. Provide a Name.
4. For IP Address, provide the IP address of the public network listed in Appendix B of the [IP Plan](/macstadium/macstadium-overview/ip-plan).
* By default, this is the `FW1-Outside` network.
5. For Address space, provide the IP range in CIDR notation of the private network listed in Appendix A of the IP Plan.
* By default, this is the `Private-1` network.
* For more information about CIDR notations, see [Understanding IP Addresses, Subnets, and CIDR Notation for Networking](https://www.digitalocean.com/community/tutorials/understanding-ip-addresses-subnets-and-cidr-notation-for-networking#cidr-notation). You can also use a CIDR calculator such as this [CIDR/Netmask Lookup Tool](https://www.ultratools.com/tools/netMask).
6. Leave Configure BGP settings deselected.
7. Select Subscription, Resource group, and Location.
8. Click Create.
9. Wait for the deployment to complete.
* This might take a while.
* When the deployment is complete, the local network gateway becomes listed under All resources.
## Create the VPN connection
With a virtual network gateway and a local network gateway in place, you can create and configure the VPN connection between Azure and your MacStadium private cloud.
1. In the search box at the top of the screen, type Local network gateways and select the respective entry in the filtered search results.
* Azure filters results as you type.
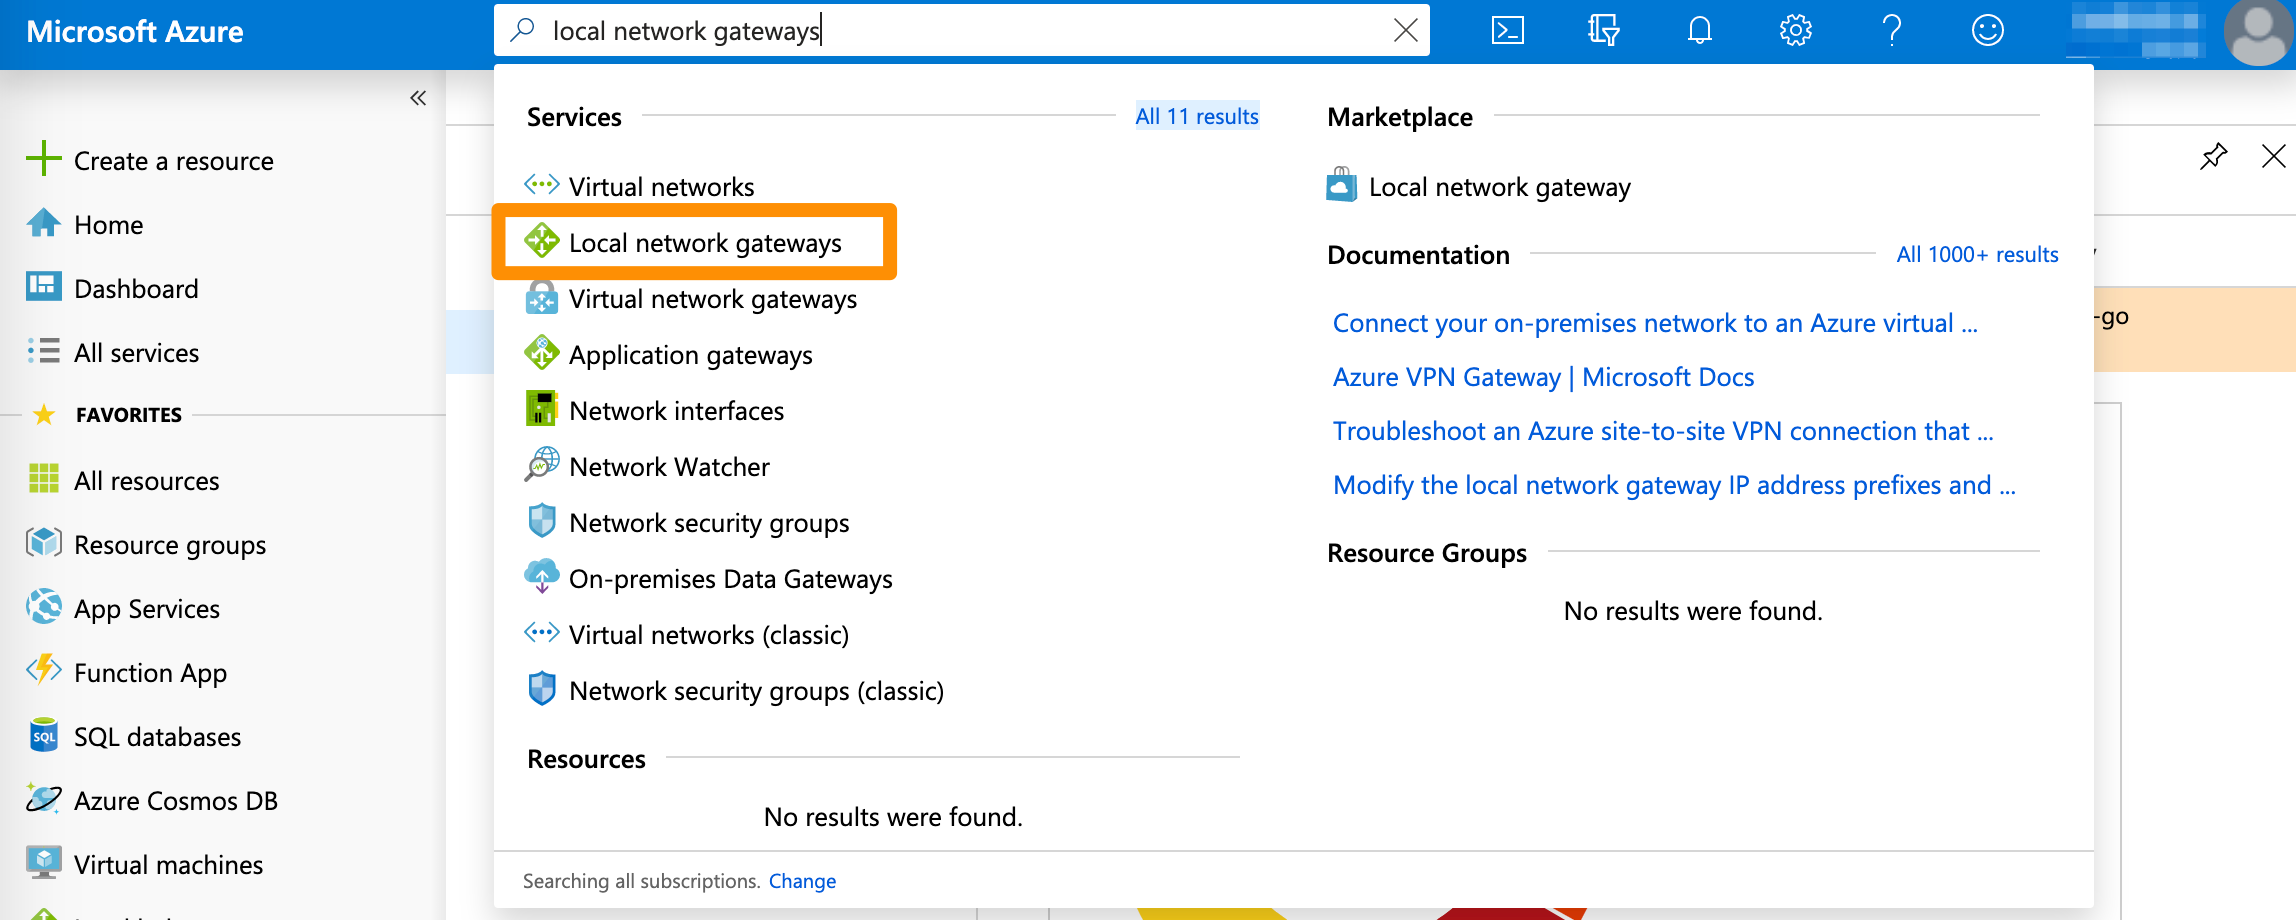 2\. On the Local network gateways screen, select the local network gateway you created earlier.
3\. From the sidebar menu, select Connections and click + Add.\\
2\. On the Local network gateways screen, select the local network gateway you created earlier.
3\. From the sidebar menu, select Connections and click + Add.\\
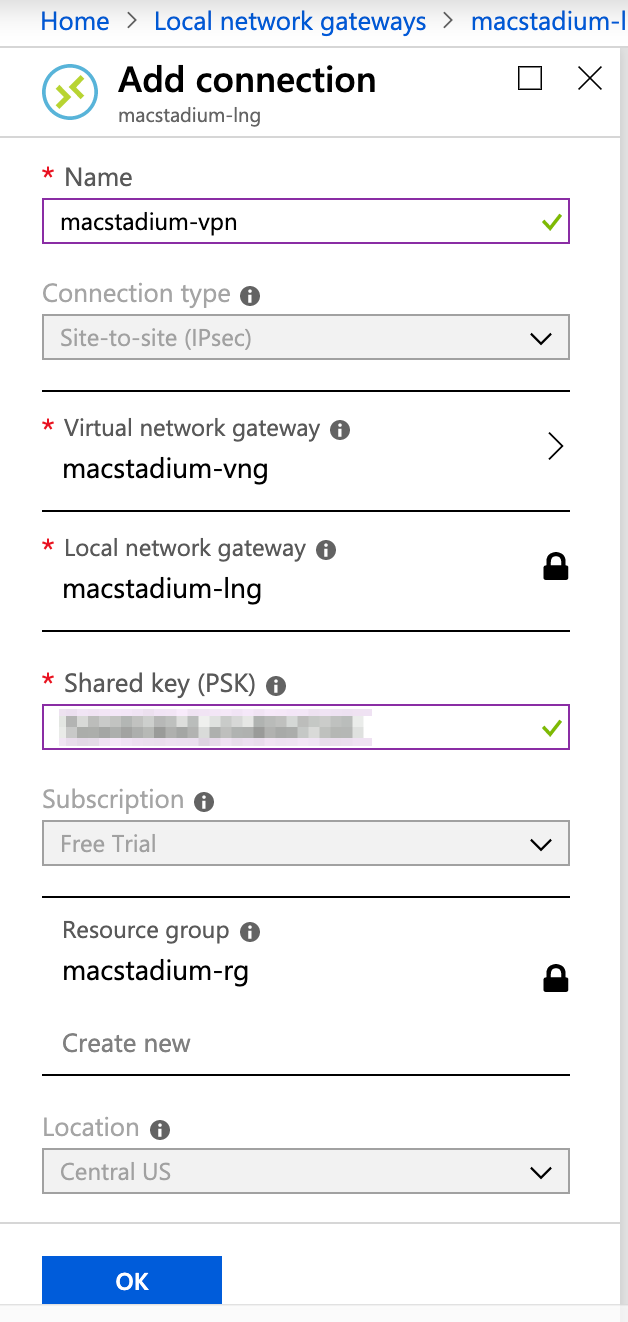
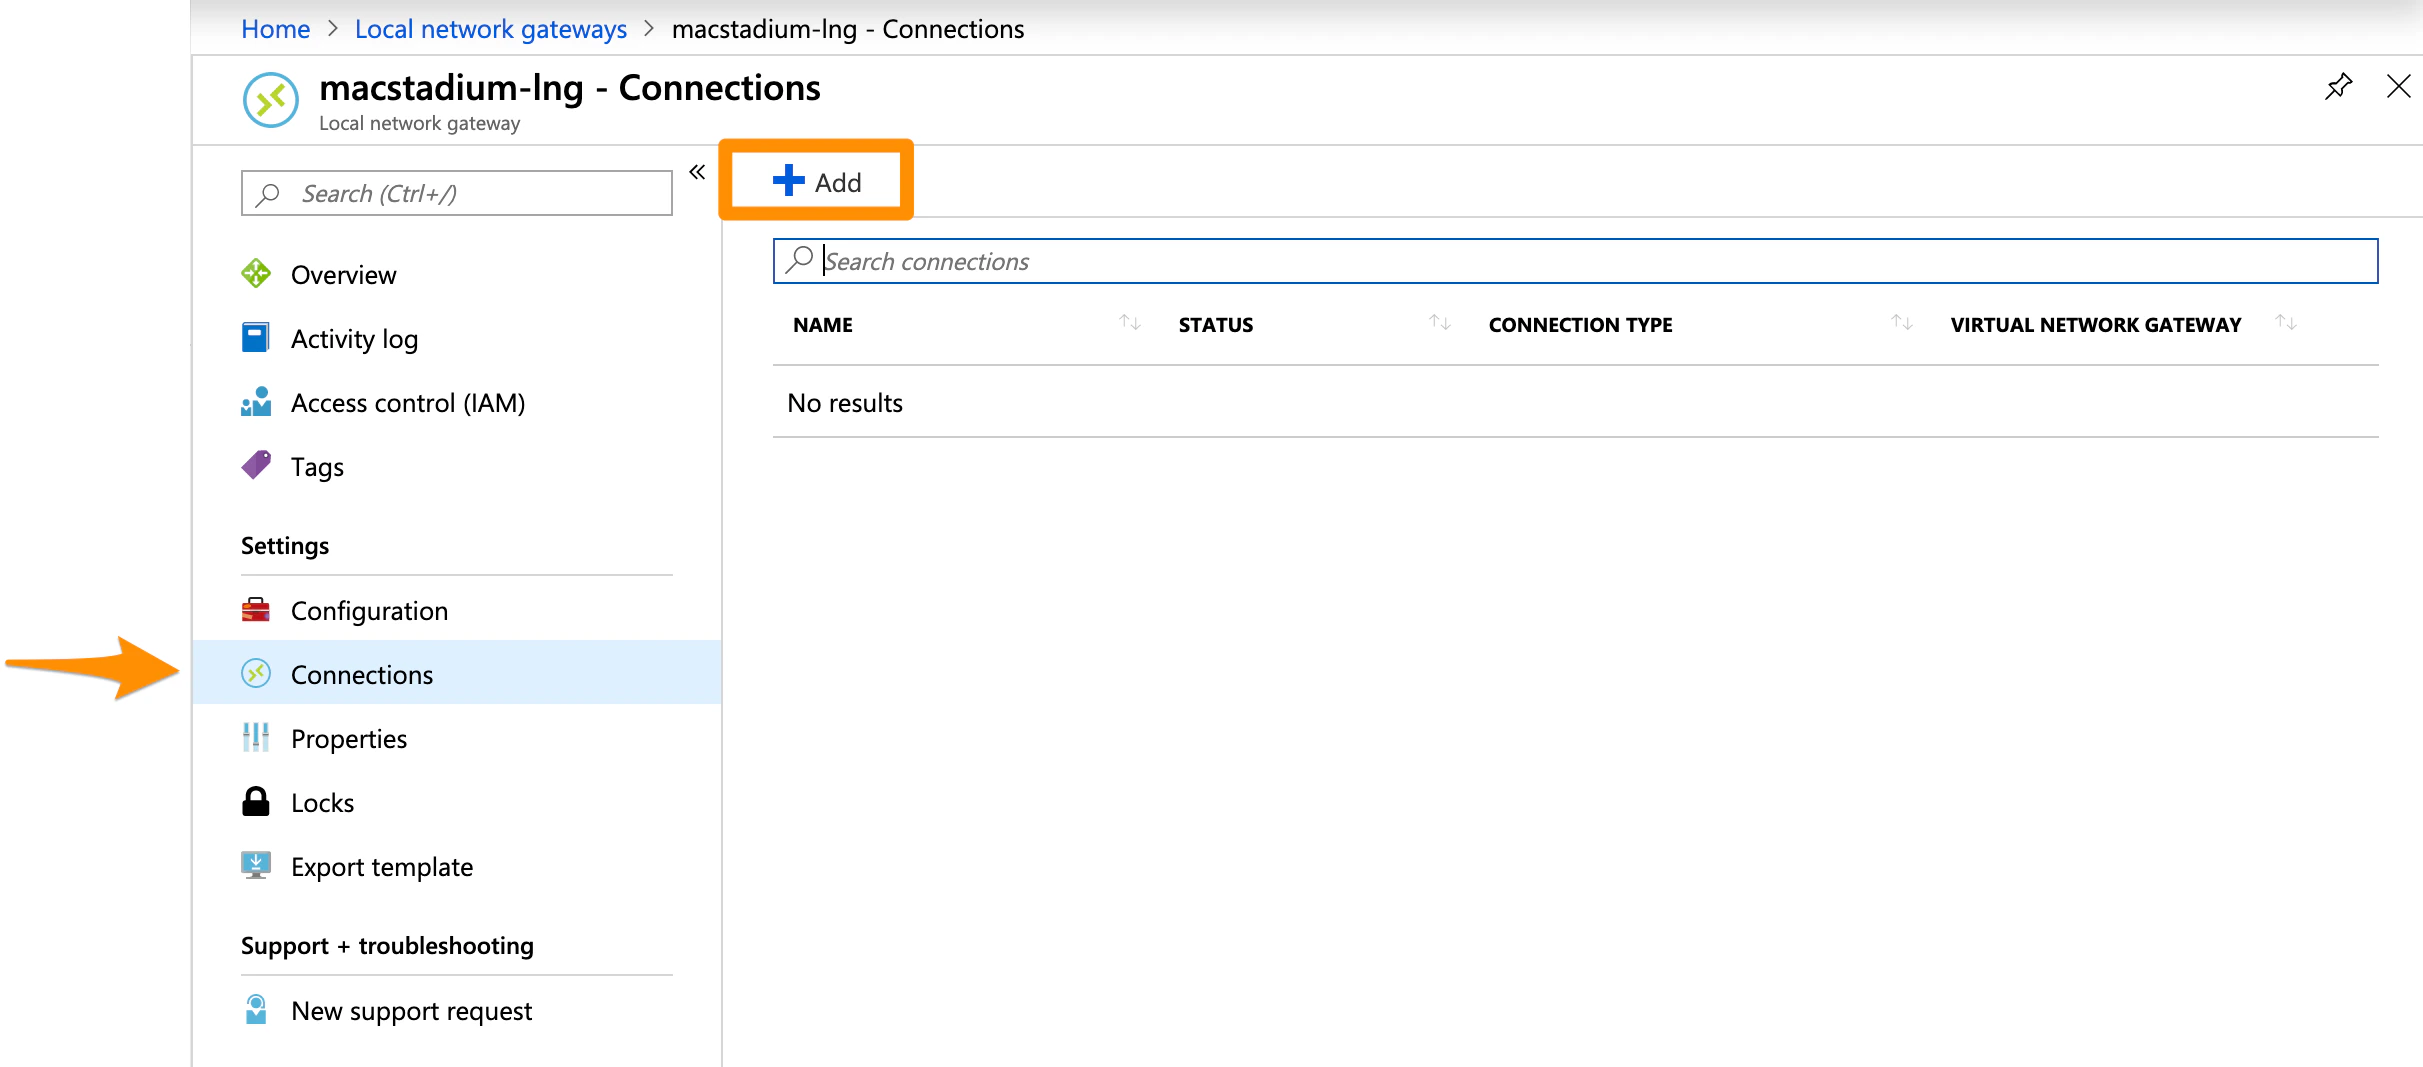 4\. Provide Name.
5\. Select Virtual network gateway.
6\. For Shared key (PSK), provide an IPSec pre-shared key that will be used to encrypt your data over the site-to-site VPN.
* You can use a generator tool such as the [IFM - IPSec Pre-shared Key (PSK) Generator](http://www.ifm.net.nz/cookbooks/IPSec-Pre-shared-Key-PSK-Generator.html).
Keep a record of the pre-shared key. You will need it later.
7. Review the remaining pre-filled settings and click OK.
8. Wait for the operation to complete.
* This might take a while.
* When the deployment is complete, the connection becomes listed under All resources.
At this point, the status of your newly created connection is Unknown.
### Example: Create the VPN connection
This image shows a sample configuration for the VPN connection.
4\. Provide Name.
5\. Select Virtual network gateway.
6\. For Shared key (PSK), provide an IPSec pre-shared key that will be used to encrypt your data over the site-to-site VPN.
* You can use a generator tool such as the [IFM - IPSec Pre-shared Key (PSK) Generator](http://www.ifm.net.nz/cookbooks/IPSec-Pre-shared-Key-PSK-Generator.html).
Keep a record of the pre-shared key. You will need it later.
7. Review the remaining pre-filled settings and click OK.
8. Wait for the operation to complete.
* This might take a while.
* When the deployment is complete, the connection becomes listed under All resources.
At this point, the status of your newly created connection is Unknown.
### Example: Create the VPN connection
This image shows a sample configuration for the VPN connection.
 ## Ensure that Azure allows inbound traffic
Based on your requirements and current setup, you might need to enable inbound traffic from MacStadium to Azure. For more information, see [Azure Documentation: Filter inbound traffic with Azure Firewall DNAT using the Azure portal](https://docs.microsoft.com/en-us/azure/firewall/tutorial-firewall-dnat) and [Azure Documentation: Security groups](https://docs.microsoft.com/en-us/azure/virtual-network/security-overview).
## Next steps
If you are ready to proceed with the MacStadium side of the configuration, see [Preparing the VPN Configuration for Input into Cisco ASA/ASAv](/iaas/azure/azure-vpn-config-for-cisco-asaasav).
## Ensure that Azure allows inbound traffic
Based on your requirements and current setup, you might need to enable inbound traffic from MacStadium to Azure. For more information, see [Azure Documentation: Filter inbound traffic with Azure Firewall DNAT using the Azure portal](https://docs.microsoft.com/en-us/azure/firewall/tutorial-firewall-dnat) and [Azure Documentation: Security groups](https://docs.microsoft.com/en-us/azure/virtual-network/security-overview).
## Next steps
If you are ready to proceed with the MacStadium side of the configuration, see [Preparing the VPN Configuration for Input into Cisco ASA/ASAv](/iaas/azure/azure-vpn-config-for-cisco-asaasav).