> ## Documentation Index
> Fetch the complete documentation index at: https://docs.macstadium.com/llms.txt
> Use this file to discover all available pages before exploring further.
# Site-to-Site VPN Configuration with Azure
> Configure an IPsec site-to-site VPN between Azure and the MacStadium Cisco ASA firewall. Covers Active/Standby and Active/Active modes with BGP routing.
## Overview
The goal of this documentation is to update the Site-to-Site VPN configuration between Azure and MacStadium ASA firewalls.
## Azure Networking Setup
To establish a stable and persistent connection between an Azure and the MacStadium private cloud, configure an IPsec Site-To-Site VPN between the two clouds.
Currently, for VPN connectivity between MacStadium and Azure there are two options:
* Active/Active Disabled. Every Azure VPN gateway consists of two instances in an Active/Standby configuration. According to Azure, for any planned maintenance or unplanned disruption that may happen to the Active instance, the Standby instance would take over (failover) automatically and resume the Site-To-Site VPN connections.
* Active/Active Enabled. In this mode, each Azure gateway instance has a unique public IP address and both instances establish an IPsec Site-To-Site VPN to your MacStadium firewall. For this VPN mode, you should also enable the TCP State Bypass feature in your ASA firewall which requires an access-list, class-map, policy-map, and a service-policy. This is a requirement for Site-To-Site VPNs with Virtual Tunnel Interfaces only and is configured to allow asynchronous routing between separate VPN tunnels.
In both VPN modes, static or dynamic routing with BGP is supported between MacStadium and Azure. In this document, BGP routing is used.
For more information about general Azure VPN design, see [Azure Documentation](https://learn.microsoft.com/en-us/azure/vpn-gateway/vpn-gateway-highlyavailable).
## Creating a Site-to-Site VPN
This is the general process for creating a Site-to-Site, from the Azure private cloud to the MacStadium private cloud.
1. Login to Azure.
2. Create a Virtual Network Gateway.
3. Create a Local Network Gateway.
4. Create a Site-to-Site VPN Connection.
## Log into Azure
1. Log into the Azure portal with the credentials.
2. Confirm the correct account and organization.
## Create a Virtual Network Gateway
The instructions below assume that there is a configured Azure Virtual Network.
In Azure, the virtual network gateway represents the Azure side of the Site-to-Site VPN tunnel.
1. In the search box at the top of the screen, type Virtual network gateways then select the respective entry in the filtered search results.\\
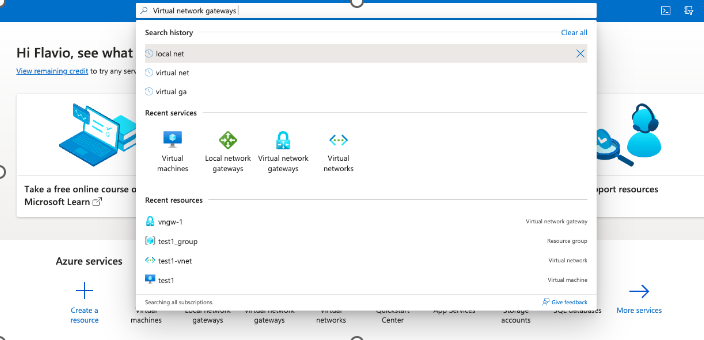 2. On the Virtual network gateways screen, click Create. (Or Create virtual network gateway, if this is the first gateway)
3. Select Subscription
4. Select Resource group
5. Provide a Name and select a Region
6. For Gateway type, confirm VPN is selected
7. For VPN type, confirm Route-based is selected
8. Select your SKU
* For more information about the available SKUs, see Azure Documentation: [Gateway SKUs](https://learn.microsoft.com/en-gb/azure/vpn-gateway/vpn-gateway-about-vpngateways).
9. Select the Virtual network to be used to send and receive traffic through the VPN.
10. For Public IP address, select an existing unused IP address or create a new one and provide a name for it.
11. In Availability zone, select Zone-redundant.
12. In the option Enable active-active mode, leave it as Disable for an Active/Standby VPN, or select Enabled for an Active/Active VPN mode.
* If Active/Active is enabled, then in the section SECOND PUBLIC IP ADDRESS select an existing unused public IP address or create a new one and provide a name for it.
* In Availability zone, select Zone-redundant
13. For the option Configure BGP, select Enabled.
14. In Autonomous system number (ASN) use the default value 65515 or, if required, use a different ASN in the private range of 64,512–65,534. This is used as the BGP process number in the MacStadium firewall.
15. In Custom Azure APIPA BGP IP address add an APIPA address from the range 169.254.21.X. Example 169.254.21.1. This IP will be used in the BGP configuration in your firewall.
16. Click Review + create, review the configuration.
17. Click Create, and wait for the deployment to complete.
* This might take several minutes.
18. Check if the virtual network gateway is deployed successfully.
* On the Virtual network gateways screen, select the virtual network gateway and click Properties.
* Verify that the Provisioning state is Succeeded.\\
2. On the Virtual network gateways screen, click Create. (Or Create virtual network gateway, if this is the first gateway)
3. Select Subscription
4. Select Resource group
5. Provide a Name and select a Region
6. For Gateway type, confirm VPN is selected
7. For VPN type, confirm Route-based is selected
8. Select your SKU
* For more information about the available SKUs, see Azure Documentation: [Gateway SKUs](https://learn.microsoft.com/en-gb/azure/vpn-gateway/vpn-gateway-about-vpngateways).
9. Select the Virtual network to be used to send and receive traffic through the VPN.
10. For Public IP address, select an existing unused IP address or create a new one and provide a name for it.
11. In Availability zone, select Zone-redundant.
12. In the option Enable active-active mode, leave it as Disable for an Active/Standby VPN, or select Enabled for an Active/Active VPN mode.
* If Active/Active is enabled, then in the section SECOND PUBLIC IP ADDRESS select an existing unused public IP address or create a new one and provide a name for it.
* In Availability zone, select Zone-redundant
13. For the option Configure BGP, select Enabled.
14. In Autonomous system number (ASN) use the default value 65515 or, if required, use a different ASN in the private range of 64,512–65,534. This is used as the BGP process number in the MacStadium firewall.
15. In Custom Azure APIPA BGP IP address add an APIPA address from the range 169.254.21.X. Example 169.254.21.1. This IP will be used in the BGP configuration in your firewall.
16. Click Review + create, review the configuration.
17. Click Create, and wait for the deployment to complete.
* This might take several minutes.
18. Check if the virtual network gateway is deployed successfully.
* On the Virtual network gateways screen, select the virtual network gateway and click Properties.
* Verify that the Provisioning state is Succeeded.\\
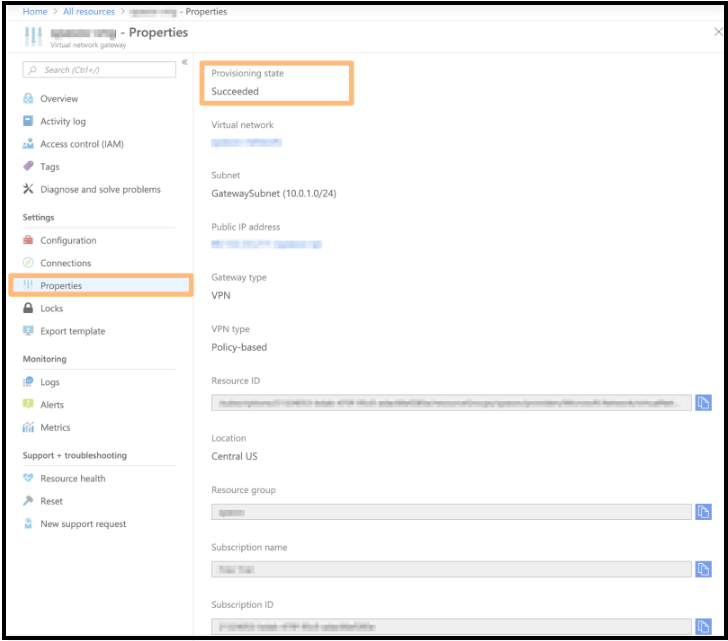 * Example: Create a virtual network gateway\\
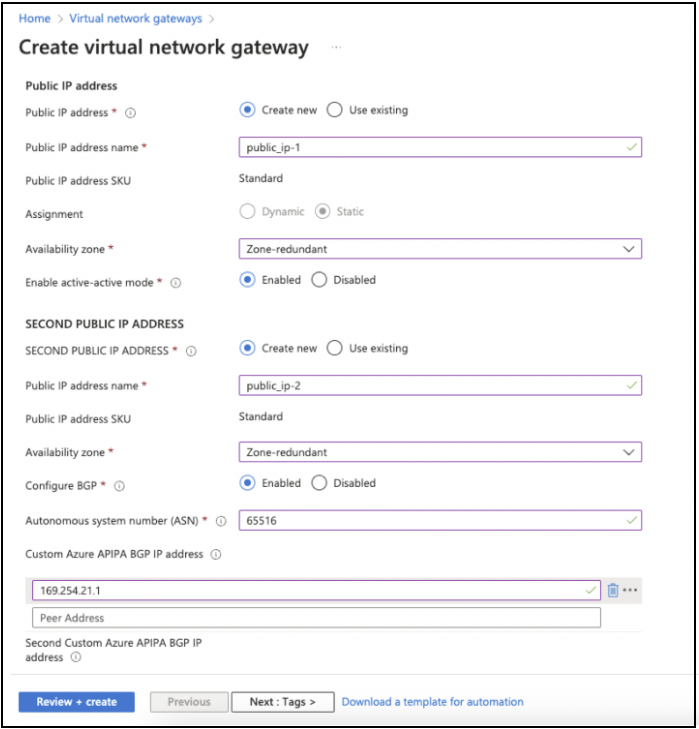 * This image shows a sample configuration for a virtual network gateway.
## Create a Local Network Gateway
In Azure, the local network gateway represents the MacStadium side of the Site-to-Site VPN tunnel.
1. In the search box at the top of the screen, type Local network gateways and select the respective entry in the filtered search results. Azure filters results.\\
* This image shows a sample configuration for a virtual network gateway.
## Create a Local Network Gateway
In Azure, the local network gateway represents the MacStadium side of the Site-to-Site VPN tunnel.
1. In the search box at the top of the screen, type Local network gateways and select the respective entry in the filtered search results. Azure filters results.\\
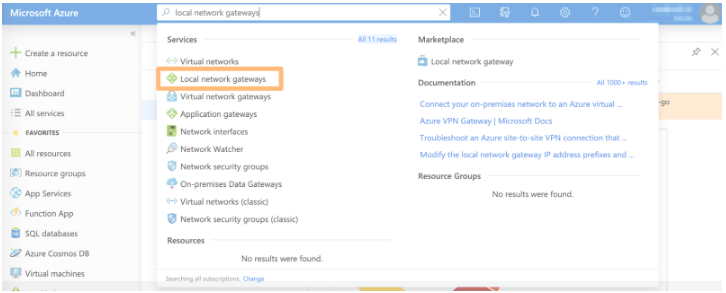 2. On the Local network gateways screen, click + Create.
3. Provide a Name.
4. For IP Address, provide the IP address of the public network listed in Appendix B of the [IP Plan](/macstadium/macstadium-overview/ip-plan).
* By default, this is the FW1-Outside network.
5. Leave Address space empty and click Next : Advanced.
6. Set the option Configure BGP settings to Yes.
7. Enter the private ASN number to use, for instance 65516.
* Notice that ASNs 8075, 8076, 12076 (public), 65515, 65517, 65518, 65519, 65520 (private) are reserved by Azure and cannot be used.
8. In BGP peer IP address enter the APIPA IP address used in the Azure side, for example 169.254.21.2.
9. Click Review + create and then Create.
10. Wait for the deployment to complete.
* This might take several minutes. When the deployment is complete, the local network gateway becomes listed under All resources.
## Create the VPN Connection
After the virtual network gateway and a local network gateway are in place, create and configure the VPN connection between Azure and the MacStadium private cloud.
1. In the search box at the top of the screen, type Virtual network gateways and select the respective entry in the filtered search results. Azure filters results.
2. On the Local network gateways screen, select the local network gateway created earlier.
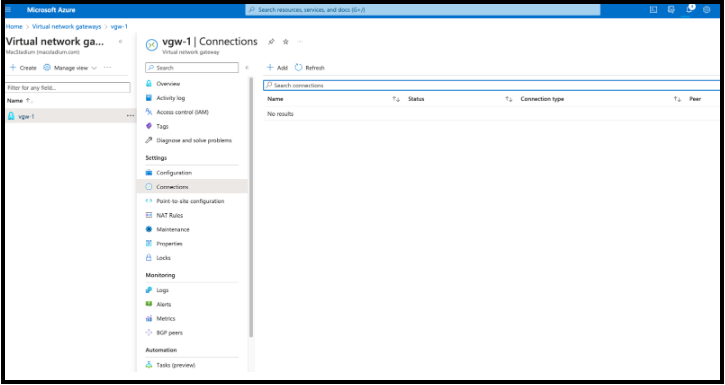
3. From the sidebar menu, select Connections and click + Add.\\
2. On the Local network gateways screen, click + Create.
3. Provide a Name.
4. For IP Address, provide the IP address of the public network listed in Appendix B of the [IP Plan](/macstadium/macstadium-overview/ip-plan).
* By default, this is the FW1-Outside network.
5. Leave Address space empty and click Next : Advanced.
6. Set the option Configure BGP settings to Yes.
7. Enter the private ASN number to use, for instance 65516.
* Notice that ASNs 8075, 8076, 12076 (public), 65515, 65517, 65518, 65519, 65520 (private) are reserved by Azure and cannot be used.
8. In BGP peer IP address enter the APIPA IP address used in the Azure side, for example 169.254.21.2.
9. Click Review + create and then Create.
10. Wait for the deployment to complete.
* This might take several minutes. When the deployment is complete, the local network gateway becomes listed under All resources.
## Create the VPN Connection
After the virtual network gateway and a local network gateway are in place, create and configure the VPN connection between Azure and the MacStadium private cloud.
1. In the search box at the top of the screen, type Virtual network gateways and select the respective entry in the filtered search results. Azure filters results.
2. On the Local network gateways screen, select the local network gateway created earlier.
3. From the sidebar menu, select Connections and click + Add.\\
 4. Provide a Name.
5. Set the Connection type to Site-to-Site (IPsec).\\
4. Provide a Name.
5. Set the Connection type to Site-to-Site (IPsec).\\
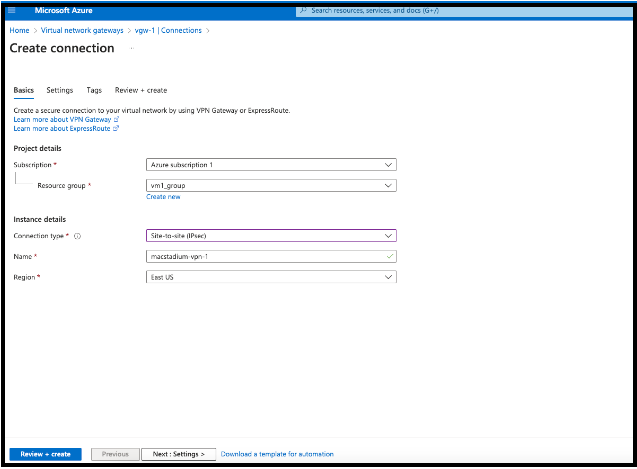 6. Select the correct Region and click Next : Settings.
7. Select the Virtual network gateway and Local network gateway that were previously created.
8. For Shared key (PSK), provide an IPSec pre-shared key.
* Keep a record of the pre-shared key. It will be used later.
9. For IKE Protocol, confirm IKEv2 is selected.
10. Select Enable BGP.
11. Select Enable Custom BGP Addresses.
12. In the Primary Custom BGP Address field, select the APIPA address that were created before.
13. In IPsec / IKE policy, select Custom
14. Set IKE Phase 1 and IKE Phase 2 as follows:\\
6. Select the correct Region and click Next : Settings.
7. Select the Virtual network gateway and Local network gateway that were previously created.
8. For Shared key (PSK), provide an IPSec pre-shared key.
* Keep a record of the pre-shared key. It will be used later.
9. For IKE Protocol, confirm IKEv2 is selected.
10. Select Enable BGP.
11. Select Enable Custom BGP Addresses.
12. In the Primary Custom BGP Address field, select the APIPA address that were created before.
13. In IPsec / IKE policy, select Custom
14. Set IKE Phase 1 and IKE Phase 2 as follows:\\
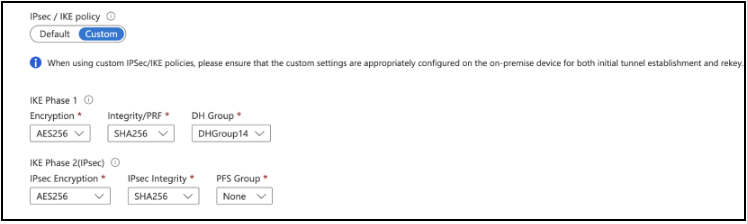 15. Review the remaining pre-filled setting and click Review + Create.\
 \\
\\
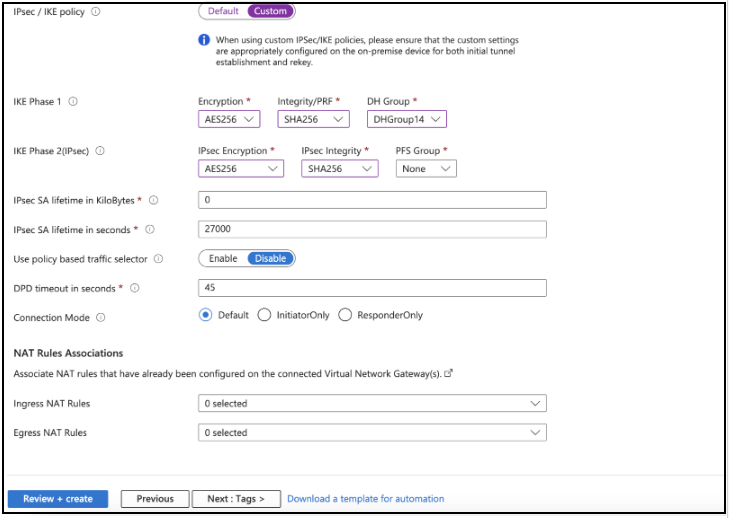 16. Click Create at the next step.
17. Wait for the operation to be completed.
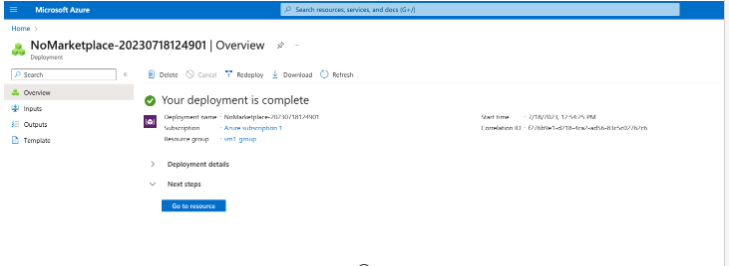
* This might take a while. When the deployment is complete, click Go to resource\\
16. Click Create at the next step.
17. Wait for the operation to be completed.
* This might take a while. When the deployment is complete, click Go to resource\\
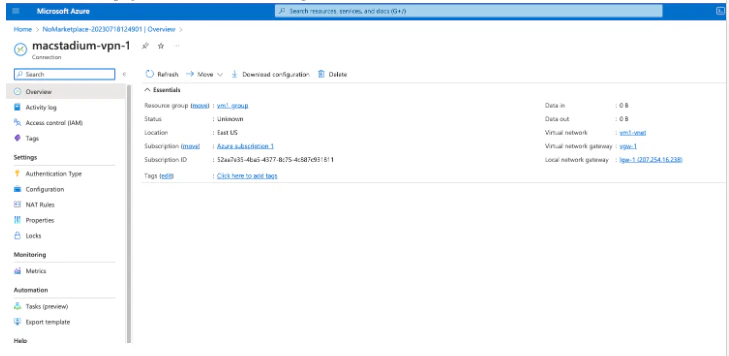
 18. In the Overview page, select Download configuration:\\
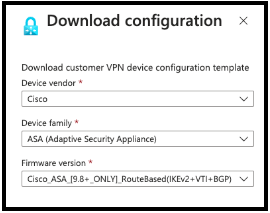
 19. In the pop-up window, set Device vendor to Cisco, Device family to ASA (Adaptive Security Appliance) and Firmware version to CiscoASA\[9.8+\_ONLY]\_RouteBased(IKEv2>VTI+BGP) and click Download configuration.\\
 * The status of the newly created connection is Unknown.
### Ensure that Azure Allows Inbound Traffic
Based on the requirements and current setup, it might be necessary to enable inbound traffic from MacStadium to Azure.
For more information, see Azure Documentation: [Filter inbound Internet traffic with Azure Firewall DNAT using the Azure portal](https://learn.microsoft.com/en-us/azure/firewall/tutorial-firewall-dnat) and [Network security groups](https://learn.microsoft.com/en-us/azure/virtual-network/network-security-groups-overview).
To proceed with the MacStadium side of the configuration, see Azure [VPN Config for Cisco ASA/ASAv](/iaas/azure/azure-vpn-config-for-cisco-asaasav).
After creating the Site-to-Site VPN connection, configure the Cisco firewall to recognize the connection and let traffic into the MacStadium private cloud. Make sure to download the VPN configuration template from Azure.
## Configuration Template
Without extensive experience with Azure and ASA/ASAv configurations, it is recommended to use a configuration template. Otherwise, the Site-to-Site VPN might not perform as expected.
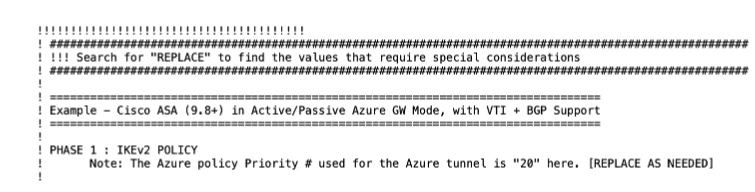
1. In the VPN configuration script downloaded from Azure, the configuration starts after the section below:\\
* The status of the newly created connection is Unknown.
### Ensure that Azure Allows Inbound Traffic
Based on the requirements and current setup, it might be necessary to enable inbound traffic from MacStadium to Azure.
For more information, see Azure Documentation: [Filter inbound Internet traffic with Azure Firewall DNAT using the Azure portal](https://learn.microsoft.com/en-us/azure/firewall/tutorial-firewall-dnat) and [Network security groups](https://learn.microsoft.com/en-us/azure/virtual-network/network-security-groups-overview).
To proceed with the MacStadium side of the configuration, see Azure [VPN Config for Cisco ASA/ASAv](/iaas/azure/azure-vpn-config-for-cisco-asaasav).
After creating the Site-to-Site VPN connection, configure the Cisco firewall to recognize the connection and let traffic into the MacStadium private cloud. Make sure to download the VPN configuration template from Azure.
## Configuration Template
Without extensive experience with Azure and ASA/ASAv configurations, it is recommended to use a configuration template. Otherwise, the Site-to-Site VPN might not perform as expected.
1. In the VPN configuration script downloaded from Azure, the configuration starts after the section below:\\
 2. Find the section where the BGP configuration starts.
3. Add the MacStadium private network and mask.
```
router bgp 65516
bgp log-neighbor-changes
bgp graceful-restart
bgp router-id 169.254.21.1
address-family ipv4 unicast
neighbor 10.0.1.254 remote-as 65515 neighbor 10.0.1.254 ebgp-multihop 255 neighbor 10.0.1.254 activate
! NOTE: THE LOCAL NETWORKS TO BE ADDED STATICALLY TO THIS BGP ROUTER NEED TO GO HERE BELOW:
! NOTE: You can add more local on-premises network ranges statically here as well, using the "network" command just like above.
!etc...
! network 10.221.188.0 mask 255.255.254.0
no auto-summary no synchronization exit-address-family
```
* Find the MacStadium Private Network by checking that section in Appendix A of the IP Plan.
* Make sure the name of the interface being used for the VPN connection is Outside as this is the name of the interface in the script downloaded from Azure. If there is a different interface name for the VPN, then make sure to replace all sections where the Outside interface is referenced in the script by the actual interface name being used.
* **Warning:** Ignore the section, STATIC ROUTING SETUP FOR AZURE, and do not configure any static routes, as BGP will be used instead.
4. Access the firewall through SSH using the credentials available in the IP Plan.
5. Paste the ASA configuration script and confirm all commands were accepted.
6. Use the following commands to confirm if the VPN has been successfully established:
```
show vpn-sessiondb l2l show crypto ipsec sa
```
* For more information, see: [Cisco Secure Firewall ASA Series Command Reference, S Commands](https://www.cisco.com/c/en/us/td/docs/security/asa/asa-cli-reference/S/asa-command-ref-S/show-cr-to-show-cz-commands.html).
7. Save the configuration with the ASA CLI command: write memory.
* Access to the Azure environment from the MacStadium host is now possible (and vice-versa).
* To feed the complete configuration into your Cisco ASA/ASAv, see [Site-to-Site VPN Config](/iaas/connecting-to-other-clouds/site-to-site-vpn-config).
2. Find the section where the BGP configuration starts.
3. Add the MacStadium private network and mask.
```
router bgp 65516
bgp log-neighbor-changes
bgp graceful-restart
bgp router-id 169.254.21.1
address-family ipv4 unicast
neighbor 10.0.1.254 remote-as 65515 neighbor 10.0.1.254 ebgp-multihop 255 neighbor 10.0.1.254 activate
! NOTE: THE LOCAL NETWORKS TO BE ADDED STATICALLY TO THIS BGP ROUTER NEED TO GO HERE BELOW:
! NOTE: You can add more local on-premises network ranges statically here as well, using the "network" command just like above.
!etc...
! network 10.221.188.0 mask 255.255.254.0
no auto-summary no synchronization exit-address-family
```
* Find the MacStadium Private Network by checking that section in Appendix A of the IP Plan.
* Make sure the name of the interface being used for the VPN connection is Outside as this is the name of the interface in the script downloaded from Azure. If there is a different interface name for the VPN, then make sure to replace all sections where the Outside interface is referenced in the script by the actual interface name being used.
* **Warning:** Ignore the section, STATIC ROUTING SETUP FOR AZURE, and do not configure any static routes, as BGP will be used instead.
4. Access the firewall through SSH using the credentials available in the IP Plan.
5. Paste the ASA configuration script and confirm all commands were accepted.
6. Use the following commands to confirm if the VPN has been successfully established:
```
show vpn-sessiondb l2l show crypto ipsec sa
```
* For more information, see: [Cisco Secure Firewall ASA Series Command Reference, S Commands](https://www.cisco.com/c/en/us/td/docs/security/asa/asa-cli-reference/S/asa-command-ref-S/show-cr-to-show-cz-commands.html).
7. Save the configuration with the ASA CLI command: write memory.
* Access to the Azure environment from the MacStadium host is now possible (and vice-versa).
* To feed the complete configuration into your Cisco ASA/ASAv, see [Site-to-Site VPN Config](/iaas/connecting-to-other-clouds/site-to-site-vpn-config).