> ## Documentation Index
> Fetch the complete documentation index at: https://docs.macstadium.com/llms.txt
> Use this file to discover all available pages before exploring further.
# Private Cloud Network Attached Storage
> Create and manage a NAS virtual machine in MacStadium Private Cloud to share storage across VMs and machines on your private network.
Network Attached Storage (NAS) devices are specialized servers that handle only data storage and file-sharing requests. They provide fast, secure, and reliable storage services to private networks.
NAS is managed through the same interface as other virtual servers in the network, so it can move from one physical host to another. NAS functionality can be added by downloading and implementing an instance of the standard NAS VM Recipe.
The NAS service is a dedicated virtual machine that presents itself as a service providing users the ability to create and manage file based storage without the need for using physical or virtual appliances. Each NAS service is complete with its own dashboard and is completely managed from the user interface.
## About NAS
NAS lets you take storage in Private Cloud and expose it to other machines, then share that storage between machines. It is a virtual NAS with redundancy. NAS storage can be exposed to other machines over the network.
NAS allows for virtual machines to share storage with assets inside or outside of the Private Cloud, then use a file share to move files back and forth between machines.
NAS is used to expand storage and to share files between Macs, and you can configure this yourself.
## Create the NAS Service
The NAS service is a dedicated virtual machine that presents itself as a service providing users the ability to create and manage file based storage without the need for using physical or virtual appliances. Each NAS service includes its own dashboard and is fully managed from the user interface. Using the integrated NAS service takes advantage of the VergeIO snapshot engine and deduplication algorithm to get the most of usable storage space.
1. From the Cloud Dashboard, select **NAS** from the left menu.
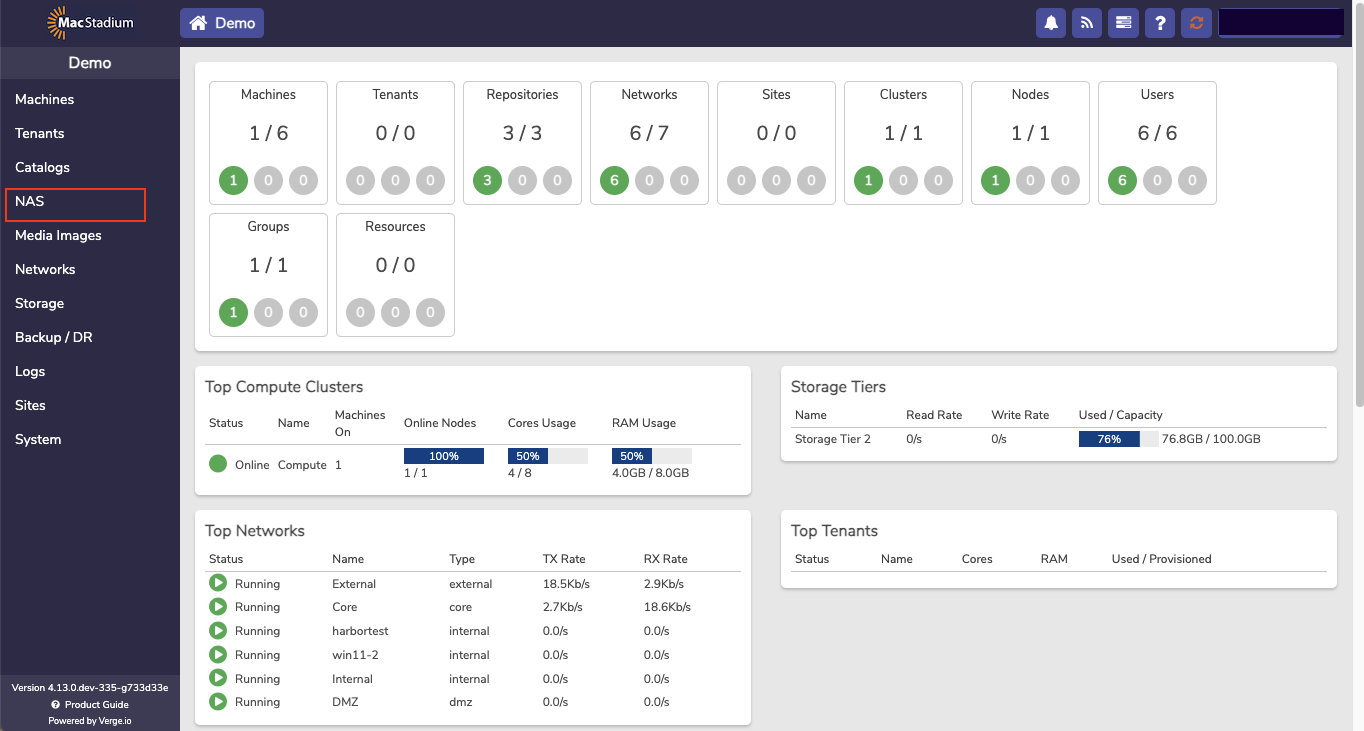 NAS
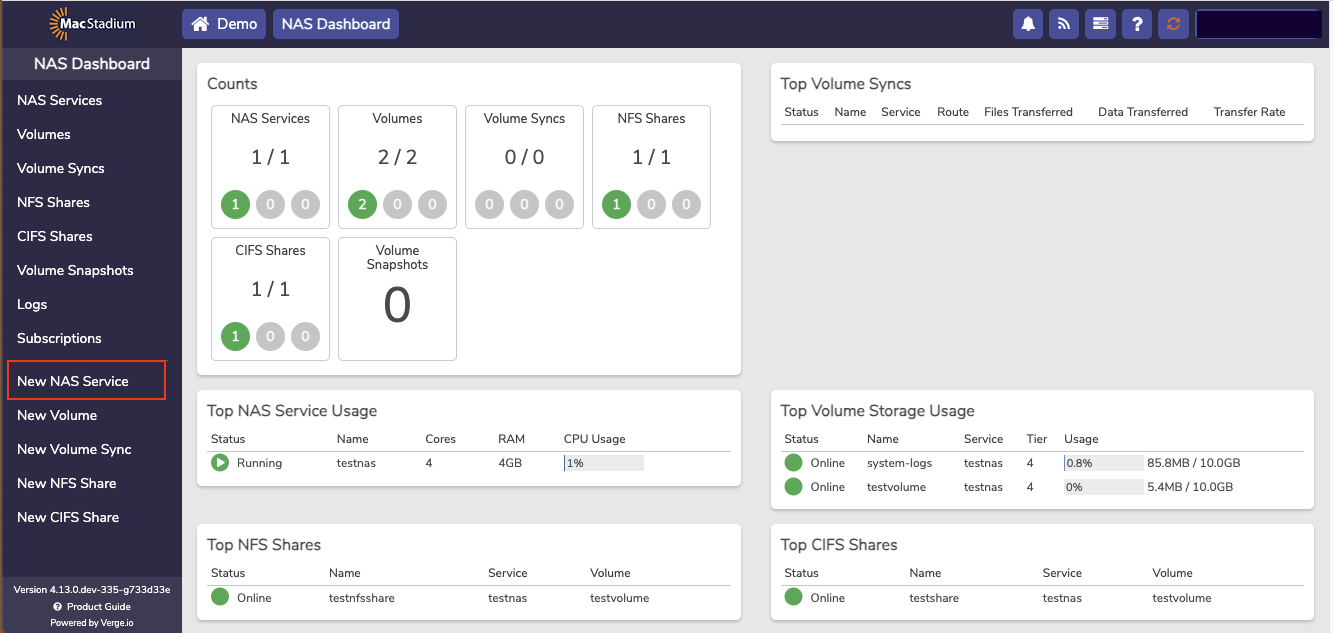
2. The **NAS Dashboard** opens.
For a new user, when this dashboard is opened for the first time, there are no NAS services or volumes. A NAS Service is the virtual machine in Private Cloud that runs the virtual NAS.
NAS
2. The **NAS Dashboard** opens.
For a new user, when this dashboard is opened for the first time, there are no NAS services or volumes. A NAS Service is the virtual machine in Private Cloud that runs the virtual NAS.
 NEW NAS Services
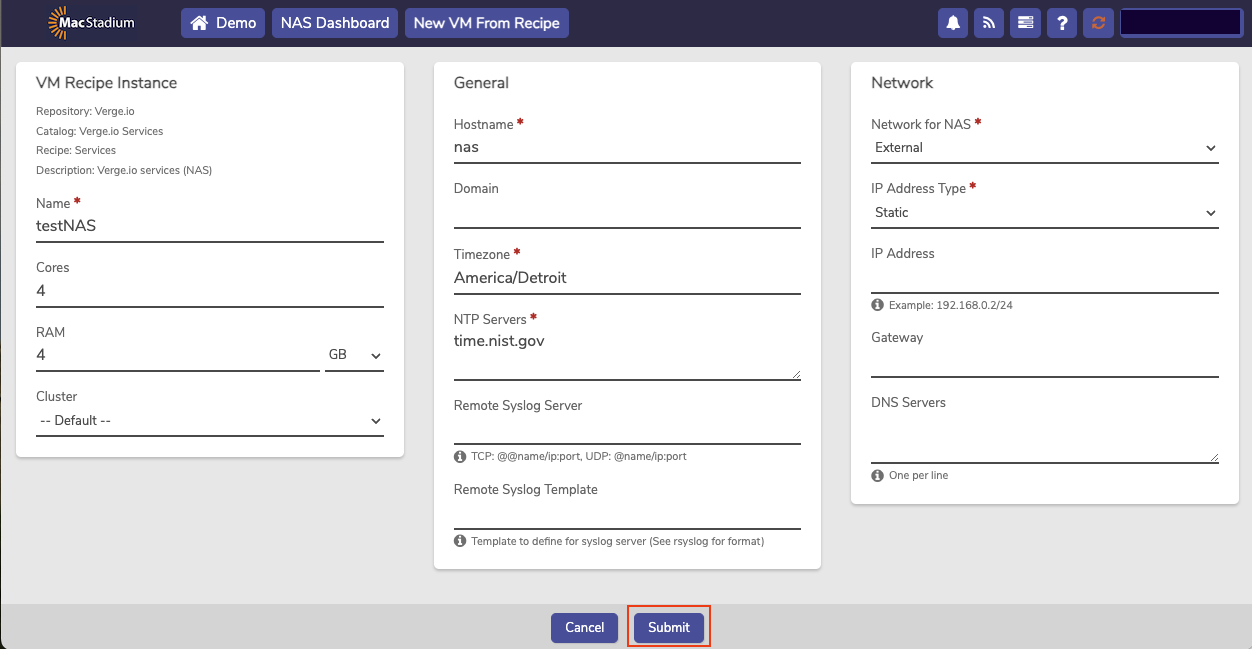
3. Click **New NAS Service** to open a recipe that is used to create the new NAS service.
NEW NAS Services
3. Click **New NAS Service** to open a recipe that is used to create the new NAS service.
 VM Recipe Instance
This recipe only deploys NAS appliances for Private Cloud.
4. Complete the following information:
* Enter a ****Name**** for the new NAS Service.
* The default setting for ****Cores**** is 4.
* The default setting for ****RAM**** is 4 GB
8 GB of RAM is required for antivirus to be enabled. If fewer than 8 GB of RAM are used, then a warning message appears. The message can be disabled, or the RAM can be set to 8 GB. The antivirus only protects the computers connected to the NAS, which is done by scanning the files on the volume. Some users may decide to keep the Antivirus and some users may decide to use less RAM. The system-defined-default ****Cluster**** is automatically selected.
* Select the ****Network**** on which the NAS should run. Options include Internal and External networks.
* Select ****IP Address Type**** for the NAS Service.
* Select **Static**
Consult the IP Plan in your MacStadium Portal account to determine an IP Address that does not conflict with existing machines.
* Define a ****Hostname**** for the NAS Service VM.
* **OPTIONAL**: Enter a ****domain.**** (If the Domain field is left blank, the system defaults the domain to **workgroup**.)
* ****Timezone**** defaults to the default time zone.
* The **default** ****NTP Servers**** setting is recommended. This defines the Network Time Protocol (NTP) servers list, which is used for keeping the NAS service time synchronized.
* **OPTIONAL**: Enter the address of a ****Remote Syslog server.****
* **OPTIONAL**: Enter a ****Remote Syslog Template.****
4. Click **Submit**, and the NAS appears in the **NAS Service list**.
VM Recipe Instance
This recipe only deploys NAS appliances for Private Cloud.
4. Complete the following information:
* Enter a ****Name**** for the new NAS Service.
* The default setting for ****Cores**** is 4.
* The default setting for ****RAM**** is 4 GB
8 GB of RAM is required for antivirus to be enabled. If fewer than 8 GB of RAM are used, then a warning message appears. The message can be disabled, or the RAM can be set to 8 GB. The antivirus only protects the computers connected to the NAS, which is done by scanning the files on the volume. Some users may decide to keep the Antivirus and some users may decide to use less RAM. The system-defined-default ****Cluster**** is automatically selected.
* Select the ****Network**** on which the NAS should run. Options include Internal and External networks.
* Select ****IP Address Type**** for the NAS Service.
* Select **Static**
Consult the IP Plan in your MacStadium Portal account to determine an IP Address that does not conflict with existing machines.
* Define a ****Hostname**** for the NAS Service VM.
* **OPTIONAL**: Enter a ****domain.**** (If the Domain field is left blank, the system defaults the domain to **workgroup**.)
* ****Timezone**** defaults to the default time zone.
* The **default** ****NTP Servers**** setting is recommended. This defines the Network Time Protocol (NTP) servers list, which is used for keeping the NAS service time synchronized.
* **OPTIONAL**: Enter the address of a ****Remote Syslog server.****
* **OPTIONAL**: Enter a ****Remote Syslog Template.****
4. Click **Submit**, and the NAS appears in the **NAS Service list**.
 Newly Created NAS Service
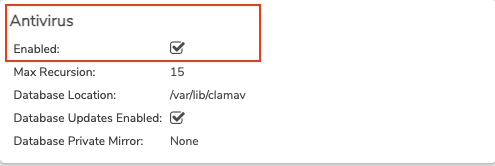
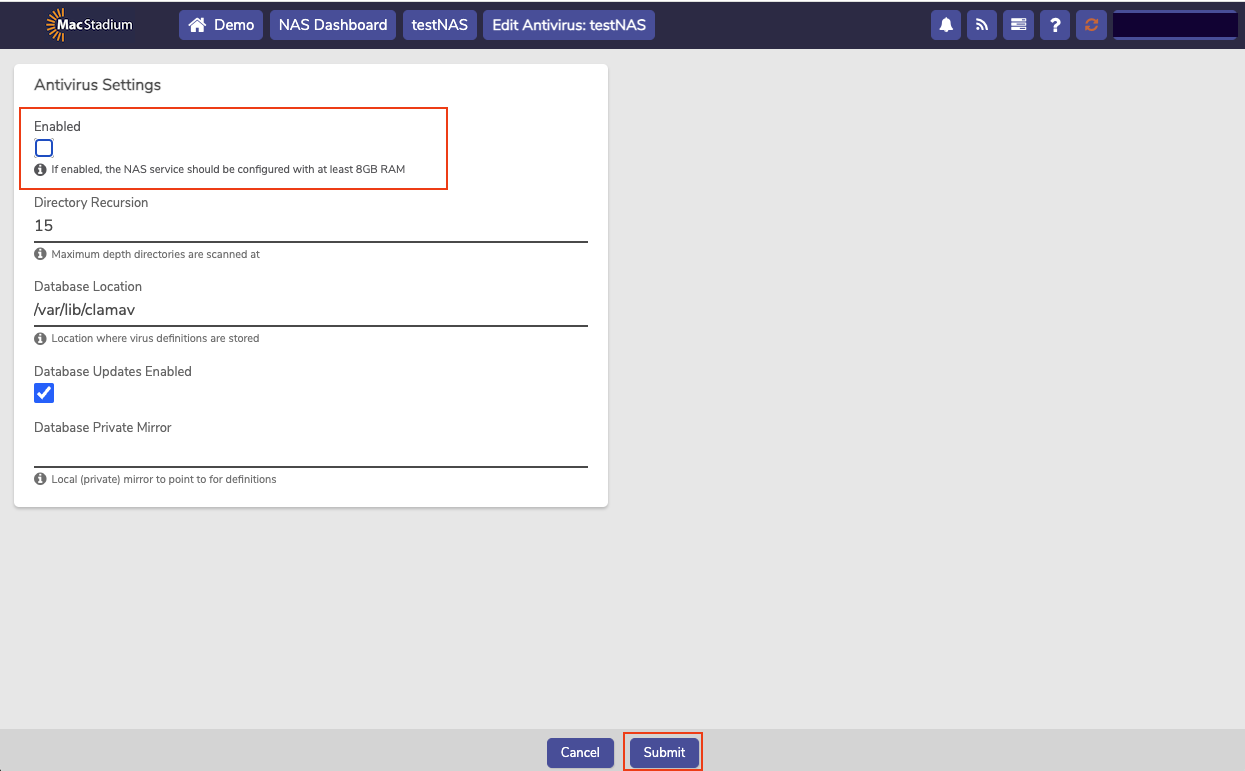
5. To disable the **Antivirus** checkbox, deselect the checkmark and the **Antivirus Settings** box opens.
Newly Created NAS Service
5. To disable the **Antivirus** checkbox, deselect the checkmark and the **Antivirus Settings** box opens.
 Antivirus Checkbox
6. Uncheck the box and click **Submit**.
Antivirus Checkbox
6. Uncheck the box and click **Submit**.
 Antivirus Setting
7. Double-click the **Service** to bring up the Dashboard for the Service.
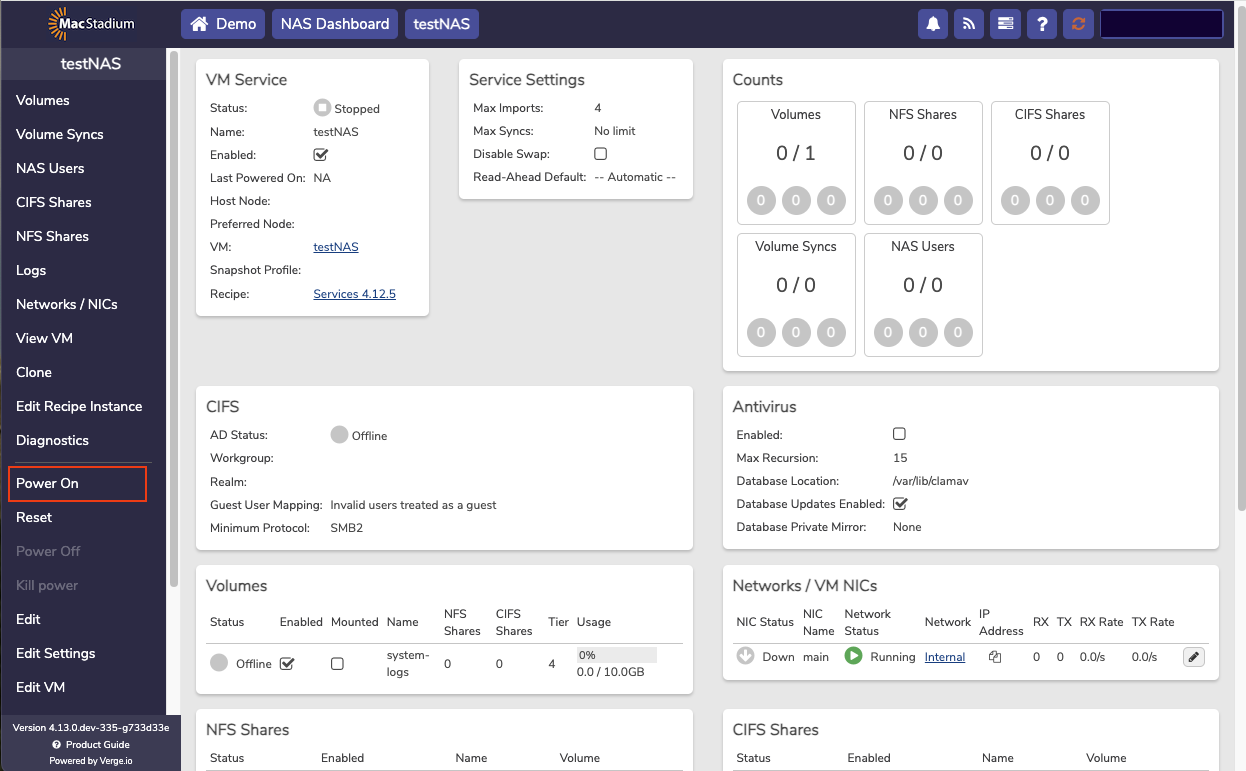
8. Select **Power On** to start the NAS.
Antivirus Setting
7. Double-click the **Service** to bring up the Dashboard for the Service.
8. Select **Power On** to start the NAS.
 Power On
9. Click the **Yes** to confirm power on.
To utilize the NAS service, at least one **Volume** needs to be implemented. A NAS service consists of one or more Volumes. Each Volume is a separate directory structure with its own settings for security, snapshots, storage tier, max size, antivirus, and sharing.
10. The next step is to create a NAS User.
### Create a NAS User
1. From the Main Dashboard, select **NAS**.
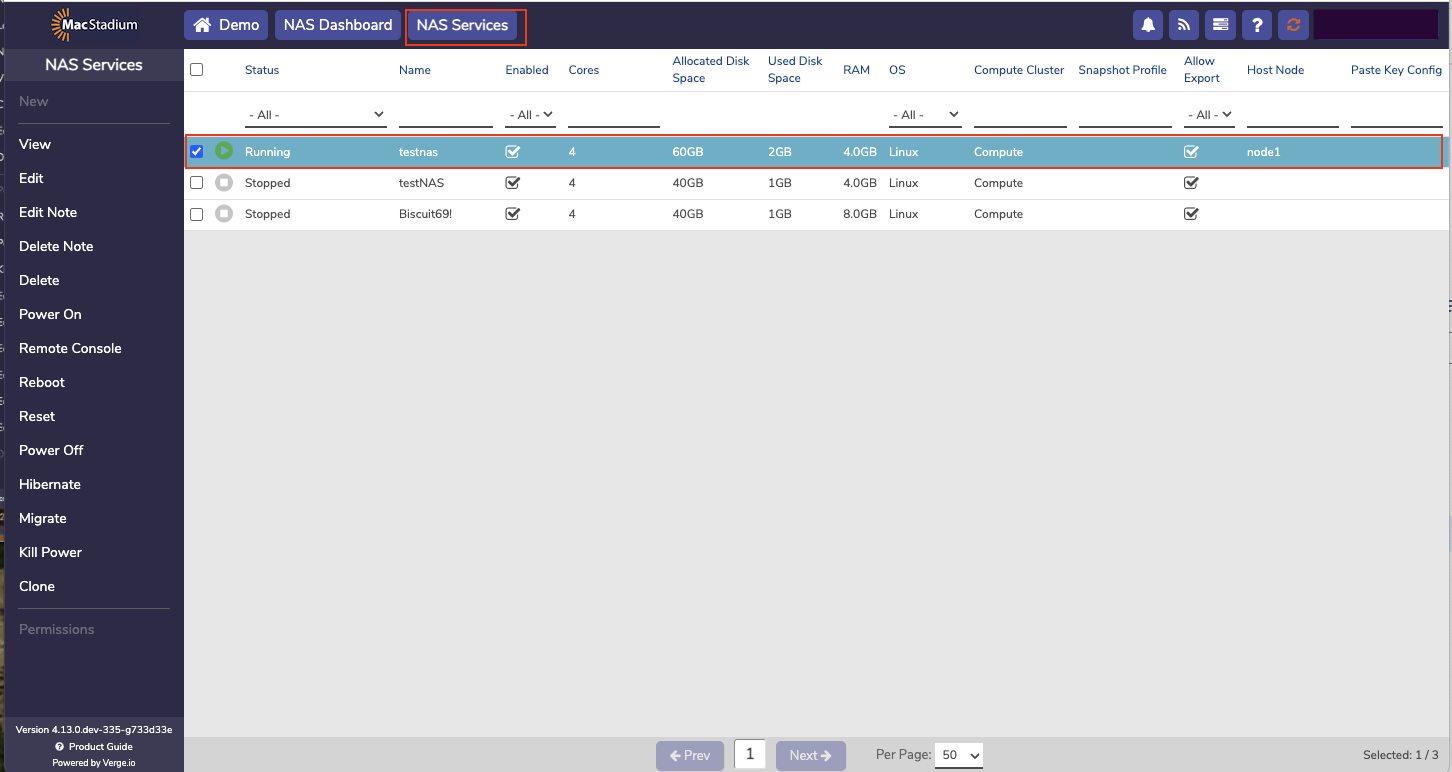
2. Select **NAS Services** → **Select a Service**.
Power On
9. Click the **Yes** to confirm power on.
To utilize the NAS service, at least one **Volume** needs to be implemented. A NAS service consists of one or more Volumes. Each Volume is a separate directory structure with its own settings for security, snapshots, storage tier, max size, antivirus, and sharing.
10. The next step is to create a NAS User.
### Create a NAS User
1. From the Main Dashboard, select **NAS**.
2. Select **NAS Services** → **Select a Service**.
 Select a Service
3. Double-click a Service.
Select a Service
3. Double-click a Service.
 NAS User
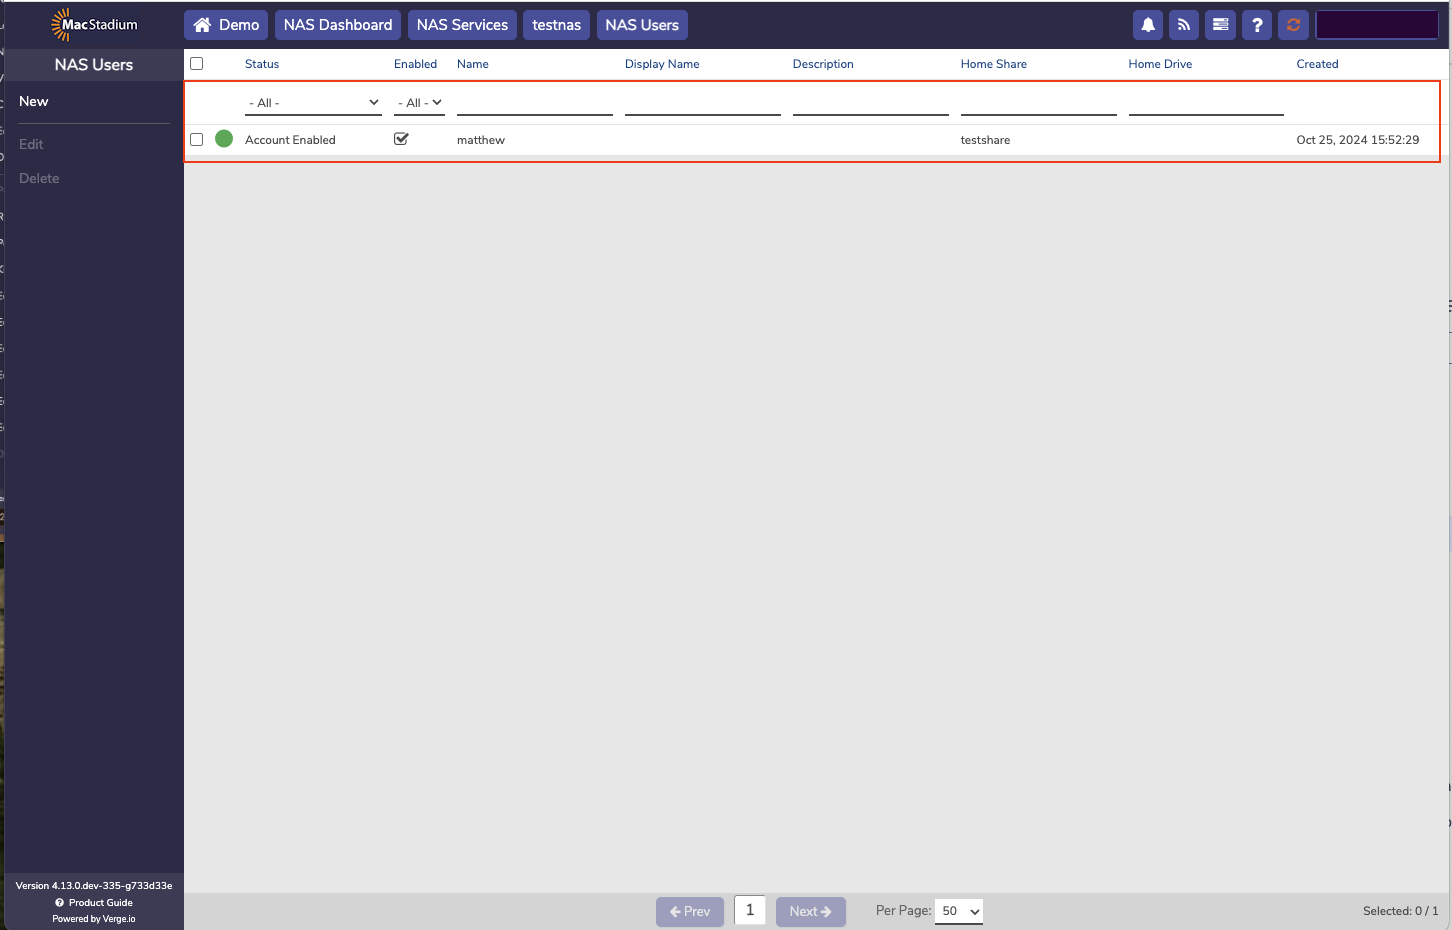
4. Select **NAS User**.
NAS User
4. Select **NAS User**.
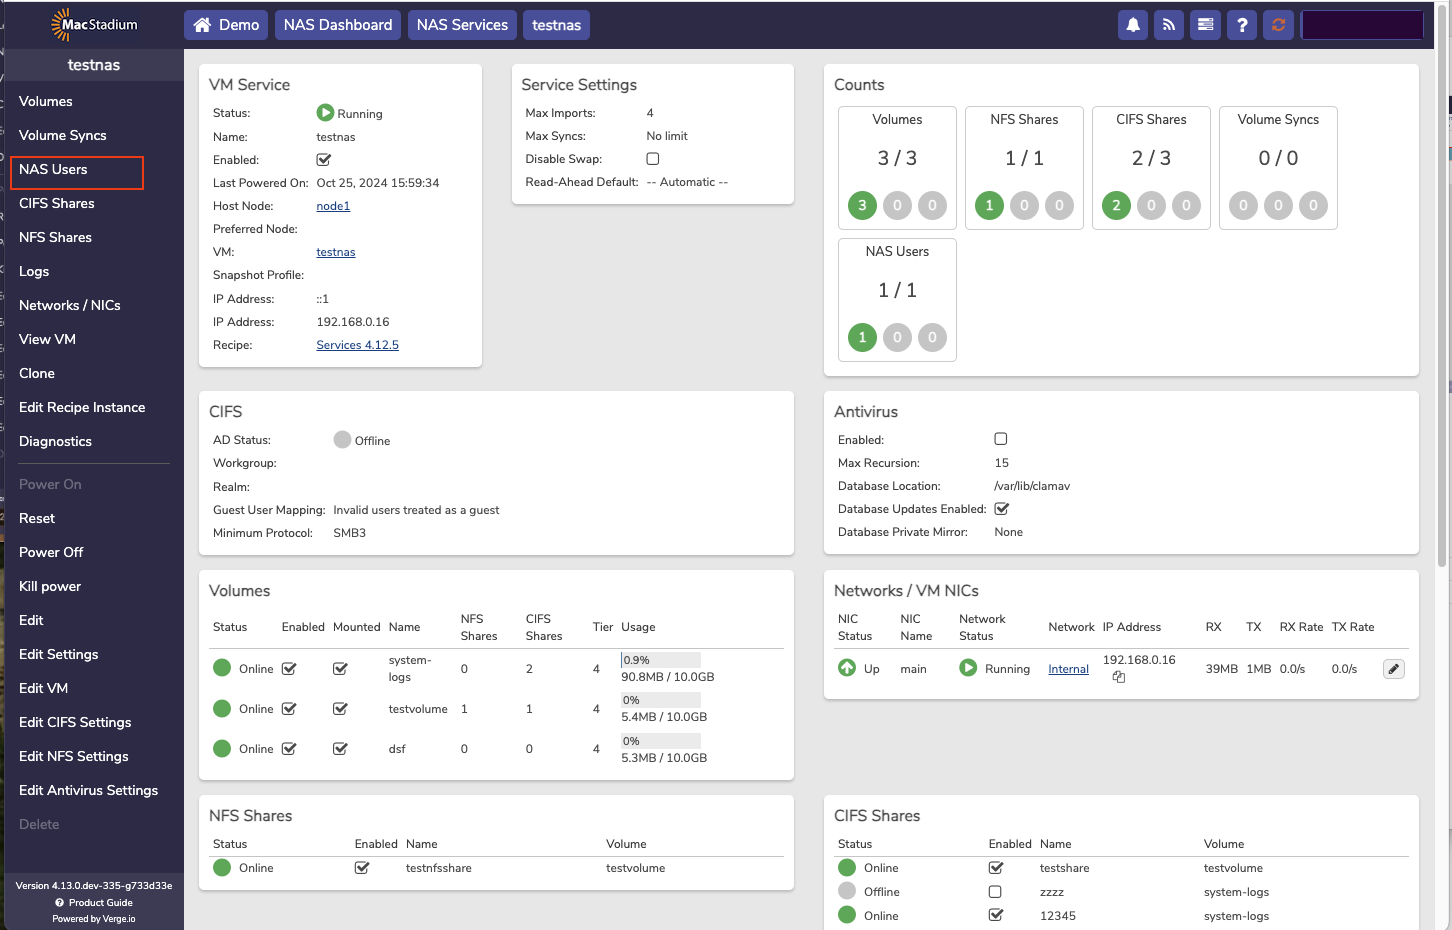 NAS User
5. Select **New** to add a new NAS User. (This page is also used to edit or delete a user.)
NAS User
5. Select **New** to add a new NAS User. (This page is also used to edit or delete a user.)
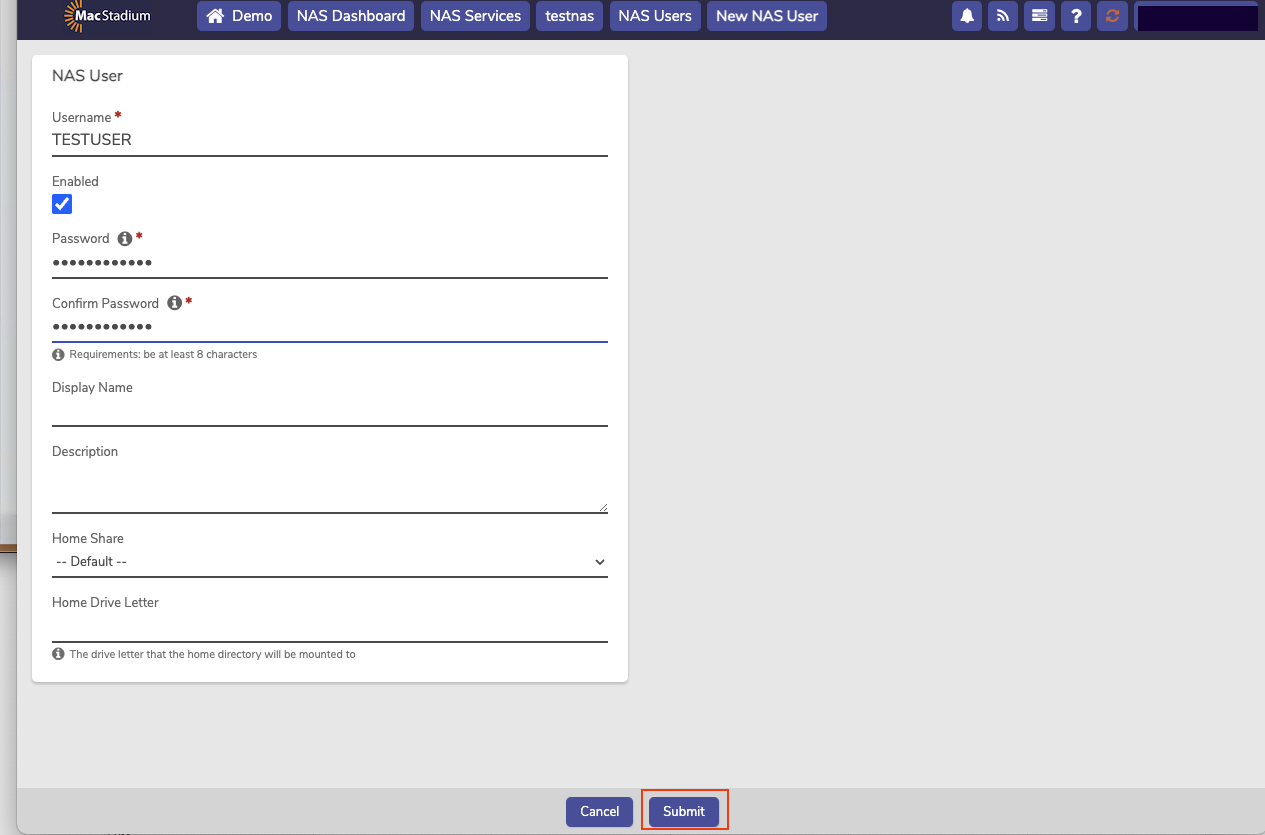 NAS User
This is per service. For every virtual NAS appliance, there must be a set of users assigned to it.
* Required: **Username**
* Required: **Password**
* Optional: **Display Name**
* Optional: **Description**
* Optional: **Home Share**
* Optional: **Home Drive Letter**
6. Click **Submit**.
NAS User
This is per service. For every virtual NAS appliance, there must be a set of users assigned to it.
* Required: **Username**
* Required: **Password**
* Optional: **Display Name**
* Optional: **Description**
* Optional: **Home Share**
* Optional: **Home Drive Letter**
6. Click **Submit**.
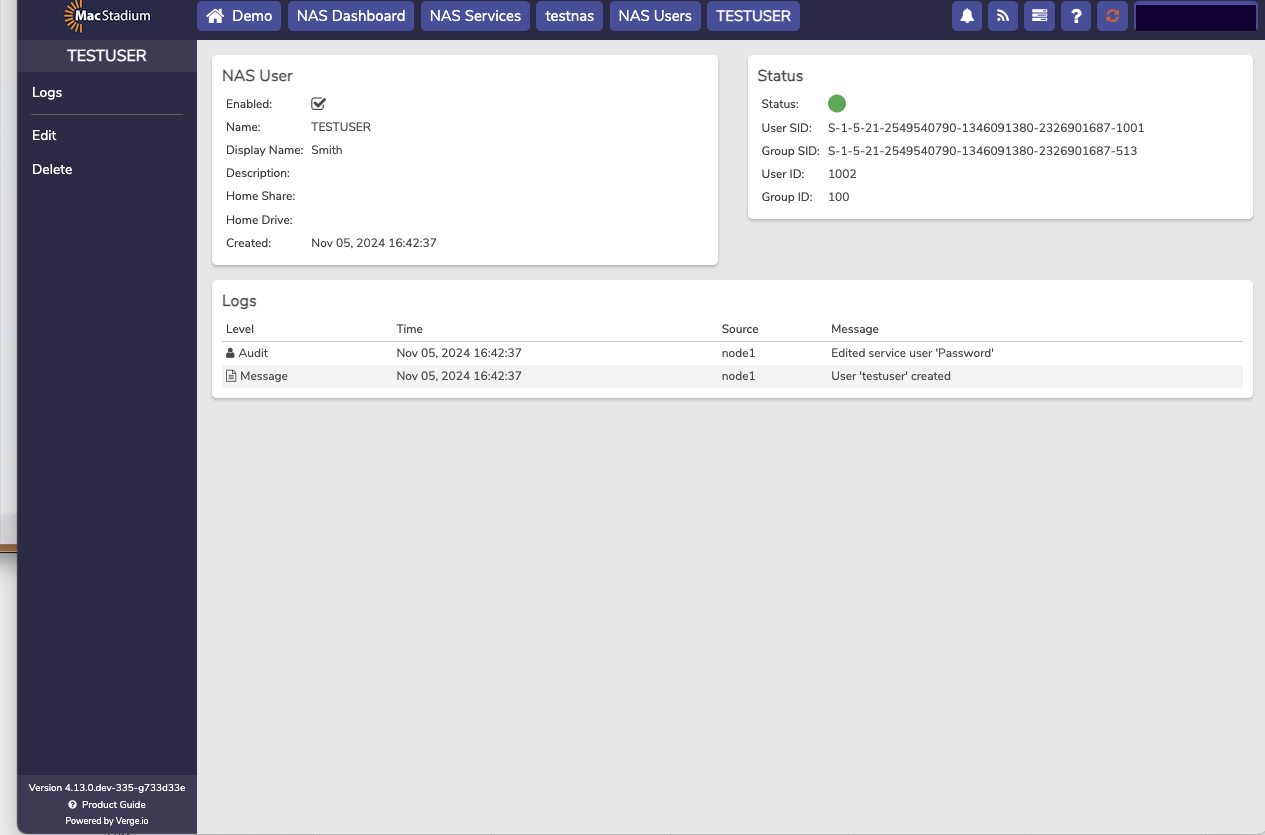 New User
7. The next step is to create a Volume.
## Volumes
A NAS service consists of one or more Volumes. Each Volume is a separate directory structure with its own settings for security, snapshots, storage tier, max size, antivirus, and sharing. Multiple volumes can be set up on the NAS, and the size of the volume determines the space available to deploy files on the NAS.
Volume-level snapshots allow for customizing snapshot schedule and retention rules per individual NAS volume and provide the option for a quiesced snapshot. (Non-quiesced NAS volumes can be imported from Cloud snapshots to be used for restore.)
Quiesced volume snapshots freeze file system during the snapshot process. The Quiesce option can be selected when taking a manual volume snapshot and can be enabled within the snapshot profile for automated snapshots.
### About Volumes
There are two types of Volumes:
* **Local Volumes** are file systems stored within Private Cloud and consume storage in the vSAN. Each local volume can have different sharing, syncing, tiering, and permission settings.
* **Remote Volumes** are external file systems that are mounted to the VergeIO system and presented as if local.
### Creating Local Volumes
1. From the Main Dashboard, select **NAS**.
2. Select **Volumes** from the left menu.
New User
7. The next step is to create a Volume.
## Volumes
A NAS service consists of one or more Volumes. Each Volume is a separate directory structure with its own settings for security, snapshots, storage tier, max size, antivirus, and sharing. Multiple volumes can be set up on the NAS, and the size of the volume determines the space available to deploy files on the NAS.
Volume-level snapshots allow for customizing snapshot schedule and retention rules per individual NAS volume and provide the option for a quiesced snapshot. (Non-quiesced NAS volumes can be imported from Cloud snapshots to be used for restore.)
Quiesced volume snapshots freeze file system during the snapshot process. The Quiesce option can be selected when taking a manual volume snapshot and can be enabled within the snapshot profile for automated snapshots.
### About Volumes
There are two types of Volumes:
* **Local Volumes** are file systems stored within Private Cloud and consume storage in the vSAN. Each local volume can have different sharing, syncing, tiering, and permission settings.
* **Remote Volumes** are external file systems that are mounted to the VergeIO system and presented as if local.
### Creating Local Volumes
1. From the Main Dashboard, select **NAS**.
2. Select **Volumes** from the left menu.
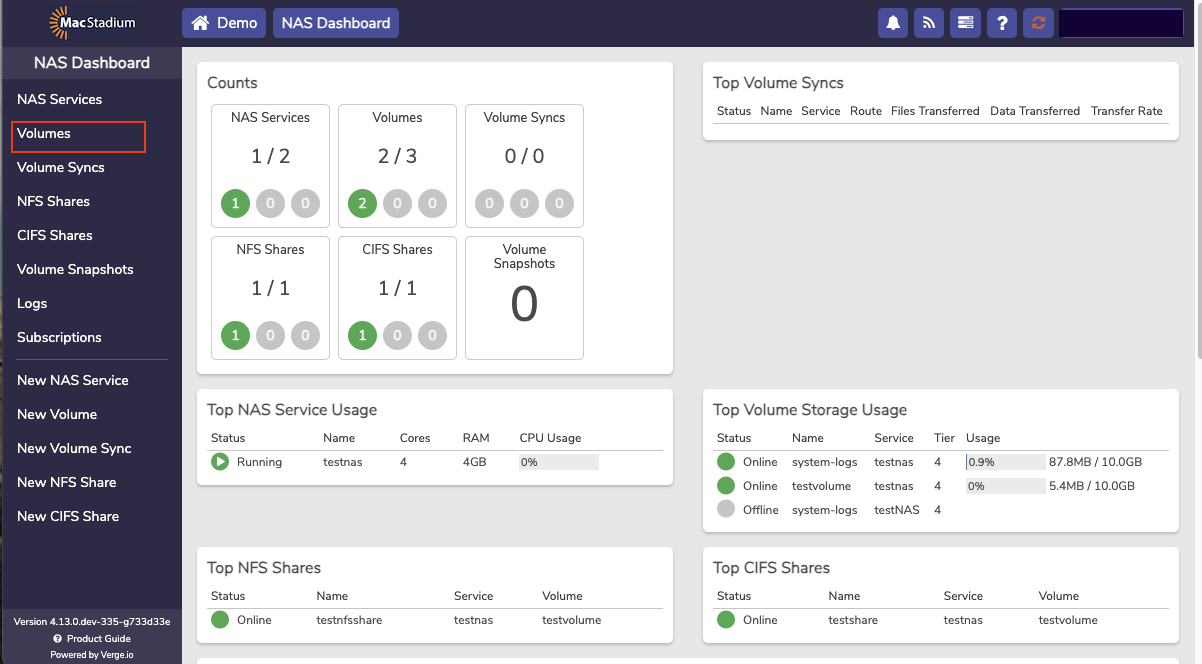 Volumes
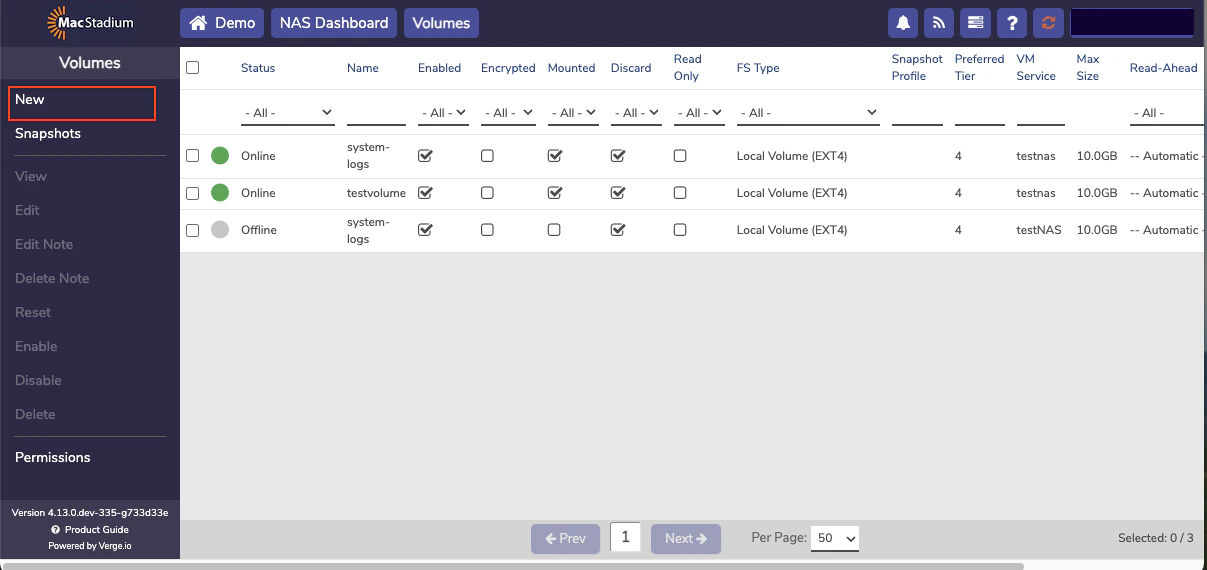
When the NAS is first created, one volume (for log files) is automatically created.
2. Select **New** from the left menu.
Volumes
When the NAS is first created, one volume (for log files) is automatically created.
2. Select **New** from the left menu.
 New
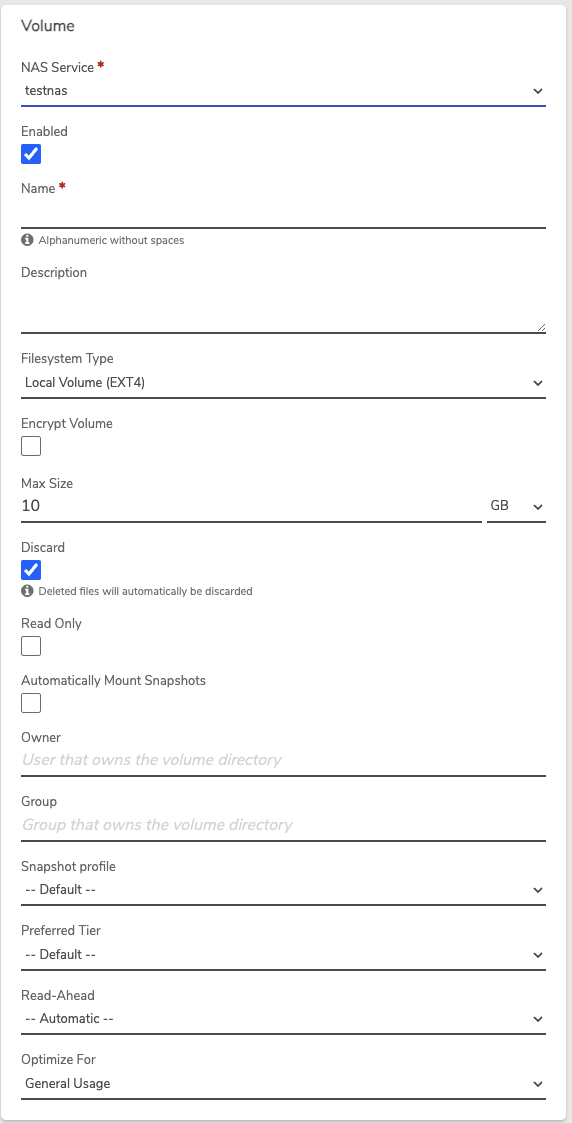
3. Select the appropriate ****NAS Service**** from the dropdown list.
New
3. Select the appropriate ****NAS Service**** from the dropdown list.
 NAS Service
* Enter a ****Name**** for the volume (required).
Spaces are not permitted.
* Enter a ****Description**** for the volume (optional).
* In the ****Filesystem Type**** dropdown list, select **Local Volume (EXT4)**.
* The ****Encrypt Volume**** option can be selected to encrypt the entire volume (AES-XTS).
**Encryption Considerations**
* **Encryption selection is only available during creation**; a volume cannot be changed from encrypted to unencrypted or vice-versa after creation.
* **Minor to moderate performance implications** are involved with enabling volume encryption.
* The **original encryption key** (defined when creating the volume) is needed for the lifetime of the volume; this encryption key must be **entered each time the volume is brought online** (for example, after disabling/enabling a volume or after its NAS service is rebooted).
* **Without the encryption key, it is not possible to bring the volume back online.**
4. Click **Submit.**
5. The next step is to create a Share (NFS or CIFS).
## Shares: NFS and CIFS
Network File System (NFS) and Common Internet File System (CIFS) are both file access protocols that allow client systems to access files on remote devices.
### About NFS and CIFS
* NFS uses a lightweight protocol with less overhead, which results in faster file access and transfer speeds.
* CIFS has more protocol overhead due to its support for various Windows-specific features. This can impact performance, especially in high-latency networks.
MacStadium recommends using CIFS.
### Creating a CIFS Share on an Existing Volume
CIFS (Common Internet File System) is a network protocol that allows clients to communicate with servers and access file sharing and print services as if they were stored locally. CIFS offers strong security features, which make it suitable for secure environments. It is important in Private Cloud because it allows access to a NAS volume over CIFS/SMB.
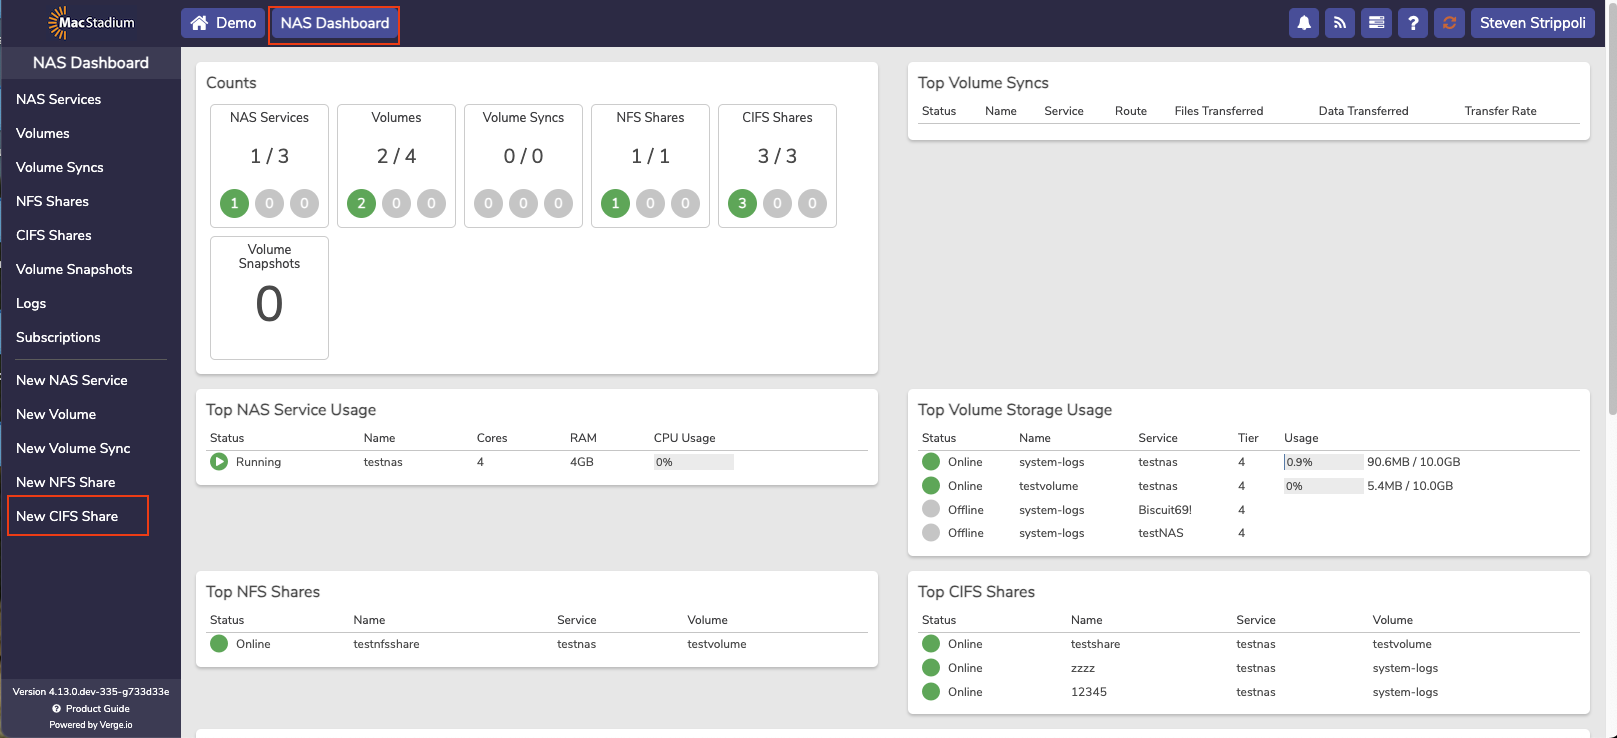
1. Navigate to the **NAS Dashboard**.
2. Click **New CIFS Shares**.
NAS Service
* Enter a ****Name**** for the volume (required).
Spaces are not permitted.
* Enter a ****Description**** for the volume (optional).
* In the ****Filesystem Type**** dropdown list, select **Local Volume (EXT4)**.
* The ****Encrypt Volume**** option can be selected to encrypt the entire volume (AES-XTS).
**Encryption Considerations**
* **Encryption selection is only available during creation**; a volume cannot be changed from encrypted to unencrypted or vice-versa after creation.
* **Minor to moderate performance implications** are involved with enabling volume encryption.
* The **original encryption key** (defined when creating the volume) is needed for the lifetime of the volume; this encryption key must be **entered each time the volume is brought online** (for example, after disabling/enabling a volume or after its NAS service is rebooted).
* **Without the encryption key, it is not possible to bring the volume back online.**
4. Click **Submit.**
5. The next step is to create a Share (NFS or CIFS).
## Shares: NFS and CIFS
Network File System (NFS) and Common Internet File System (CIFS) are both file access protocols that allow client systems to access files on remote devices.
### About NFS and CIFS
* NFS uses a lightweight protocol with less overhead, which results in faster file access and transfer speeds.
* CIFS has more protocol overhead due to its support for various Windows-specific features. This can impact performance, especially in high-latency networks.
MacStadium recommends using CIFS.
### Creating a CIFS Share on an Existing Volume
CIFS (Common Internet File System) is a network protocol that allows clients to communicate with servers and access file sharing and print services as if they were stored locally. CIFS offers strong security features, which make it suitable for secure environments. It is important in Private Cloud because it allows access to a NAS volume over CIFS/SMB.
1. Navigate to the **NAS Dashboard**.
2. Click **New CIFS Shares**.
 New CIFS Shares
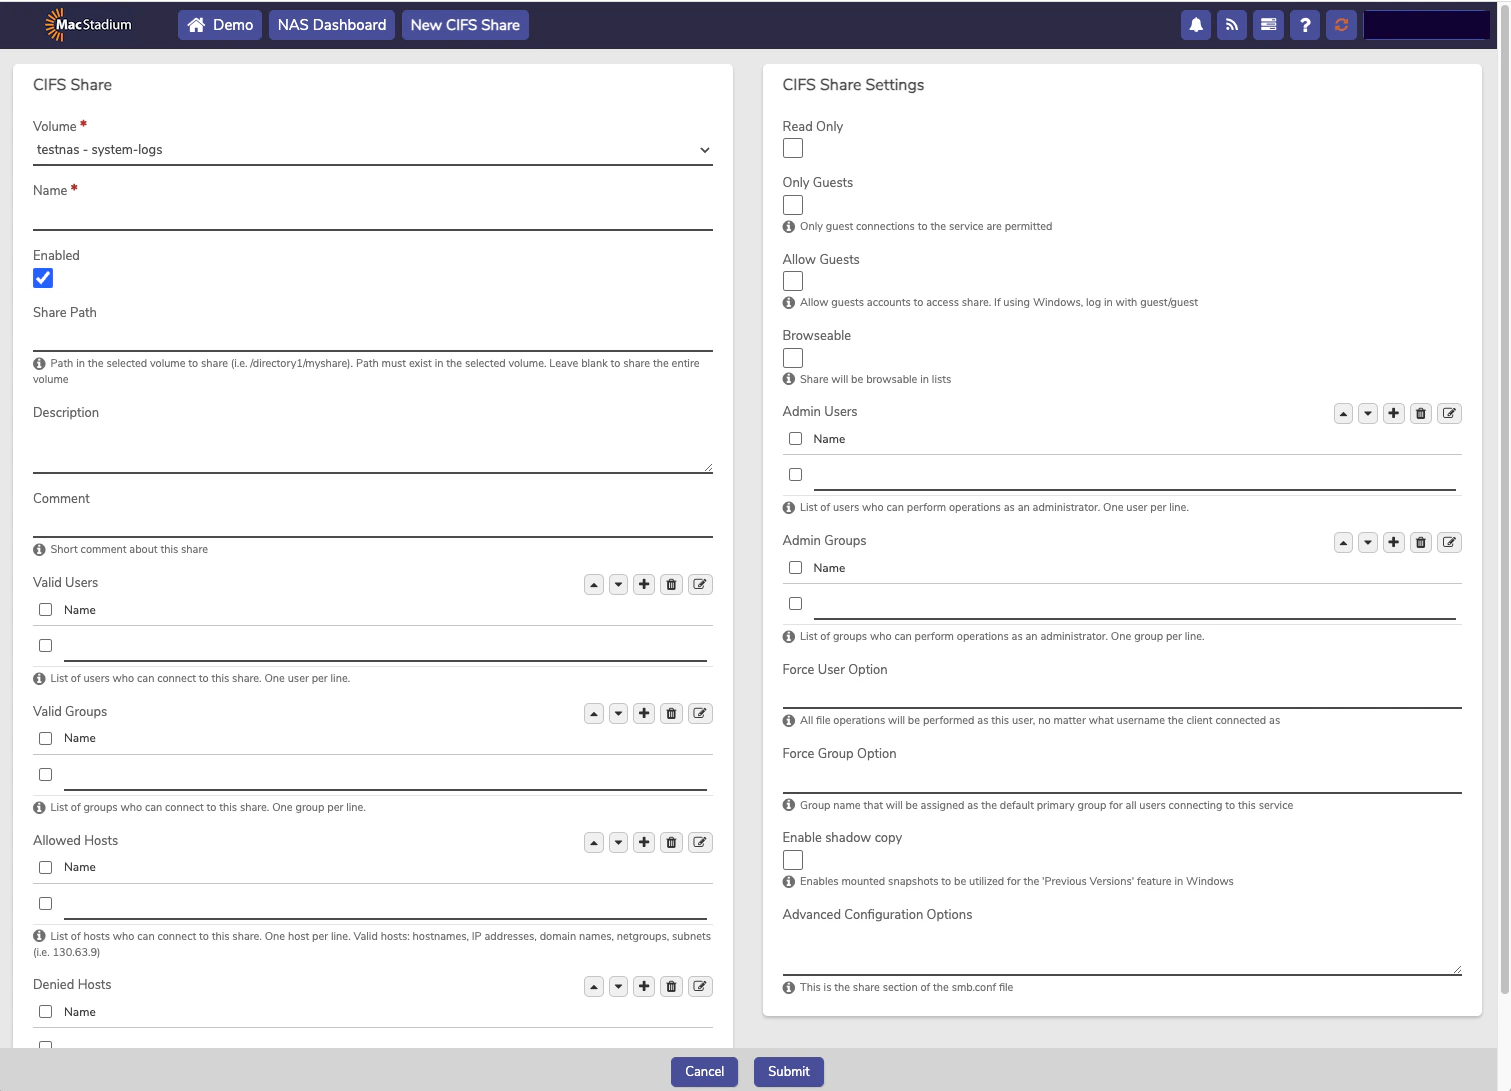
3. In the **CIFS Shares** screen enter the necessary information.
New CIFS Shares
3. In the **CIFS Shares** screen enter the necessary information.
 CIFS Shares
* Required: Enter a **Name** for the CIFS share.
* Optional: **Share Path** can be entered to define a specific path within the Volume; **otherwise**, this field **can be left blank** to share the entire Volume.
* Optional: A **Description** can be entered for the Share to record additional information about the Share.
* Optional: A **Comment** can be entered for the Share.
* Optional: A **Valid Users** list can be specified. This defines the users that are allowed to connect to the Share.
* Optional: A **Valid Groups** list can be specified. Users of the specified groups are allowed connection to the Share.
* Optional: **Allowed Hosts** field is to define one or more hosts that are permitted to access the Share. Hostname, IP address, domain name, netgroup, and subnet are all valid entries.
* Optional: **Denied Hosts** field is to define one or more hosts that are NOT permitted access to the Share. **Hostname, IP address, domain name, netgroup, and subnet are all valid entries.**
* Optional: **Read-Only** option can be selected to deny any write operations via this Share.
* **Browseable** option can be selected to make the Share visible in lists of available shares. **This option is disabled by default**.
Optional: **Users / Admin Groups** allow is to grant administrative privileges to the Share. This means that all file operations will be done as the super-user (root). Use this option carefully, as those in the list can do anything on the Share, regardless of individual file permissions.
* Optional: **User / Force Group** options can be specified to define a user or group used for all file operations performed via this Share.
* Optional: **Configuration Options** (advanced samba share options) can be specified to handle special-case scenarios.
3. Click **Submit**.
CIFS Shares
* Required: Enter a **Name** for the CIFS share.
* Optional: **Share Path** can be entered to define a specific path within the Volume; **otherwise**, this field **can be left blank** to share the entire Volume.
* Optional: A **Description** can be entered for the Share to record additional information about the Share.
* Optional: A **Comment** can be entered for the Share.
* Optional: A **Valid Users** list can be specified. This defines the users that are allowed to connect to the Share.
* Optional: A **Valid Groups** list can be specified. Users of the specified groups are allowed connection to the Share.
* Optional: **Allowed Hosts** field is to define one or more hosts that are permitted to access the Share. Hostname, IP address, domain name, netgroup, and subnet are all valid entries.
* Optional: **Denied Hosts** field is to define one or more hosts that are NOT permitted access to the Share. **Hostname, IP address, domain name, netgroup, and subnet are all valid entries.**
* Optional: **Read-Only** option can be selected to deny any write operations via this Share.
* **Browseable** option can be selected to make the Share visible in lists of available shares. **This option is disabled by default**.
Optional: **Users / Admin Groups** allow is to grant administrative privileges to the Share. This means that all file operations will be done as the super-user (root). Use this option carefully, as those in the list can do anything on the Share, regardless of individual file permissions.
* Optional: **User / Force Group** options can be specified to define a user or group used for all file operations performed via this Share.
* Optional: **Configuration Options** (advanced samba share options) can be specified to handle special-case scenarios.
3. Click **Submit**.
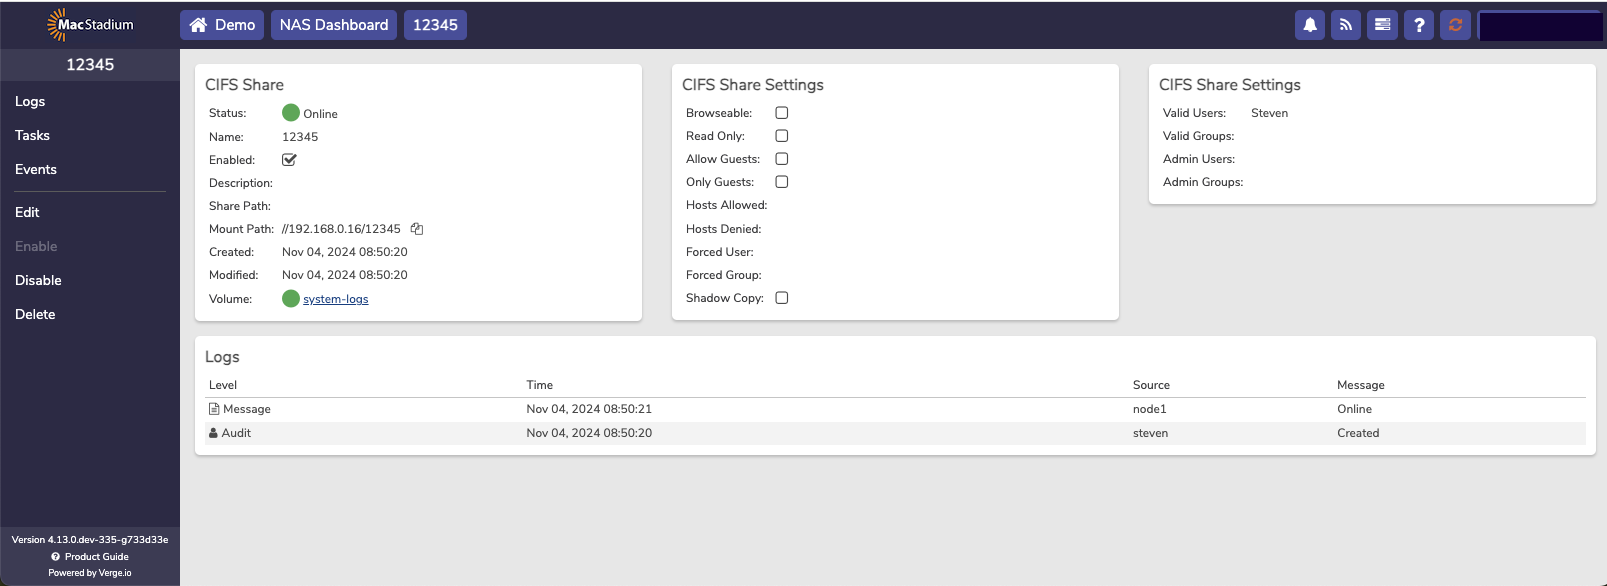 Newly Created CIFS Share
### Creating a NFS File Share on an Existing Volume
1. From the Main Dashboard, select **NAS**.
Newly Created CIFS Share
### Creating a NFS File Share on an Existing Volume
1. From the Main Dashboard, select **NAS**.
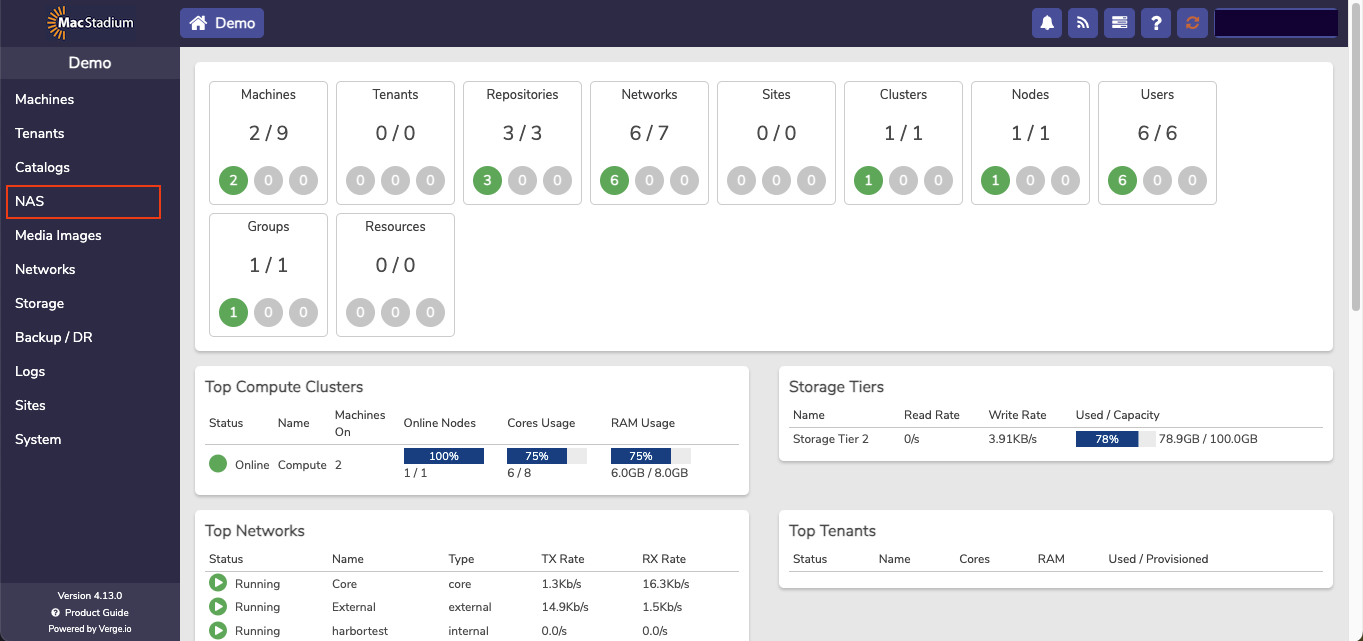 NAS
2. Select **Volumes**.
NAS
2. Select **Volumes**.
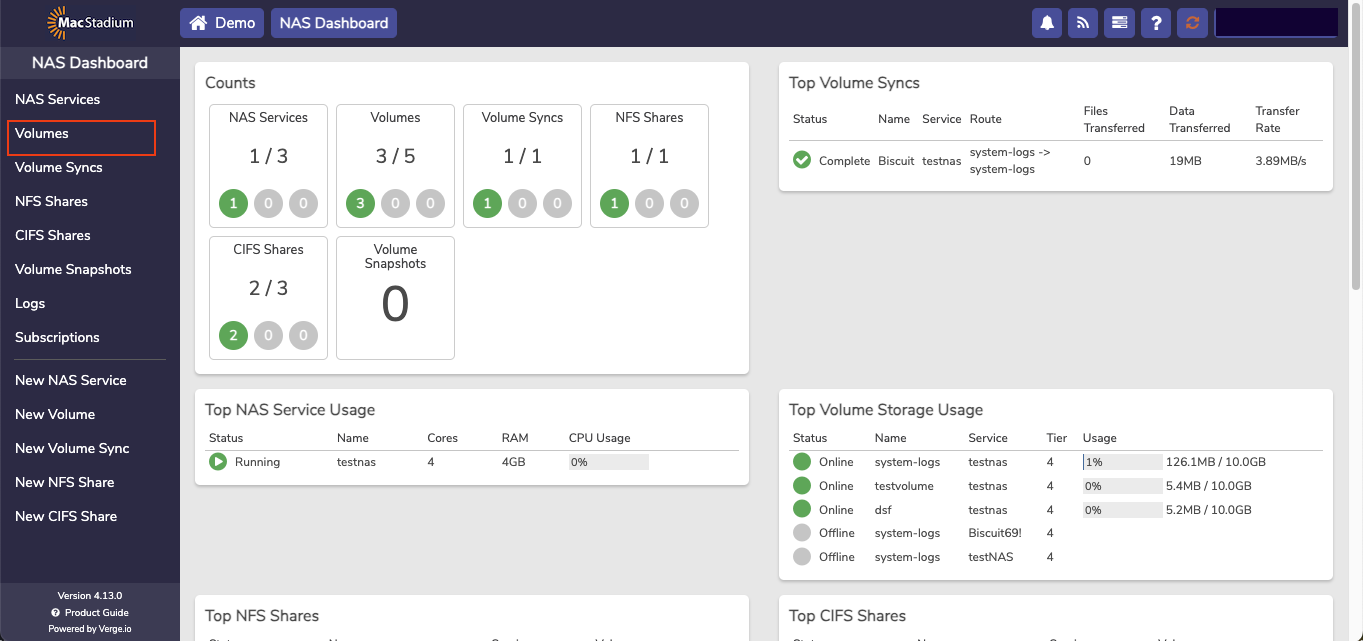 Volumes
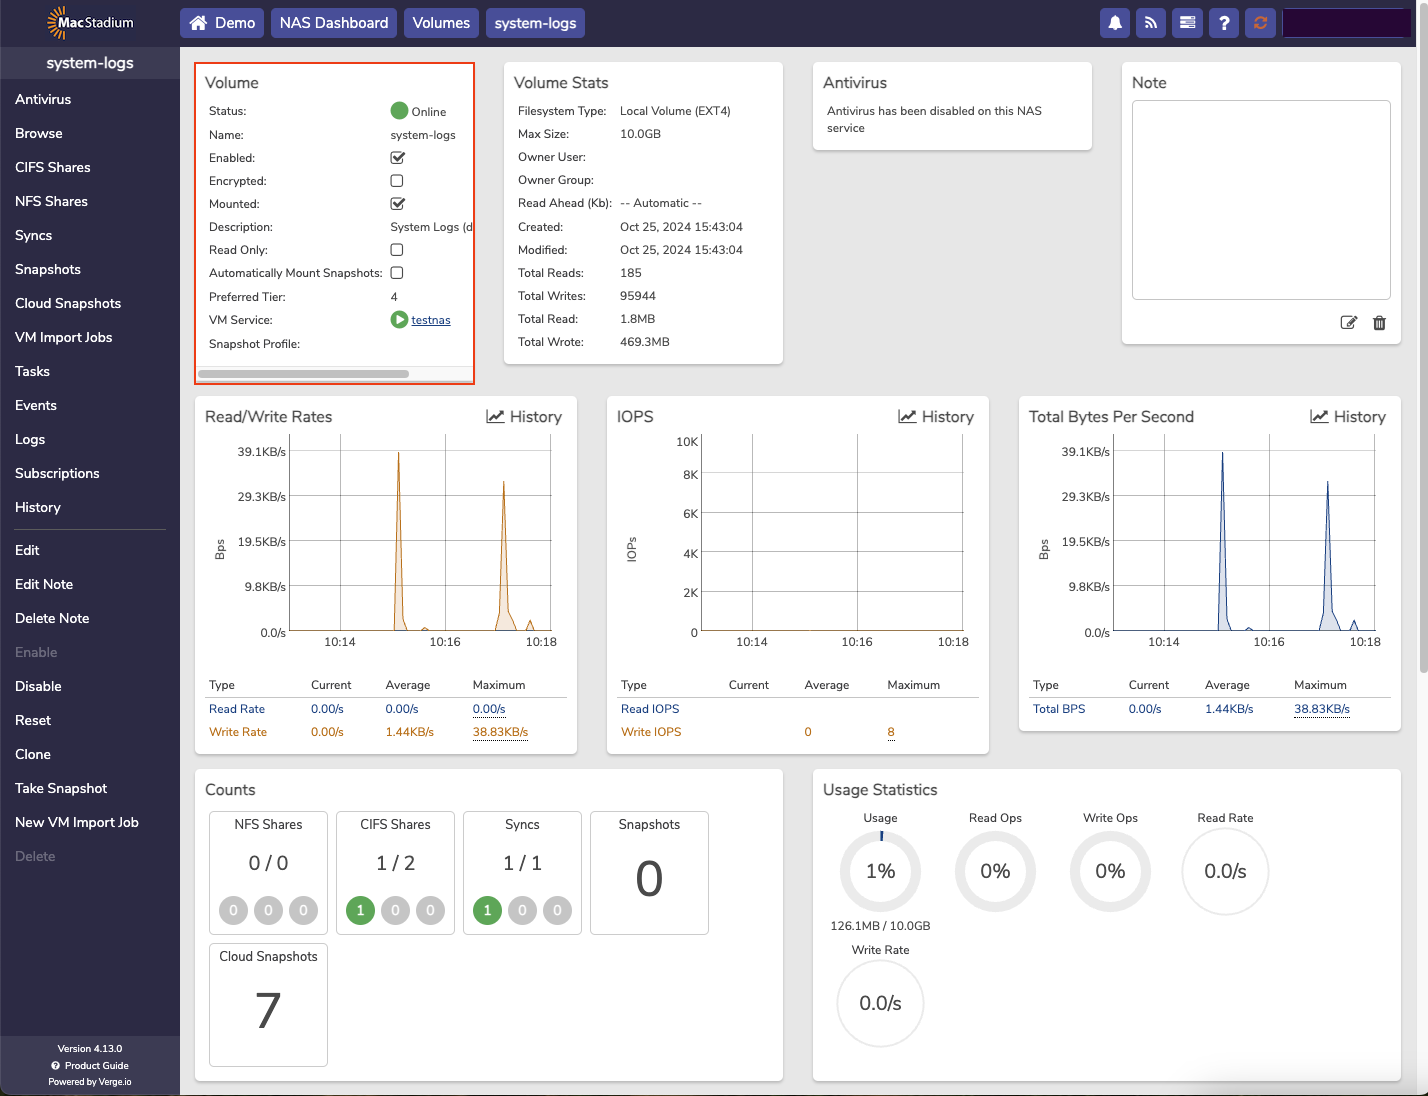
3. Select the **Volume**.
Volumes
3. Select the **Volume**.
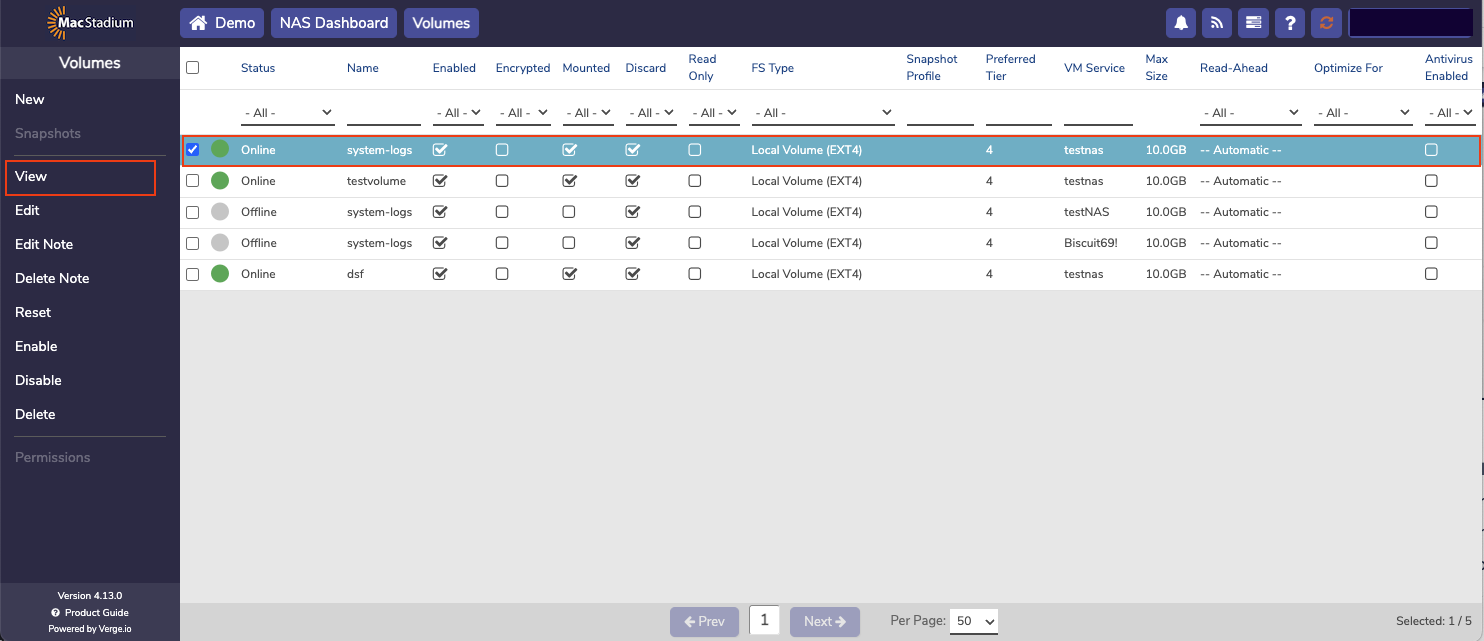 View
4. Select **View**.
View
4. Select **View**.
 Volumes
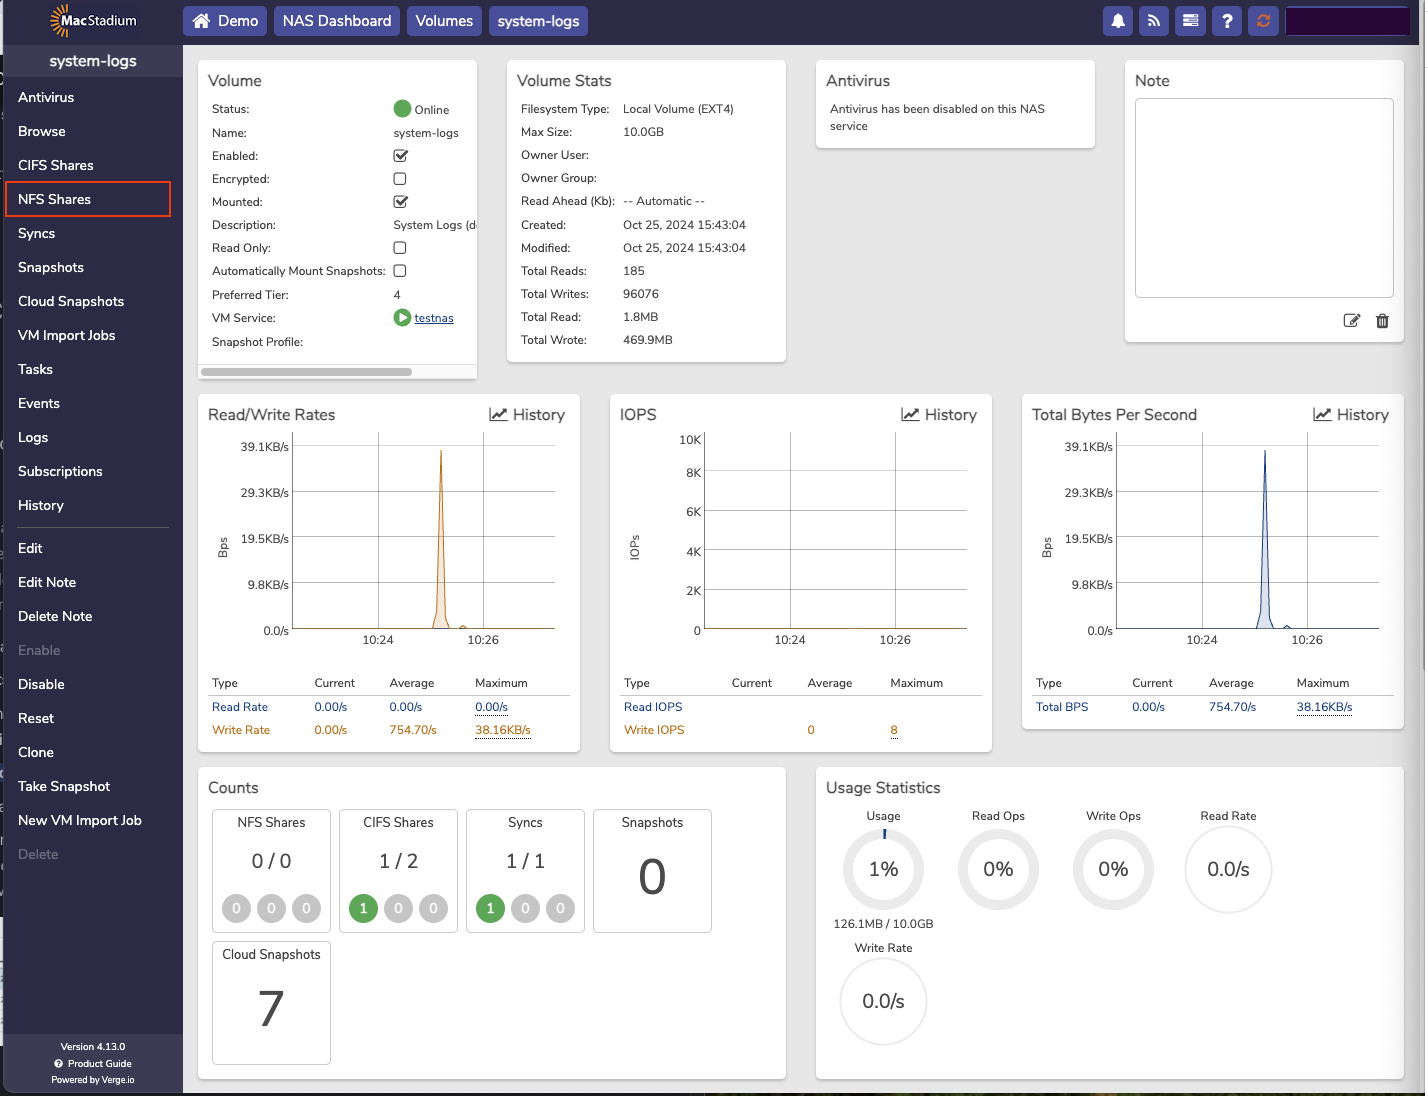
5. Select **NFS Shares**.
Volumes
5. Select **NFS Shares**.
 NFS Shares
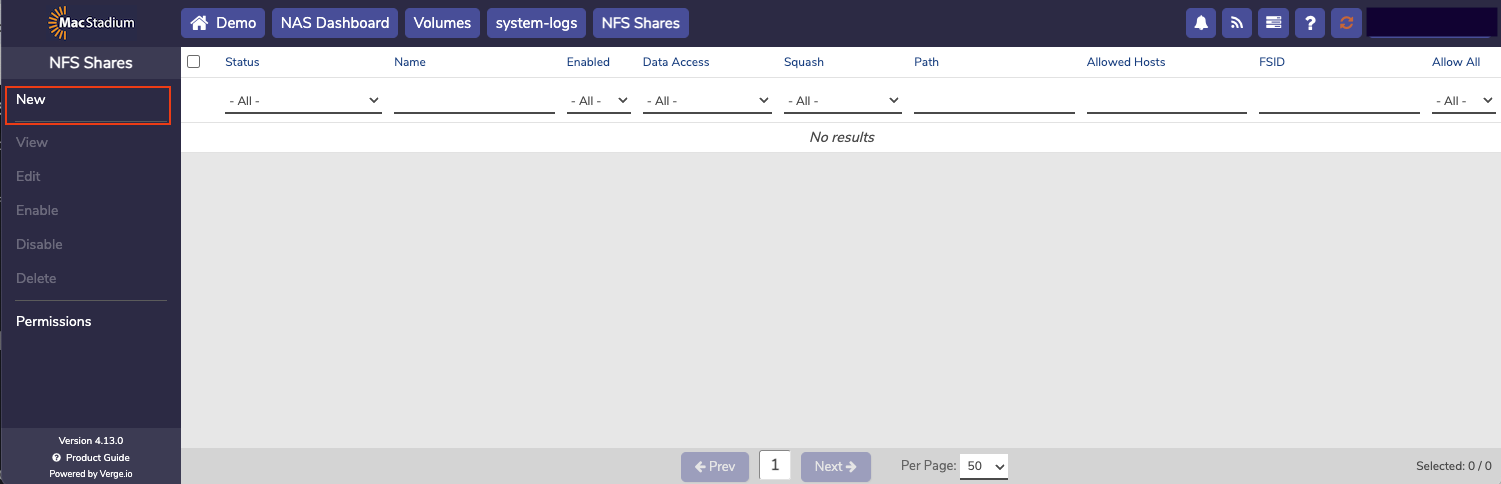
6. Select **New** to create a new share.
NFS Shares
6. Select **New** to create a new share.
 New
* Enter a Name for the share
* Enter a Share Path to define a specific path within the volume
* Enter a Description for the share
* Select Allow Everyone to allow all hosts, or specify one or more allowed hosts
* Select a Data Access option
* Select a User/Group Squashing option
7. Click **Submit**.
## Connecting to the Share
Now that the NAS Service, Volume, Users, and Share are created, end users can map to the shared drive from their Mac mini or other devices on the network.
New
* Enter a Name for the share
* Enter a Share Path to define a specific path within the volume
* Enter a Description for the share
* Select Allow Everyone to allow all hosts, or specify one or more allowed hosts
* Select a Data Access option
* Select a User/Group Squashing option
7. Click **Submit**.
## Connecting to the Share
Now that the NAS Service, Volume, Users, and Share are created, end users can map to the shared drive from their Mac mini or other devices on the network.