> ## Documentation Index
> Fetch the complete documentation index at: https://docs.macstadium.com/llms.txt
> Use this file to discover all available pages before exploring further.
# Shared VM storage for Orka CI artifacts
> Mount a shared storage volume across Orka VMs for CI artifact caching. Available for Apple silicon and Intel VMs running macOS Ventura or later.
| Platform | Status | Notes |
| ----------------------------------------- | --------------------------------------------------------------------------------------- | ---------------------- |
| Apple silicon, macOS Ventura and later | Supported as of [Orka 3.0](/orka/orka-upgrades-and-release-notes/orka-30-release-notes) | Requires Orka VM Tools |
| Intel, macOS Ventura (13) and Sonoma (14) | Supported | |
**Orka 3.5 default change:** Shared VM storage is disabled by default for new Orka deployments. Existing deployments retain the previous setting (enabled). To enable shared storage on a new deployment, open a support ticket.
**Orka 3.5.2:** Per-instance shared attached disk sizing is now supported. On AWS, set `VM_SHARED_DISK_SIZE` in each instance's user data script. On-prem, set `osx_node_orka_vm_shared_disk_size` via Ansible. See the [Orka 3.5.2 release notes](/orka/orka-upgrades-and-release-notes/orka-35-release-notes) for full setup steps.
## Overview
Starting with Orka 1.6.0, all deployed Intel-based VMs will have access to a shared storage volume in the cluster. Starting with Orka 2.1.0, all deployed ARM-based VMs will have access to the same shared storage.
This storage can be used to cache build artifacts in-between stages of your CI/CD pipeline, for example, or host Xcode installers and other build dependencies.
Orka offers two different ways to utilize shared VM storage:
1. By default, the VM shared storage directory will be placed on the primary NFS storage export for your cluster. This means that VM shared storage will share storage space with VM images and ISOs, so please keep this in mind!
2. Optionally, you may request to provision a secondary storage export that will be dedicated to shared storage. This is ideal if you plan to share a lot of data between your CI/CD pipeline builds.
## Shared Storage in ARM-based VMs
In ARM-based VMs the shared storage will be automatically mounted and available to use. Same storage is shared between ARM-based and Intel-based VMs.
To use shared VM storage with VMs deployed on ARM nodes, your image must include Orka VM Tools. Orka VM Tools is required for shared storage to automount in the VM.
[Learn more about pulling an image](/orka/orka3-cli-reference/image-management)
## Shared Storage in Intel-based VMs
```
sudo mount_9p orka
```
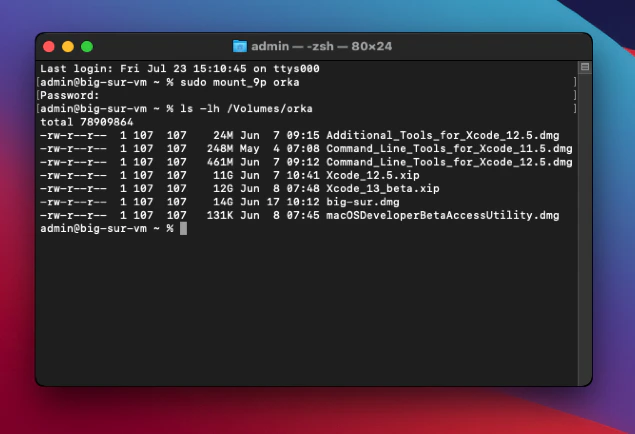
The volume will be mounted at /Volumes/orka. The first time you attempt to access the filesystem via Terminal, you will be asked to grant the Terminal application permissions to access files on a network volume:
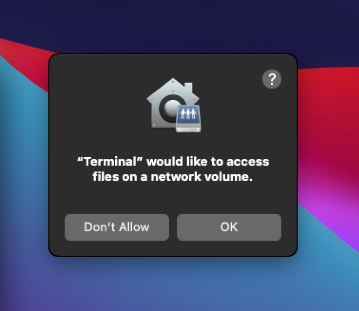 Click the OK button to allow access. You will then be able to access files on the volume:
 ## Automount shared storage in Intel-based VMs
Instead of mounting the shared storage manually after every OS restart, you can create a /Library/LaunchDaemons/com.mount9p.plist to handle automounting the shared storage.
1. Connect to your VM via SSH.
```
ssh @ -p
```
2. Make sure that /Volumes/orka is already mounted on the VM.
```
ls /Volumes
```
3. If not already mounted, mount the shared VM storage.
```
sudo mount_9p orka
```
4. Navigate to /Library/LaunchDaemons and create a com.mount9p.plist file.
```
cd /Library/LaunchDaemons
ls
sudo vim com.mount9p.plist
```
5. Copy the following contents and paste them in Vim. Type :wq to save and exit.\
com.mount9p.plist
```
Label
com.mount9p.plist
RunAtLoad
StandardErrorPath
/var/log/mount_9p_error.log
StandardOutPath
/var/log/mount_9p.log
ProgramArguments
/bin/bash
-c
mkdir -p /Volumes/orka && mount_9p orka
```
6. Change the ownership and permissions for com.mount9p.plist.
```
sudo chown root:wheel /Library/LaunchDaemons/com.mount9p.plist
sudo chmod 600 /Library/LaunchDaemons/com.mount9p.plist
```
7. Reboot the VM and save or commit the VM image.
## Limitations
### Reading and Writing Data
You may encounter permissions issues when reading or writing data to the shared storage volume. In order to get around this, you may need to become the root user to write data to the shared storage volume.
If you need to give a specific user read and write access to files, you can add that user to the group 107. For example, if your CI user is called machine-user create the group ci:
```
sudo dscl . create /Groups/ci
sudo dscl . create /Groups/ci gid 107
sudo dscl . create /Groups/ci passwd '*'
sudo dscl . create /Groups/ci GroupMembership machine-user
```
Confirm the above changes were made with the command dscl . read /Groups/ci. Reboot the virtual machine and save or commit the VM image to persist these changes.
Files must be given group write access to be modified by the user you have added to the 107 group. For example, `sudo chmod g+w myfile.txt`.
### Cluster storage limits
If you are using the default primary storage export in your cluster for shared VM storage, keep in mind that this storage is also used to host your Orka VM images and other data. This should be acceptable for sharing a limited set of files between virtual machines but is not recommended for intensive IO. In the case that you require frequent use of multiple reads and writes to the shared storage volume, setting up dedicated secondary storage is highly recommended.
## Known Issues
When connecting to the VM over SSH and attempting to access the shared storage volume, you may encounter the error orka: Operation not permitted:
## Automount shared storage in Intel-based VMs
Instead of mounting the shared storage manually after every OS restart, you can create a /Library/LaunchDaemons/com.mount9p.plist to handle automounting the shared storage.
1. Connect to your VM via SSH.
```
ssh @ -p
```
2. Make sure that /Volumes/orka is already mounted on the VM.
```
ls /Volumes
```
3. If not already mounted, mount the shared VM storage.
```
sudo mount_9p orka
```
4. Navigate to /Library/LaunchDaemons and create a com.mount9p.plist file.
```
cd /Library/LaunchDaemons
ls
sudo vim com.mount9p.plist
```
5. Copy the following contents and paste them in Vim. Type :wq to save and exit.\
com.mount9p.plist
```
Label
com.mount9p.plist
RunAtLoad
StandardErrorPath
/var/log/mount_9p_error.log
StandardOutPath
/var/log/mount_9p.log
ProgramArguments
/bin/bash
-c
mkdir -p /Volumes/orka && mount_9p orka
```
6. Change the ownership and permissions for com.mount9p.plist.
```
sudo chown root:wheel /Library/LaunchDaemons/com.mount9p.plist
sudo chmod 600 /Library/LaunchDaemons/com.mount9p.plist
```
7. Reboot the VM and save or commit the VM image.
## Limitations
### Reading and Writing Data
You may encounter permissions issues when reading or writing data to the shared storage volume. In order to get around this, you may need to become the root user to write data to the shared storage volume.
If you need to give a specific user read and write access to files, you can add that user to the group 107. For example, if your CI user is called machine-user create the group ci:
```
sudo dscl . create /Groups/ci
sudo dscl . create /Groups/ci gid 107
sudo dscl . create /Groups/ci passwd '*'
sudo dscl . create /Groups/ci GroupMembership machine-user
```
Confirm the above changes were made with the command dscl . read /Groups/ci. Reboot the virtual machine and save or commit the VM image to persist these changes.
Files must be given group write access to be modified by the user you have added to the 107 group. For example, `sudo chmod g+w myfile.txt`.
### Cluster storage limits
If you are using the default primary storage export in your cluster for shared VM storage, keep in mind that this storage is also used to host your Orka VM images and other data. This should be acceptable for sharing a limited set of files between virtual machines but is not recommended for intensive IO. In the case that you require frequent use of multiple reads and writes to the shared storage volume, setting up dedicated secondary storage is highly recommended.
## Known Issues
When connecting to the VM over SSH and attempting to access the shared storage volume, you may encounter the error orka: Operation not permitted:
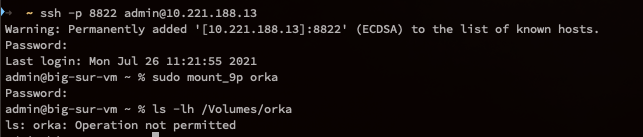 To fix this issue, connect to the VM via VNC and navigate to **System Settings → Privacy & Security → Full Disk Access**. Click the padlock to make changes:
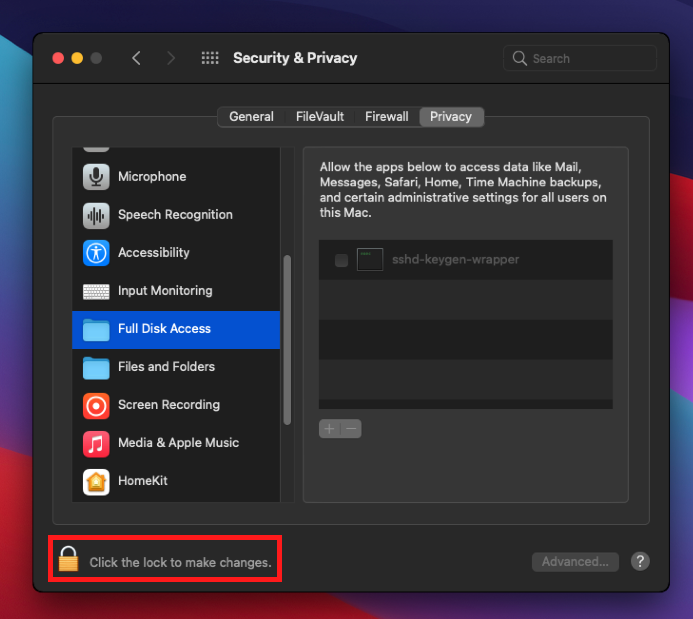 You will then be prompted to enter your password. Next, click the checkbox next to sshd-keygen-wrapper:
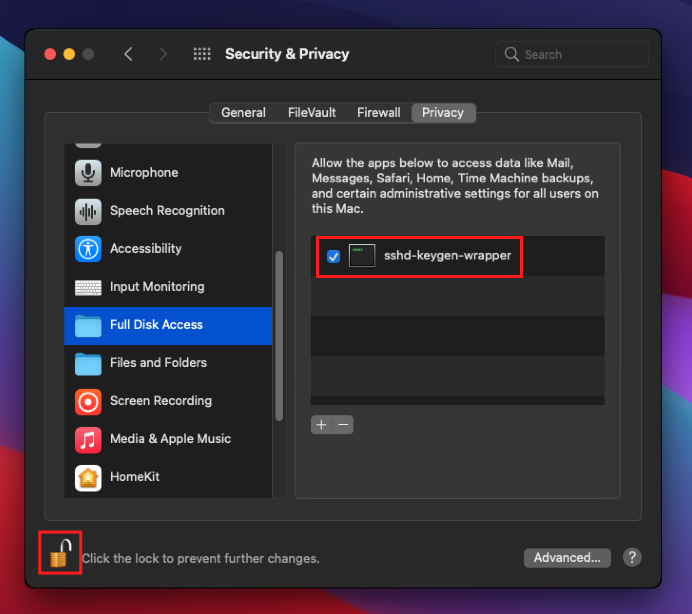 Click the padlock again to prevent further changes. You should now be able to access the shared storage volume over an SSH connection.
**IMPORTANT**
Make sure to save or commit the VM image after completing the above steps to persist changes.
Click the padlock again to prevent further changes. You should now be able to access the shared storage volume over an SSH connection.
**IMPORTANT**
Make sure to save or commit the VM image after completing the above steps to persist changes.