This guide introduces IT administrators to managing a deployed MacStadium VDI environment. Once you’ve completed the initial deployment following the MacStadium VDI deployment guide this document covers ongoing operations, user management, and system maintenance. What this guide covers:Documentation Index
Fetch the complete documentation index at: https://docs.macstadium.com/llms.txt
Use this file to discover all available pages before exploring further.
- Understanding your role and responsibilities in the support and maintenance of your organization’s MacStadium VDI architecture
- Navigating core management interfaces (Ansible, Citrix Cloud, Orka Engine)
- Executing common operational tasks (provisioning desktops, managing images, troubleshooting)
- Establishing operational best practices for your MacStadium VDI environment
Your role in managing MacStadium VDI
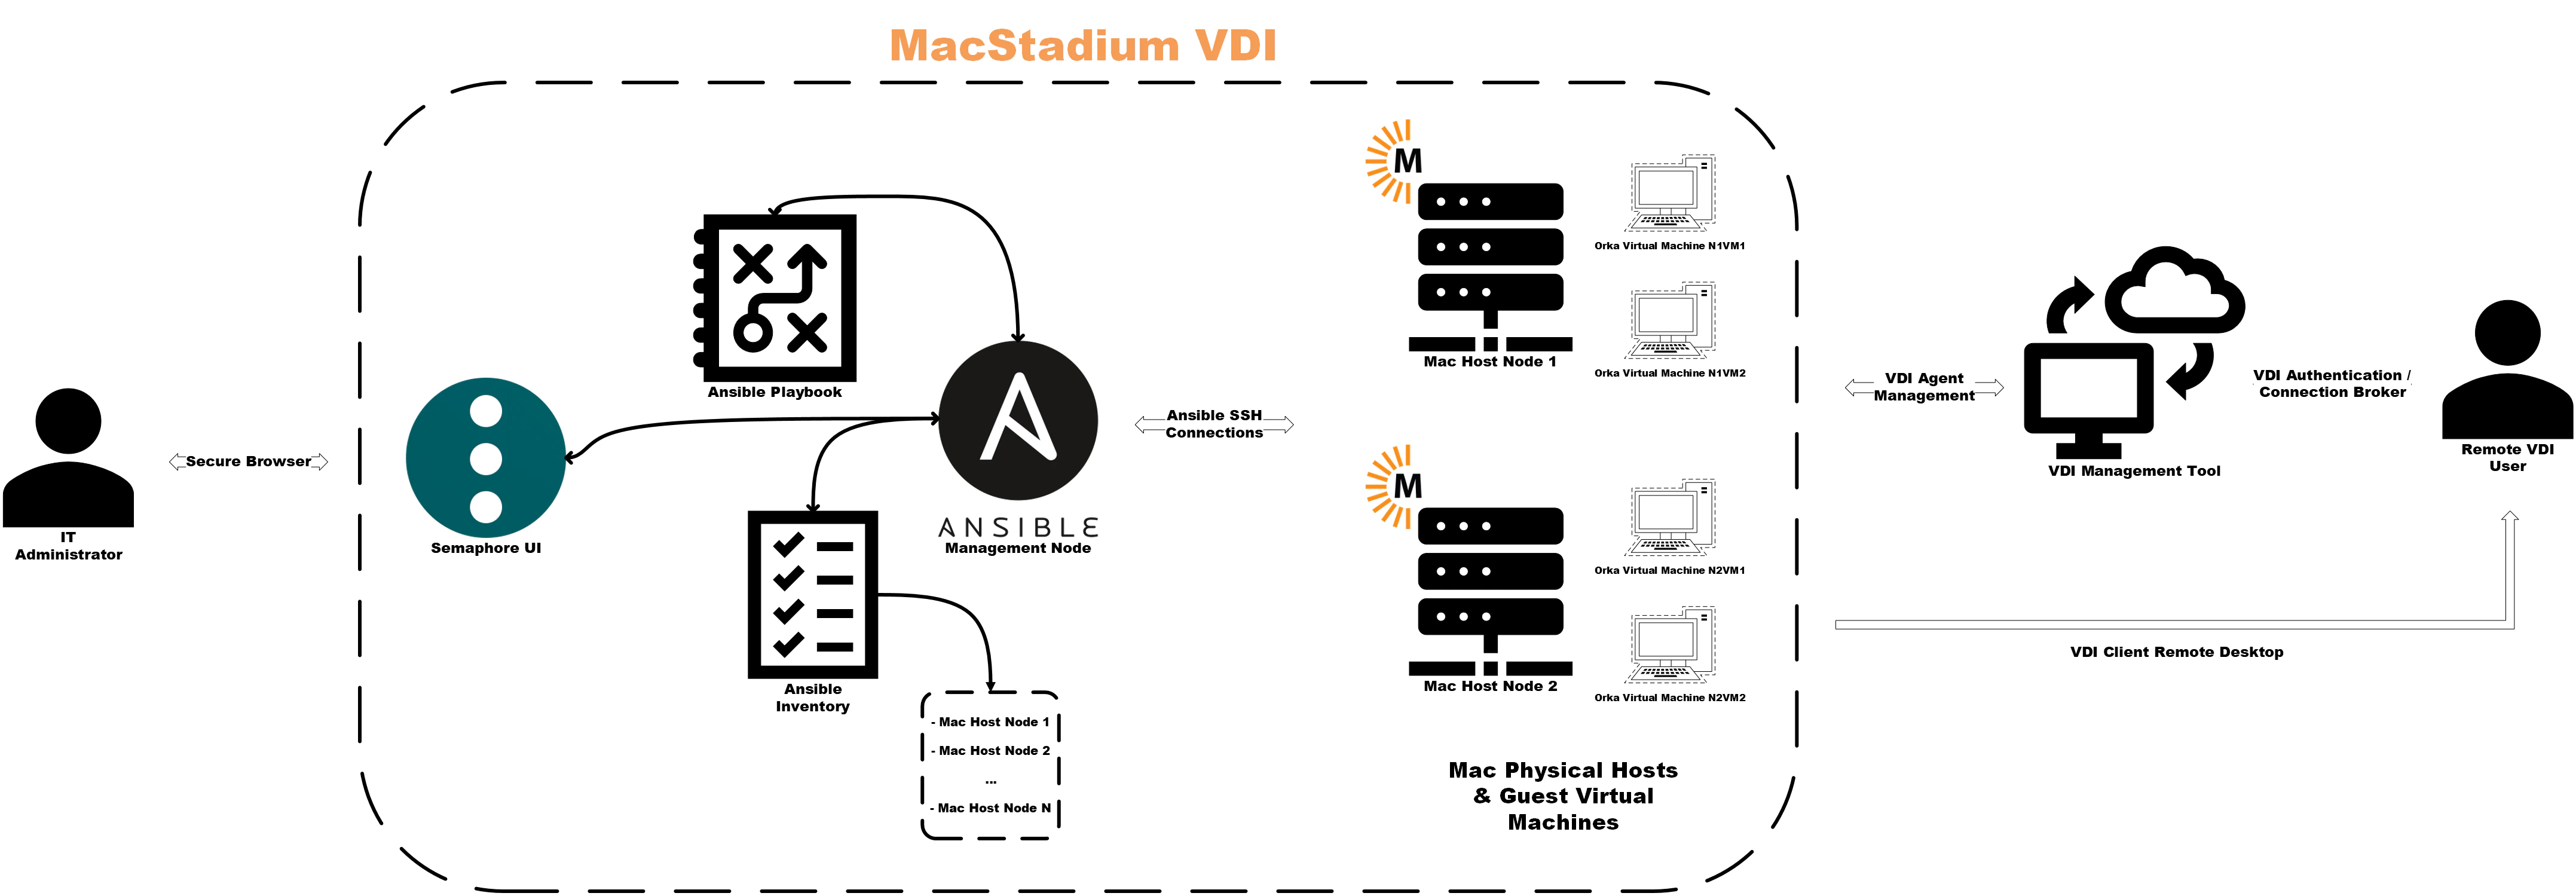
As an administrator, you will be responsible for managing the three interconnected systems that make up MacStadium VDI. These are: Orka Engine (virtualization layer):- Hosts MacOS VMs on Apple silicon hardware
- Manages VM lifecycle (create, start, stop, delete)
- Handles image storage and distribution
- Brokers user connections to desktops
- Manages Machine Catalogs and Delivery Groups
- Controls access policies and user assignments
- Automates VM deployment and lifecycle operations
- Maintains configuration consistency
- Coordinates image management across hosts
Key concepts and terminology
Orka-specific terms:- Orka host: Physical Mac running Orka Engine (e.g. Mac mini M4, Mac Studio)
-
VM group: A logical collection of VMs managed together (e.g.
citrix-vda-finance,citrix-vda-engineering) - Golden image: Template VM with MacOS, Citrix VDA, and applications pre-installed
- Max VMs per host: Typically two, due to Apple licensing restrictions
- Bridged networking: VMs receive IPs directly from your network (no NAT needed)
- Machine catalog: Collection of VMs with similar configuration (these map to VM groups in Orka)
- Delivery group: Links machine catalog to users and defines access policies
- VDA (Virtual delivery agent): Software on MacOS VM that registers with Citrix Cloud
- Enrollment token: Time-limited credential for VDA registration
- Rendezvous protocol: Enables HDX connections to non-domain-joined VMs
-
Inventory: List of Orka hosts (
dev/inventory) -
Playbook: YAML file (
deploy.yml,vm.yml) -
Group vars: Configuration variables shared across hosts (
dev/group_vars/all/main.yml) -
Tags: Selective playbook execution (e.g.,
--tags planfor dry runs)
Architecture overview:
Getting Started
Ansible access and credentials setup
You will want to verify that you have access to all three MacStadium VDI management layers.Ansible control node:
The Ansible control node (also known as an “Ansible runner”) is where you execute playbooks to manage Orka hosts. Access method: SSH to the Ansible control nodessh admin@ansible-control.example.com
cd ~/ansible-citrix-orka
Verify Ansible access:
ansible hosts -i dev/inventory -m ping
ansible --version (v2.12 or later recommended)
Credentials stored in Ansible:
-
SSH keys for Orka hosts:
~/.ssh/ansible_orka_key -
Ansible Vault password:
.vault_pass(or manually entered) - Ansible Vault contents: Orka API tokens, Citrix enrollment tokens, registry credentials
-
Deploying VMs:
ansible-playbook -i dev/inventory deploy.yml -
Managing VM state:
ansible-playbook -i dev/inventory vm.yml -
Creating images:
ansible-playbook -i dev/inventory create_image.yml
Citrix Cloud Console access and credentials setup
Citrix Cloud Console is the web-based management control plane for Citrix DaaS. Access URL: https://citrix.cloud.comLogin: Your Citrix Cloud administrator credentials
Key sections:
- Web studio: Machine catalogs, delivery groups, enrollment tokens
- Monitor: Session metrics, connection quality, active users
- Policies: HDX settings, access control, feature restrictions
Credentials needed:
- Citrix Cloud administrator account
- Customer ID (visible in Cloud Console, used in VDA configuration)
Common tasks performed in Citrix Cloud Console:
- Generating enrollment tokens
- Creating or modifying Delivery Groups
- Assigning users to desktops
- Monitoring session health
Orka Hosts
As an IT administrator, you will need direct SSH access to physical Macs running Orka Engine. This access is used for troubleshooting, not routine operations. You can access your Orka Engine hosts by SSHing directly to the host IP:ssh admin@10.0.100.10
When you’ll need this:
- Debugging Orka Engine issues
-
Checking disk space:
df -h /var/orka -
Reviewing Orka logs:
sudo tail -100 /var/log/orka-engine.log -
Manually inspecting VMs:
orka-engine vm list
-
SSH key:
~/.ssh/ansible_orka_key(this is the same key Ansible uses) -
User:
admin(or whichever user was configured during deployment)
OCI registry
An OCI registry is a container registry for storing your organization’s golden images. This can be public (GHCR) or private (Harbor, Artifactory, etc.)MacStadium’s public GHCR registry:
-
URL:
ghcr.io/macstadium/orka-images - No authentication required
-
Base images:
sonoma:latest,sequoia:latest,tahoe:latest
Private OCI registry:
-
URL: Defined in
dev/group_vars/all/main.yml(e.g.,registry.example.com) -
Credentials: Stored in Ansible Vault (
vault_registry_username,vault_registry_password) - Contains: Your golden images with Citrix VDA pre-installed
Common tasks performed when managing OCI images:
-
Pulling images:
ansible-playbook -i dev/inventory pull_image.yml -
Creating/pushing images:
ansible-playbook -i dev/inventory create_image.yml
Citrix Cloud Console Navigation
After logging in to https://citrix.cloud.com:-
Hamburger menu: Navigate between services
- Select “DaaS” or “Virtual Apps and Desktops” to access Web Studio
-
Web Studio:
- Machine Catalogs: View registered VMs, enrollment tokens
- Delivery Groups: User assignments, published desktops
- Policies: HDX settings, security policies
-
Monitor tab:
- Real-time session data
- Connection quality metrics
- Historical trends
-
Support menu:
- Documentation links
- Support case management You may wish to run some quick checks to verify service health:
- Machine Catalogs → Select your catalog → Verify VMs show “Registered”
- Monitor → Check session launch success rate >95%
- Monitor → Verify there have been no “Unregistered” machines in past 24 hours
Connecting to the Ansible Management Node
Initial connection:ssh admin@ansible-control.example.comcd ~/ansible-citrix-orkacat dev/inventory
Expected output:
[hosts]10.0.100.1010.0.100.1110.0.100.12
Testing Ansible connectivity
ansible hosts -i dev/inventory -m ping
If Ansible connectivity fails:
-
Verify the SSH key exists:
ls -la ~/.ssh/ansible_orka_key -
Test direct SSH connectivity:
ssh -i ~/.ssh/ansible_orka_key admin@10.0.100.10 - Check that your Ansible inventory file has the correct IPs listed
dev/group_vars/all/main.yml:
cat dev/group_vars/all/main.yml
Key Ansible variables:
-
ansible_user: SSH user (typicallyadmin) -
vm_image: Default golden image path -
max_vms_per_host: VM capacity limit (typically2) -
.vault_pass: Sensitive credentials (passwords, etc.) are encrypted with Ansible Vault.-
View Vault contents with:
ansible-vault view dev/group_vars/all/vault.yml -
Note: Keep your
.vault_passsecure, never commit it to Git. If this is ever lost, you’ll need to recreate your Ansible vault file with new credentials.
-
View Vault contents with:
-
Ansible vault contains the following:
-
vault_citrix_enrollment_token -
vault_citrix_customer_id -
vault_registry_username/vault_registry_password
-
Reviewing Mac Host inventory
-
List all Orka hosts:
ansible hosts -i dev/inventory --list-hosts -
Check Orka Engine version on all hosts:
ansible hosts -i dev/inventory -m shell -a "orka-engine --version" - Check capacity per host:
- Check available disk space:
ansible hosts -i dev/inventory -m shell -a "df -h /var/orka"
- <70% used: Healthy
- 70-85% used: Plan for cleanup or expansion
-
85% used: Action required (delete old images, expand storage)
- Host IP
- Hardware model (Mac mini M4, Mac Studio M2 Ultra, etc.)
- Current VM count
- Available capacity
- Network interface (10Gb vs 1Gb)
- Notes (e.g., “Reserved for engineering team”)
Core workflows
Provisioning a new desktop
You will need to refer to this workflow when a user requests access to a macOS virtual desktop. Be sure the following prerequisites have been met before proceeding:- The user account exists in your identity provider (Azure AD, Okta, etc.)
- The user is assigned to the appropriate Delivery Group in Citrix Cloud
- There is available capacity on your Orka hosts (at least 1 VM slot free)
- The appropriate golden image is cached on the host(s)
- Select the appropriate golden image. Determine this based on the user’s department/role/access needs:
ansible hosts -i dev/inventory -m shell -a "orka-engine image list" will list all available images in Orka Engine. For example: registry.example.com/citrix-vda/sonoma-finance:latest.
If the golden image isn’t cached, run:ansible-playbook -i dev/inventory pull_image.yml \ -e "remote_image_name=registry.example.com/citrix-vda/sonoma-finance:latest"
(This can take 5-15 minutes depending on the image size and your network speed)
- Run Ansible playbook: VM Deploy
--tags plan first:
ansible-playbook -i dev/inventory deploy.yml \ -e "vm_group=citrix-vda-finance \ desired_vms=11" \ --tags plan
This show the current VM count per host, where new VMs will be deployed, which host has available capacity, and does not create VMs (dry run only.) When reviewing the plan output, you will want to verify that the new VM will deploy to a host with capacity, the correct golden image will be used, and that the network configuration looks correct.
Next, you will want to execute the deployment:
ansible-playbook -i dev/inventory deploy.yml \ -e "vm_group=citrix-vda-finance \ desired_vms=11 \ vm_image=registry.example.com/citrix-vda/sonoma-finance:latest"
This typically takes between 5-10 minutes, and completes the following steps in the playbook:
- Ansible selects hosts with available inventory- VM is created from the selected golden image
- VM boots and VDA service starts
- VDA registers with Citrix Cloud using an enrollment token
- Desktop appears in the Machine Catalog as “Available” You can monitor the progress of your deployment in another terminal by running the following command:
watch -n 10 'ansible-playbook -i dev/inventory list.yml -e "vm_group=citrix-vda-finance"'
- Verify VDA registration in Citrix
- Select your Machine Catalog (e.g., “Orka-macOS-Sonoma-Finance”)
- Refresh the machine list
- New VMs should appear with:
- Registration state: ‘Registered’
- Power state: ‘On’
- Fault state: ‘None’ If the VM doesn’t appear after 10 minutes, check the VDA service status by running:
ansible-playbook -i dev/inventory list.yml -e "vm_group=citrix-vda-finance"ansible mac_vms -i dev/inventory -m shell \ -a "sudo launchctl list | grep citrix" \ --limit 10.0.100.10
Expected output: Service running with PID. To confirm this, you can check the VDA logs by running:
ansible mac_vms -i dev/inventory -m shell \ -a "sudo tail -50 /Library/Application\ Support/Citrix/VDA/Logs/vda.log" \ --limit 10.0.100.10
You should see a message similar to: ‘Registration successful’, or ‘Connected to broker’. To troubleshoot VDA registration failures, refer to the Troubleshooting Quick Reference Guide.
- Assign to user/delivery group
- Select Delivery Group (e.g., “Finance-macOS-VDI”)
- Click “Edit Delivery Group” → “Users” tab
- Add user: Search for user account, select, assign to specific VM If using pooled/random assignments: No action is needed if the user has already been assigned to a Delivery Group. The next available VM will be assigned automatically when the user launches a desktop. You will want to verify that the user has access by: - Having the user launch the Citrix Workspace application
- User logs in
- Desktop should appear: “Mac OS Finance Desktop” (or configured display name)
- User clicks desktop → session launches successfully The desktop should appear in Citrix Workspace immediately after being assigned to a Delivery Group, and should launch within 15-30 seconds. When the provisioning workflow has completed, the user will now have access to their macOS virtual desktop.
Managing images
Golden images are the foundation for rapid desktop provisioning. The image lifecycle is typically:- Create: Build a golden image with macOS + VDA + applications
- Test: Deploy a test VM and validate its functionality
- Publish: Push your image to an OCI registry with an applicable version tag
- Cache: Pull an image to all Orka hosts
- Deploy: Use an image for new VM provisioning
- Update: Apply patches and create a new image version
- Retire: Remove old image versions after migration to a new version is complete
-
Configuration scripts are prepared in the
/scriptsdirectory - A base MacOS image is available
- Registry credentials are in Ansible Vault
create_image.yml playbook automates the following:
- Deploy a temporary VM from a base image
- Run configuration scripts
- Commit VM to an image
- Push image to a container registry with a version tag applied
- Delete temporary VM
/scripts directory in your project:
cd ~/ansible-citrix-orka/scripts ls -la
Scripts execute in alphabetical order. An example script structure would be:
scripts/ 01_install_dotnet.sh .NET Runtime (required for VDA) 02_install_citrix_vda.sh 03_install_office.sh 04_install_slack.sh 05_configure_system.sh 06_cleanup.sh
Example script (03: install_office.sh):
#!/bin/bashset -eecho "Installing Microsoft Office..."curl -L -o /tmp/MicrosoftOffice.pkg "https://download.example.com/office.pkg"
sudo installer -pkg /tmp/MicrosoftOffice.pkg -target /
if [ -d "/Applications/Microsoft Word.app" ]; then echo "Office installed successfully" else echo "Office installation failed" exit 1 fi
rm /tmp/MicrosoftOffice.pkg echo "Office installation complete"
Important notes:
-
Scripts run as
adminuser with sudo privileges - Test scripts individually before image creation
-
Include error handling (
set -e, exit codes) - Clean up temporary files
create_image playbook:
-
The playbook deploys a temporary VM named
image-builder-[timestamp] - VM boots (2-3 minutes)
- Scripts are copied to the VM via SSH
- Scripts execute sequentially
- VM shuts down cleanly
-
The image is committed (in this example,
sonoma-finance:v2.0) -
Image is pushed to
registry.example.com/citrix-vda/sonoma-finance:v2.0 - Temporary VM is deleted
ansible-playbook -i dev/inventory deploy.yml \ -e "vm_group=test-image-v2 \ desired_vms=1 \ vm_image=registry.example.com/citrix-vda/sonoma-finance:v2.0"
You will want to verify that the VM has deployed successfully, the VDA registers with Citrix Cloud, applications launch correctly, there are no errors in the VDA logs, and test users can launch sessions and access applications. If issues are found, you can fix any script errors in the /scripts directory, delete the failed image from your container registry, and re-run create_image.yml with the corrected scripts.
Once the image has been validated, you can tag it as :latest for production use. To do so, you can re-run create_image.yml or if you have registry access, you can do so via your container registry’s CLI (e.g., Docker):
docker pull registry.example.com/citrix-vda/sonoma-finance:v2.0 docker tag registry.example.com/citrix-vda/sonoma-finance:v2.0 \ registry.example.com/citrix-vda/sonoma-finance:latest docker push registry.example.com/citrix-vda/sonoma-finance:latest
You can also update dev/group_vars/all/main.yml: vm_image: registry.example.com/citrix-vda/sonoma-finance:v2.0
Updating Existing Images
Patch an existing golden image:- Pull the current production image
- Create a new image version with patches applied
- Test the image thoroughly
-
Update the
vm_imagedefault to new version - Recreate VMs from the new image (for persistent desktops)
-
Update the
vm_imagedefault image - New sessions will automatically use the updated image
- Existing VMs are recreated upon the next user logout
- Schedule a maintenance window
- Delete old VMs
- Deploy a VM from the newly created image
- Restore user data from backups (if applicable)
Caching Images Across Hosts
Why cache:- Faster VM deployment (no download wait)
- Reduces network bandwidth during deployments
- Ensures consistency across hosts
Cache images on all hosts:
ansible-playbook -i dev/inventory pull_image.yml \ -e "remote_image_name=registry.example.com/citrix-vda/sonoma-finance:v2.0"
Verify cached image:
ansible hosts -i dev/inventory -m shell -a "orka-engine image list | grep sonoma-finance"
Cache multiple images:
ansible-playbook -i dev/inventory pull_image.yml \ -e "remote_image_name=registry.example.com/citrix-vda/sonoma-finance:latest"
ansible-playbook -i dev/inventory pull_image.yml \ -e "remote_image_name=registry.example.com/citrix-vda/sonoma-engineering:latest"
Remove old image versions to free space:
ansible hosts -i dev/inventory -m shell -a "df -h /var/orka"ansible hosts -i dev/inventory -m shell \ -a "orka-engine image rm sonoma-finance:v1.0"
Best practice: Maintain 2-3 recent versions cached, and delete older versions quarterly.
Version control and rollback
Version numbering scheme:
Use semantic versioning:MAJOR.MINOR.PATCH
-
v1.0.0- Initial release -
v1.1.0- Added new application -
v1.1.1- Security patch -
v2.0.0- Major update (macOS version upgrade)
vim dev/group_vars/all/main.ymlvm_image: registry.example.com/citrix-vda/sonoma-finance:v1.2.1(e.g. rollback to v1.2.1)
Then, you will want to recreate the affected VMs by deleting the VMs using the problematic image, and redeploying from the rollback image:
ansible-playbook -i dev/inventory delete.yml \ -e "vm_group=citrix-vda-finance \ delete_count=10"ansible-playbook -i dev/inventory deploy.yml \ -e "vm_group=citrix-vda-finance \ desired_vms=10 \ vm_image=registry.example.com/citrix-vda/sonoma-finance:v1.2.1"
You will want to communicate this change to users: “We’ve rolled back to the previous desktop image version due to [the previously identified issue]. Your desktop will be refreshed automatically.” Rollback time is estimated to take between 30-60 minutes for 20-30 VMs.
User assignment and policies
This involves managing which users can access specific desktops, and what they can do within active sessions.Working with Citrix Delivery Groups
Delivery Groups link Machine Catalogs (VMs) to your users. To view existing Delivery Groups: Navigate to Citrix Cloud Console → Web Studio → Delivery Groups. You should then see a list of configured Delivery Groups. For example:Finance-macOS-VDI - 50 VMs, pooled, 150 users
Create a new Delivery Group
In a scenario where a team may need new MacOS desktops within your MacStadium VDI instance, you can run an Ansible deployment playbook similar to the following example:ansible-playbook -i dev/inventory deploy.yml \-e "vm_group=citrix-vda-marketing \desired_vms=15 \vm_image=registry.example.com/citrix-vda/sonoma-standard:latest"
After running the playbook, proceed through the following steps:
- Navigate to Citrix Cloud Console → Delivery Groups → Create New Delivery Group
- Select machines by choosing the Machine Catalog containing the new VMs created in the previous step(s)
- Add users by clicking “Add”, searching for the specified team, and selecting the correct AD/Azure AD group. Alternatively, you can add users individually.
- To configure desktops, give them a display name (e.g. “MacOS Marketing Desktop”) and add a description for the VM.
- Choose ‘Add Desktop’ as the Delivery Type
Modify existing Delivery Groups
Add a user to an existing group:- Delivery Groups → Select group → Edit
- Users tab → Add → Search for the selected user → Assign
- Delivery Groups → Select group → Edit
- Users tab → Select user → Remove
Assignment types:
Static (dedicated):
- Each user is assigned permanently to a specific VM
- The VM retains the user’s settings, files (if they are stored locally)
- Best used for: Developers, power users
Pooled (random):
- User gets the next available VM
- The VM resets to golden image after logout
- Best used for: Individual task workers and call centers
Change assignment type:
Typically, you cannot change an existing Delivery Group’s assignment type. Instead, you can do the following:- Create new a Delivery Group with the desired assignment type
- Migrate your users to the new group
- Delete the old Delivery Group
Access Control and Entitlements
These settings control which users can access desktops and from where.User entitlements:
In Citrix,entitlements are what grant users permission to access specific resources.
Grant access:
- Assign the user to a Delivery Group (as shown above)
- The user sees the assigned desktop in Citrix Workspace immediately
Revoke access:
- Remove the user from a Delivery Group
- The desktop disappears from the user’s Workspace within 5 minutes
Conditional access:
Require specific conditions for desktop access:- Citrix Cloud Console → Web Studio → Policies
- Create a new policy, or edit an existing policy
-
Configure conditions:
- Device type: macOS, iOS, web only
- Network location: Internal network only, or allow external network
- Device compliance: Require managed device (if using MDM) Example policy: “The finance team can only access desktops from inside the corporate network or via a VPN”
Multi-factor authentication (MFA):
This is enforced at the identity provider level (Azure AD, Okta), not in Citrix directly. Configure MFA from within your IdP:- Require MFA for Citrix Workspace access
- Users will be prompted for a second factor during login
Session Policies and Preferences
These control user session behavior.Session timeout:
- Navigate to Citrix Cloud Console → Web Studio → Policies
- Edit the policy for the necessary Delivery Group
-
Configure session settings:
- Session idle timeout: Disconnect after X hours idle (default: 24 hours)
- Disconnected session timeout: Log off user(s) after X hours disconnected (default: never) Recommended settings:
- Pooled desktops: 8 hours idle, 30 minutes disconnected (aggressive cleanup)
- Dedicated desktops: 24 hours idle, never disconnect (preserve work)
Reconnection:
This allows users to reconnect to disconnected sessions:- Policy → Session → Connection → Enable “Session reconnection”
- When users close Workspace without logging out, their session is preserved
- When users reopen their Workspace, they can reconnect to same session
Feature policies (HDX settings):
These control what users can do within sessions. Common policies:Clipboard:
- Bidirectional: Copy/paste both ways (client ↔ VM)
- Client to VM only: Users can paste into the VM, but not copy out
- Disabled: No clipboard access
- Policies → HDX Settings → Clipboard redirection
- Select: Allowed / Prohibited / Client to VM only
File transfer:
- Allow: Users can drag files between client and VM
- Prohibit: No file transfers are allowed
- Policies → HDX Settings → Client drive redirection
- Select: Allowed / Prohibited
USB redirection:
- Allow specific devices: Keyboards, mice, smart cards
- Prohibit all: Block USB entirely
- Policies → HDX Settings → USB device redirection
- Select device classes allowed
Printing:
- Client printer mapping: The user’s local printers appear in the VM
- Disable: No printing
- Policies → Printing → Client printer redirection
- Select: Allowed / Prohibited
Example policy set (Finance team - secure):
- Clipboard: Client to VM only (prevent data exfiltration)
- File transfer: Prohibited
- USB: Prohibited
- Printing: Allowed
- Session timeout: 8 hours idle
Example policy set (Engineering team - open):
- Clipboard: Bidirectional
- File transfer: Allowed
- USB: Allowed (specific devices)
- Printing: Allowed
- Session timeout: 24 hours idle
Apply policies to a specific Delivery Group:
- Create a policy with the desired settings configured
- In Citrix Cloud Console, navigate to Policies → Filter → Set filter to Delivery Group name
- The chosen policy applies to all users in that group
Lifecycle operations
These consist of day-to-day VM management operations. You will likely need to Start, Stop, and Delete VMs on a regular basis as needed to troubleshoot VM issues, apply configuration changes requiring a restart, and to help conserve resources during off-peak hours.Start a VM: ansible-playbook -i dev/inventory vm.yml -e "vm_name=webapp-abc123" -e "desired_state=running"
Stop a VM: ansible-playbook -i dev/inventory vm.yml -e "vm_name=webapp-abc123" -e "desired_state=stopped"
After a VM has been stopped, it shuts down gracefully (clean shutdown). The VDA then unregisters from Citrix (the desktop becomes “Unavailable”), and resources are freed on the Orka host. Users cannot access the desktop until the VM has been restarted.
Delete a single VM: ansible-playbook -i dev/inventory vm.yml -e "vm_name=webapp-abc123" -e "desired_state=absent"
You may also need to recreate a VM from a template in order to refresh pooled desktops to a golden image (remove user changes), fix corrupted VMs, or apply an updated golden image to an existing VM. To delete and re-deploy a VM, refer to the following example Ansible playbook:
ansible-playbook -i dev/inventory vm.yml \ -e "vm_name=citrix-vda-finance-abc123 \ desired_state=absent"
ansible-playbook -i dev/inventory deploy.yml \ -e "vm_group=citrix-vda-finance \ desired_vms=10 \ vm_image=registry.example.com/citrix-vda/sonoma-finance:v2.0"
To recreate VMs in a batch, refer to the following example:
ansible-playbook -i dev/inventory delete.yml \ -e "vm_group=citrix-vda-finance \ delete_count=10"
ansible-playbook -i dev/inventory deploy.yml \ -e "vm_group=citrix-vda-finance \ desired_vms=10 \ vm_image=registry.example.com/citrix-vda/sonoma-finance:v2.0"
To recreate an estimated 10 VMs, this playbook will take 30-60 minutes to run. User impact will vary depending on if VMs are pooled or dedicated. If a VM is pooled, user impact should be minimal if recreation is done during off-hours. If a VM is assigned to a dedicated user, that user will lose their local data unless it is backed up upon VM recreation. It is considered a best practice to schedule VM reconfiguration during specific maintenance windows, and to notify users in advance.
When considering the VM deprovisioning and cleanup process, you will want to remove desktop access when a users leaves your organization, or a VM is no longer needed.
To remove users from a Citrix Delivery Group:
- Navigate to Citrix Cloud Console → Delivery Groups → Select group
- Edit → Users tab → Remove user
ansible-playbook -i dev/inventory list.yml -e "vm_group=citrix-vda-finance"
ansible-playbook -i dev/inventory vm.yml \ -e "vm_name=citrix-vda-finance-abc123 \ desired_state=absent"
If the user’s desktop had local data on it, you will want to SSH into the VM before deletion, copy the user’s home directory, and delete the VM after the backup has been confirmed.
To delete an entire VM group and bulk-deprovision the VMs, run the following Ansible playbook:
ansible-playbook -i dev/inventory delete.yml \ -e "vm_group=citrix-vda-marketing \ delete_count=15"
VM cleanup task checklist:
- Remove User from the Citrix Delivery Group
- Delete the VM from Orka
- Archive User data (if necessary)
- Update capacity tracking spreadsheet/software
- Confirm that the VM has been removed from the Machine Catalog in Citrix
Monitoring and Troubleshooting
Key metrics to watch:
Check daily:
-
VM registration status. Check this by navigating to Citrix Cloud Console → Monitor → Machine Catalogs. You will want to look for:
- Unregistered Machines: Should be 0
- Power state “Off”: Investigate why VMs are powered off
- Faults: Any VM faults which require attention
-
Session launch success rate. Check this by navigating to Citrix Cloud Console → Monitor → User Activity.
- Target: >95% success rate.
- If Users Activity is <95%: Review failed connection attempts, identify any patterns to help determine the cause (specific users, times issues occur, VMs impacted)
-
Host capacity. This can be checked by running:
ansible-playbook -i dev/inventory list.ymland verifying:- Host capacity: Check and confirm there are no hosts at 2/2 VM capacity.
- Confirm disk space is >85%
- If yes, plan for disk expansion or cleanup.
Check weekly:
-
Performance trends. You can review these by navigating to Citrix Cloud Console → Monitor → Trends. Review the following:
- Average session launch time (target: <30 seconds)
- Session quality (should be “Good” or “Excellent”)
- Peak concurrent users (plan capacity for 20% growth)
-
Host health can be verified by confirming available disk space using:
ansible hosts -i dev/inventory -m shell -a “df -h /var/orka”- Check for any errors in the Orka logs:
ansible hosts -i dev/inventory -m shell \ -a “sudo grep -i error /var/log/orka-engine.log | tail -20”
- Check for any errors in the Orka logs:
-
Image currency
- Are VMs running the latest golden image version?
- Are there any security patches pending?
- If yes, schedule any updates that are needed and communicate any downtime to Users.
Check monthly:
-
Capacity planning
- Confirm your current VM count vs. your total VM capacity
- Calculate anticipated user growth trends
- Use these calculations to help determine your projected need for additional hosts
-
User feedback
- Are there any session quality complaints? If so, what are they, and are there any trends to surface? Track these in an internal spreadsheet or other tool for additional sentiment analysis.
- Application performance issues
- Feature requests or service improvements
-
Security review
- Verify if enrollment tokens been rotated in the last 90 days
- Confirm SSH keys are up-to-date
- Review audit logs
-
Alert thresholds
- Set up relevant monitoring alerts via email/Slack/Teams/etc.
-
Confirm which alerts require immediate response (Critical)
- VDA registration drops below 80% of expected targets
- All VMs in a Delivery Group are unavailable
- Host disk space >90%
-
Confirm which alerts require a response within 4 hours:
-
10% of sessions launched fail over 15 minutes
- Host CPU sustained usage >80% for 30 minutes
- Available disk space >75%
-
- If session launch time exceeds baseline by 50%, or a new “Unregistered” VM appears, review this information daily.
Common issues and resolutions
VM deployed, but is not registered in Citrix:
Symptoms:-
The VM appears in the
list.ymloutput - The Citrix Machine Catalog shows no new VM
- Desktop is not available in Workspace
- Check the VDA service is running:
ansible mac_vms -i dev/inventory -m shell \ -a "sudo launchctl list | grep citrix" --limit 10.0.100.10
-
Check enrollment token:
- Citrix Cloud → Machine Catalogs → Enrollment Token
- Verify that the token is not expired
- If the token is expired: Generate a new enrollment token, update Ansible Vault, and redeploy the VM
- Check the Citrix VDA logs:
ansible mac_vms -i dev/inventory -m shell \ -a "sudo tail -100 /Library/Application\ Support/Citrix/VDA/Logs/vda.log" \ --limit 10.0.100.10
Look for any registration errors, and follow up on any that appear.
- Test network connectivity:
ansible mac_vms -i dev/inventory -m shell \ -a "curl -I https://[customer_ID].xendesktop.net" --limit 10.0.100.10
This should return HTTP 200
If this problem persists, review Guide C: Troubleshooting Quick Reference
Issue: Session launch timeout
Symptoms:- User clicks on the desktop in their Citrix Workspace
- A connection progress bar appears
- The session eventually times out with a “Cannot connect” error
- Verify the VM is powered on:
ansible-playbook -i dev/inventory list.yml
- Confirm the Citrix Machine Catalog shows that the VM is both “Registered” and “Available”
- Test Rendezvous connectivity:
ansible mac_vms -i dev/inventory -m shell \ -a "curl -I https://*.nssvc.net" --limit 10.0.100.10
- Verify that the firewall allows HDX ports (1494, 2598)
- Try a different client device to isolate if the problem is a client-side vs. server-side issue
Issue: Disk space full on Orka host
Symptoms:- VM deployment fails with “insufficient space” error
- Host disk usage >90%
- Check disk usage:
ansible hosts -i dev/inventory -m shell -a "df -h /var/orka"
- List images on the Orka host:
ansible hosts -i dev/inventory -m shell -a "orka-engine image list" --limit 10.0.100.10
- Remove old image versions:
ansible hosts -i dev/inventory -m shell \ -a "orka-engine image rm sonoma-finance:v1.0" --limit 10.0.100.10
- If inventory is still low: Move VMs to other hosts, expand storage, or add new host(s)
Log Locations
Orka Engine logs:
-
Location:
/var/log/orka-engine.log -
View:
sudo tail -100 /var/log/orka-engine.log - Contains: VM lifecycle events, image operations, errors
Citrix VDA logs:
-
Location:
/Library/Application Support/Citrix/VDA/Logs/ -
Key files:
-
vda.log- Main VDA service log -
registration.log- Registration events -
broker.log- Communication with Citrix Cloud
-
-
View:
sudo tail -100 /Library/Application\ Support/Citrix/VDA/Logs/vda.log
System logs:
-
Location:
/var/log/system.log -
View:
sudo tail -100 /var/log/system.log - Contains: macOS system events, service crashes
Ansible logs:
- Location: Playbook output (stdout)
-
Verbose mode: Add
-vvvto playbook command -
Example:
ansible-playbook -i dev/inventory deploy.yml -vvv
Centralized logging (if configured):
- Check your logging infrastructure (Splunk, ELK, CloudWatch)
- Search by hostname, VM name, or error keywords
When to Escalate to MacStadium Support
Escalate when:- The Orka Engine service crashes repeatedly
- If you are unable to deploy VMs after following the documented troubleshooting steps
- You suspect hardware failure (host unresponsive)
- Image operations fail consistently
- You need guidance on capacity planning or architecture changes
- The problem description and its symptoms/potential root causes. If you have noticed any trends or patterns when the issue occurs, provide this information as well.
- The steps you have already taken to troubleshoot the issue
- Relevant log excerpts (Orka Engine, VDA)
- Output of any diagnostic commands you have run
- Timeline of the issue (when it started, issue frequency)
- Support Portal: support@macstadium.com
- Include: Account ID, affected host IPs, error messages
- Attach: Log files, screenshots if helpful
- Severity 1 (production down): 1 hour
- Severity 2 (degraded service): 4 hours
- Severity 3 (question/guidance): 24 hours
Security and Compliance
Network Isolation Best Practices
VLAN segmentation:
Your deployment should use separate VLANs:- Management VLAN: Orka API, Ansible control node (restricted access)
- VM VLAN: Citrix VDA VMs (isolated from management)
- User VLAN: End-user access (if applicable)
ansible mac_vms -i dev/inventory -m shell -a "ifconfig en0 | grep inet". VMs should be on a VM VLAN subnet, not a management VLAN.
Firewall rules:
Orka hosts should allow:- Inbound: SSH (port 22) from the Ansible control node only
- Inbound: Orka API (port 80/443) from the Ansible control node only
- Outbound: Container registry (port 443)
- Outbound: Internet access for macOS updates (port 80/443)
VMs should allow:
- Inbound: HDX (ports 1494, 2598) from the Citrix Gateway Service
-
Outbound: Citrix Cloud (port 443 to
*.xendesktop.net,*.nssvc.net) - Outbound: Internet access for application updates
Block unnecessary traffic:
- VM-to-VM traffic (unless required by applications)
- VM-to-management-VLAN traffic
- Direct VM-to-Internet (route connections through a company proxy if required by policy)
SSH key management
Key rotation schedule:
Rotate SSH keys annually, and/or after personnel changes.Generate a new SSH key:
ssh-keygen -t ed25519 -C "ansible-orka-2026" -f ~/.ssh/ansible_orka_key_2026
Deploy the new SSH key to your host(s):
ssh-copy-id -i ~/.ssh/ansible_orka_key_2026.pub admin@10.0.100.10ssh-copy-id -i ~/.ssh/ansible_orka_key_2026.pub admin@10.0.100.11ssh-copy-id -i ~/.ssh/ansible_orka_key_2026.pub admin@10.0.100.12
Remove old SSH key(s) from a host:
ansible hosts -i dev/inventory -m shell \ -a "sed -i '' '/ansible-orka-2025/d' ~/.ssh/authorized_keys"
SSH key storage
- Store private keys securely
- Never commit private keys to Git
- Limit access to keys (only authorized admins)
If a key is compromised
- Generate a new key immediately
- Deploy the new SSH key to all hosts
- Remove the compromised key from all hosts
- Review access logs for unauthorized use
- Document the incident for additional review
Audit logging
You will want to enable audit logging for security compliance.Citrix:
- Configuration Logging: Tracks changes to Machine Catalogs, Delivery Groups, policies
- Access: Citrix Cloud Console → Configuration → Logging
- Retention period: 90 days (configurable)
Orka:
- Orka Engine logs all VM operations
-
Location:
/var/log/orka-engine.log - Retention period: Configure log rotation (default: 30 days)
Ansible:
- Playbook execution logs
-
Capture stdout:
ansible-playbook ... | tee -a /var/log/ansible-playbook.log - Include timestamp(s), operator name, and the command(s) executed
What to log
- VM provisioning and deprovisioning
- User access grants and revocations
- Policy changes
- Image updates
- Configuration changes
Log review
- Weekly: Review logs for any anomalies
- Monthly: Summarize log activity for management
- Quarterly: Audit logs for compliance
Data Sovereignty Considerations
Where data resides:VM data:
-
Stored on the Orka host local disk (
/var/orka) - A physical location: Your data center (on-premises) or MacStadium data center (hosted)
Images:
- Stored in an OCI registry
- A physical location: Your data center (on-premises) or MacStadium data center (hosted)
User data:
- Within the VM (ephemeral for pooled access, persistent for dedicated access)
- Backup location: Your backup infrastructure
Citrix metadata:
- Stored in Citrix Cloud (US or EU region, depending on account)
- Contains: User assignments, policies, and session logs (no VM content)
Compliance considerations
GDPR (European users):
- Ensure Citrix Cloud region is EU
- Document data flows
- Implement data retention policies (delete VMs when a user leaves the organization)
HIPAA (U.S.-based healthcare policy):
- Encrypt data at rest (FileVault on VMs)
- Encrypt data in transit (HDX uses TLS)
- Implement audit logging
- Sign BAA with Citrix
Data residency requirements:
- Deploy Orka hosts in the required geographic region
- Use a container registry located in the same region
- Verify Citrix Cloud region compliance
Best practices
Image Hygiene and Update Cadence
Monthly:
- Apply macOS security updates to golden images
- Update applications (Office, browsers, etc.)
- Test the updated image thoroughly
- Deploy the image to production
Quarterly:
- Review installed applications (remove any unused applications)
- Update the Citrix VDA to the latest version
- Audit image sizes (optimize if these are >50GB)
- Document any changes made in your CHANGELOG.MD file and push these updates to Git.
Annually:
- Upgrade macOS major version (e.g., Sonoma → Sequoia)
- Review all configuration scripts
- Rebuild images from scratch (vs. doing incremental updates)
Image testing checklist:
- VM deploys successfully
- The VDA registers with Citrix
- All applications launch as expected
- No errors appear in the VDA logs
- Test that user(s) can access the desktop
- Confirm session performance is acceptable
Capacity planning
Current capacity formula:
Total Capacity = (Number of Hosts) × (max_vms_per_host) = (3 hosts) × (2 VMs/host) = 6 VMsEstimate concurrent users:
Current users: 50 - Expected growth: +20 per quarter - Concurrent usage rate: 60% (30 users at peak)Calculate your VM needs:
Required VMs = (Total Users) × (Concurrent Rate) × (Buffer) = (50) × (0.6) × (1.2 buffer) = 36 VMsDetermine your host requirement(s):
Hosts Needed = (Required VMs) / (max_vms_per_host) = 36 / 2 = 18 hostsChange management procedures
Procurement timeline:- Order hosts 60 days before capacity constraint
- Allow 14 days for delivery (if hosted with MacStadium)
- Allow one week for deployment and testing
- VM utilization >75%: Start planning for host expansion
- VM utilization >90%: Expedite new hosts
Backup and Disaster Recovery
What to back up: Golden images:- Store these in an OCI registry (off-site)
- Maintain at least three recent versions
- Test the golden image VM restoration process quarterly
User data (persistent desktops only):
- Do daily backups via Time Machine or an enterprise backup tool
- 30-day retention of user data
- Test data restoration process and procedures monthly
Configuration:
- Ansible playbooks and inventory: Store these in a Git repository
- Citrix configuration: Export this monthly via PowerShell
- Documentation: Store this in a company wiki such as Confluence, in Git, or on a shared drive
Disaster recovery scenarios:
Scenario 1: Single host failure
- Impact: 2 VMs unavailable
- RTO: 4 hours
-
Procedure:
- Provision a replacement Mac
- Install Orka Engine on the machine
- Add the machine to your existing Ansible inventory
- Pull golden images
- Deploy VMs to new host from the golden image
Scenario 2: Complete site failure
- Impact: All VMs are unavailable
- RTO: 8-12 hours
-
Procedure:
- Provision Macs at an alternate site (or host these directly with MacStadium)
- Restore your last known good Ansible configuration from Git
- Pull images from your OCI registry
- Deploy new VMs
- Verify VDA registration in Citrix
Disaster recovery (DR) testing:
- Annually: Conduct a full DR exercise
- Quarterly: Conduct a partial failover test
- Document lessons learned
Change Management Procedures
Before any production change:- Document the change:
- What: Description of the suggested change
- Why: Business justification for making the change
- Impact: Affected systems, users, and any anticipated downtime
- Rollback plan: Steps necessary to revert the change if any issues occur
- Test in a non-production environment:
- Deploy to a test VM group
- Validate functionality
- Measure performance impact
- Schedule a change maintenance window:
- Communicate the change to users 1 week in advance
- Choose a low-usage time (evenings, weekends)
- Change duration: 2× expected time (buffer for issues)
- Execute the change:
- Follow the documented change procedure
- Monitor for any issues
- Validate success criteria has been met
- Communicate change completion
- Post-change review process:
- Document the actual vs. planned change(s)
- Capture any lessons learned during the change process
- Update change procedure(s) if needed
Example change: Update golden image from v1.2 to v2.0
Change request:
- Change: Update finance golden image to v2.0 (adds Microsoft Teams)
- Impact: 50 finance VMs, 200 users
- Downtime: 2 hours (pooled desktops, off-hours)
-
Rollback: Revert
vm_imageto v1.2, redeploy VMs
Test plan:
- Deploy 2 test VMs from v2.0 image
- Validate Microsoft Teams launches correctly
- Test user session quality is acceptable
Change execution plan:
-
Update
vm_imagein group vars to v2.0 -
Delete any existing VMs:
delete.yml(30 min) -
Deploy the new VMs:
deploy.yml(60 min) - Verify VDA registration in Citrix (15 min)
- Test user sessions (15 min)
Change rollback plan (if adverse issues occur):
-
Update the
vm_imageback to v1.2 - Delete v2.0 VMs
- Redeploy VMs from v1.2
Change communication:
- 1 week before scheduled change: “Scheduled maintenance Sunday 2 AM-4 AM, desktops will be unavailable”
- Day of change: “Maintenance is currently in progress, desktops will be available by 4 AM”
- After change is complete: “Maintenance is now complete, Microsoft Teams is now available on finance desktops.”
Resources and support
Documentation:
MacStadium
- Orka Documentation and Support: support@macstadium.com
- Bare Metal Mac Options: Cloud-hosted Bare Metal Macs | MacStadium
Citrix
- VDA for macOS Documentation: Citrix Virtual Delivery Agent for macOS
- System Requirements: System Requirements | Citrix Virtual Delivery Agent for macOS
- Citrix Cloud Console: https://citrix.cloud.com
- Citrix Support: Citrix Support
Ansible:
- Ansible Documentation: Ansible Community | Ansible documentation
- Ansible Vault Guide: https://docs.ansible.com/ansible/latest/user_guide/vault.html
Support Contact Information
MacStadium Support:
- Portal: support@macstadium.com
- Email: support@macstadium.com
- Phone: Available in support portal
- Hours: 24/7 for Severity 1, business hours for others
- SLA: 1 hour (Sev 1), 4 hours (Sev 2), 24 hours (Sev 3)
- Your Account ID
- Affected host IPs or VM names
- Problem description and timeline
- The troubleshooting steps you have already taken
- Log excerpts (Orka Engine, VDA)
Citrix Support:
- Portal: Citrix Support
- Access via Citrix Cloud Console → Support
- Include: Your Customer ID, Machine Catalog name, applicable error messages
Citrix community forums:
- Citrix Discussions: https://discussions.citrix.com
- Citrix Community: Citrix Community