

How does Orka On-Prem work?
The diagram below illustrates the architecture of an Orka Cluster On-Prem, detailing how it integrates with Kubernetes 1.35, Mac compute hosts, and OCI Registries for image storage.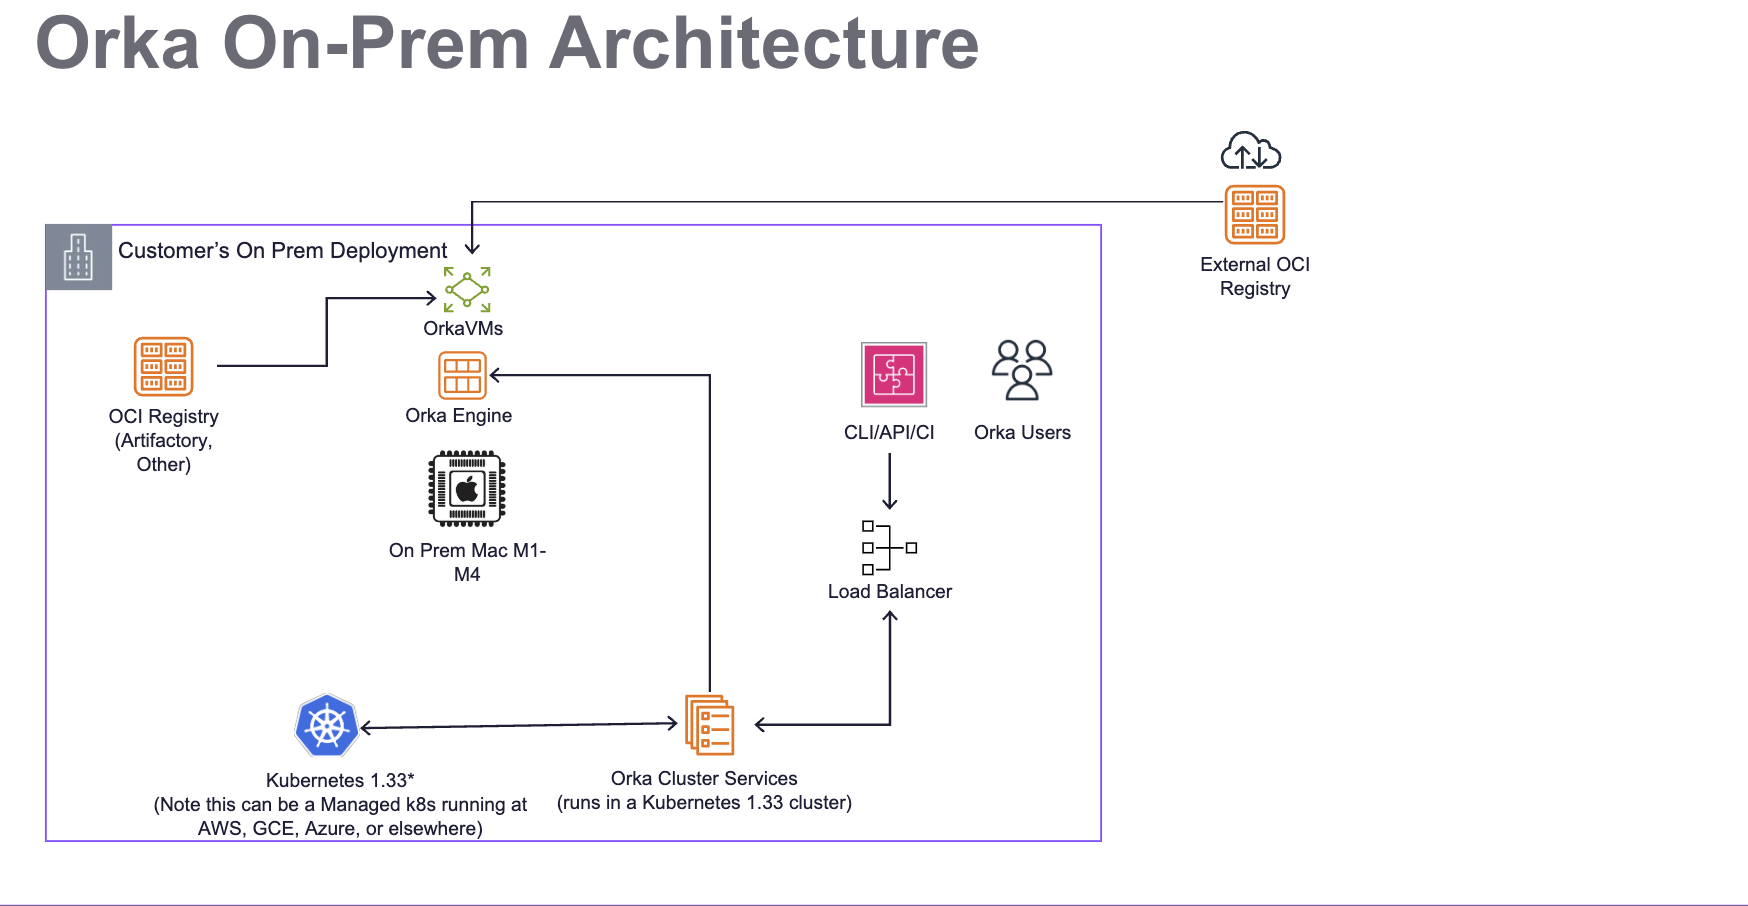
- A private network configuration for Orka.
- A dedicated Kubernetes 1.35 cluster, which runs Orka Cluster Services for orchestration and automation.
- Mac Nodes to be used for compute, usually on-prem.
- An OCI Registry such as Artifactory, GitHub Container Registry, Docker Registry, AWS ECR, or others.
- A load balancer for Orka Users to interact with the Orka Services on Kubernetes via CLI, API, or CI tools.
Networking considerations
The Orka VMs use the 192.168.64.0/24 network. This is a virtual network on each of the hosts and it is not directly accessible. You might experience issues if your Orka VMs need to access services that are in a network that overlaps with their virtual network. For the Apple silicon nodes, the following ports should be open to all networks that need access to the VMs: TCP 5900-6200 (Screenshare), TCP 5999-6299 (VNC), and TCP 8822-9122 (SSH). In general, we recommend allowing outbound requests uniformly for forward compatibility.NOTE: SSH/Screen Share/VNC ports are globally tracked and allocated. The ranges given above are applicable to each Apple silicon node.
Install Steps
Kubernetes requirements and initial steps
Orka requires a dedicated Kubernetes 1.35 cluster to run.- Orka requires a dedicated cluster because it limits certain cluster operations (such as what namespaces can be created and what pods can be deployed), and user management is generally more restrictive.
Setting up OIDC for authentication
Orka uses OIDC for user authentication. Make sure to configure the MacStadium OIDC provider in your Kubernetes cluster. This can be done by setting the following values for your Kubernetes API Server:Obtaining an Orka license key
Your license key is included in your order confirmation from MacStadium. If you don’t have it, retrieve it from the customer portal or contact support@macstadium.com. For portal access and credential details, see Managing your Orka license. Add your license key tocluster.yml under orka_engine_license_key before running the installer (see below).
Installing the Orka cluster services
MacStadium provides the Orka Cluster Services installer as a public container image on GitHub Container Registry (GHCR). You will need an environment with outbound internet access to pull the Ansible image, connectivity to the Kubernetes API, and cluster admin access.- Ensure the Ansible runner is set up correctly:
- The Ansible runner must have connectivity to the cluster API.
- The Ansible runner must have Cluster Admin privileges to set up the cluster (i.e. a kube config with admin privileges)
-
On the host create a file called
cluster.yml. This file will contain Ansible variables needed for the Orka setup. Add the following content:
- Run the Ansible container:
<kube_config_location> is the path to your kubeconfig (typically ~/.kube/config), cluster.yml is the file created in the previous step, and <version_tag> is the Orka version you are installing (e.g. 3.6.0).
- Make sure you are in the
/ansibledirectory - You can now run the Ansible playbook:
Exposing the Orka API service
To use the CLI, you need access to the Orka API service, which is also utilized by some integrations (e.g., Jenkins).orka3 vm push requires an Orka API token. Run orka3 login or orka3 user set-token before pushing images.vm push. If you encounter an Unauthorized error from vm push, this indicates a missing Orka API token, not an OCI registry issue.
Currently, the service is exposed as ClusterIP service called orka-apiserver in the default namespace.
One way to expose the service is to use something like MetalLB to expose the service as LoadBalancer so it can be reached from outside the cluster.
Cluster admin access
By default, Orka’s validator webhooks restrict certain operations (including deleting another user’s VM) to cluster admins only. On AWS and on-prem deployments, cluster admin status must be explicitly configured. This differs from MacStadium-hosted clusters, where kubeadm automatically establishes thekubeadm:cluster-admins group.
The default admin group for AWS and on-prem is orka:cluster-admins. To use a different group, set the cluster_admin_group Ansible variable before running the installation playbook.
To grant a user cluster admin access, add them to the orka:cluster-admins group (or your configured group) in your identity provider.
Web UI
The Orka Web UI is not actively maintained and is not recommended for production use. If you need to access it, you can expose the web UI service using an ingress controller or load balancer; see Exposing the Orka API service for the approach.Setting up Mac nodes
Prerequisites
All of your Mac nodes need to:- Have a common user created. This user needs admin privileges
- SSH is enabled for this user
- An SSH key is setup for this user, so that SSH connections using SSH keys are allowed
python3
Setup
MacStadium provides another Ansible playbook that allows you to configure your Mac nodes with the software needed to run these nodes as Kubernetes worker nodes. To set up the Mac Nodes:- Ensure the
cluster.ymlfile is present and the values are correct - Create a new file called nodes.yml with the following content:
You don’t normally need to set these. The
orka-ansible package ships with its own default pin for the node tooling version. Set them explicitly only if MacStadium has given you a specific build to deploy, for example a custom build for your environment.- Create an inventory file called
hostswith the following content:
- Run the same Ansible image that was used to configure the Orka services:
<kube_config_location> is the path to your kubeconfig (typically ~/.kube/config), <mac_ssh_key_location> is the SSH key used to connect to the Mac nodes, and <version_tag> is the Orka version (e.g. 3.6.0).
- Ensure you are in the
/ansibledirectory. - Run the configuration playbook:
Upgrading
Upgrades reuse this same container image and the samecluster.yml, nodes.yml, and hosts files, just pointed at a newer version tag. See Upgrading Orka Anywhere for the upgrade-specific steps, including how to pin the Orka Engine and Virtual Kubelet version in nodes.yml.
Setting up backups
Orka backups are exports of the Orka specific resources within the cluster:- Orka Nodes
- Virtualmachine configs
- Service Accounts
- RoleBindings
- Implement the backup logic yourself
- You define the resources that need to be backed up and how often
- You define where the backups are stored
- Use the functionality provided by MacStadium
- MacStadium provides an Ansible playbook that:
- Sets up a cronjob that runs every 30 min by default
- The cronjob exports the resources mentioned above by default
- The job stores the backups in an S3 bucket that you have specified
Using the MacStadium-provided backup
To use the MacStadium provided functionality you need to:- Create an AWS S3 bucket and generate AWS access id and secret access key that provide permissions to write to the bucket
- Run the Ansible image provided by MacStadium and mount a backup.yml file with the following content
- Run the container
- Run the backup playbook inside the
/ansiblefolder
Implementing your own backup
The recommended way to backup Orka resources is via a CronJob, similar to what MacStadium provides out of the box. The resources you need to backup are:- All namespaces with the label orka.macstadium.com/namespace
- OrkaNodes, VirtualMachineConfigs, ServiceAccounts, Rolebindings from these namespaces Note - you need to remove some metadata from these resources. To do that, run the following:
Logging, Monitoring, and Alerting
OpenTelemetry standards
Logging and monitoring conform to OpenTelemetry best practices, meaning that metrics can be scraped from the appropriate resources via Prometheus and visualized with Grafana using Prometheus as a data source. Logs can be exposed on Mac workers by installing apromtail service, allowing them to be aggregated through Loki.