Xcode
Xcode is the Apple IDE, enabling the development of applications for Apple platforms, including iOS and macOS. In order to download Xcode, a valid Apple ID is required, regardless of the method used. There are several ways to install it:Xcodes.app (Recommended)
The Xcodes app is the fastest and easiest way to install Xcode. By leveraging multithreaded downloads, as well as accelerated decompression of Xcode packages, Xcodes is much faster than directly downloading from the Apple Developer Portal or using the App Store, while still using signed official packages from Apple. Additionally, while it does require an Apple ID, it does not sign the Mac into iCloud, which prevents issues with Find My Mac.Installation
Download the latest version of Xcodes from the following link: https://github.com/XcodesOrg/XcodesApp/releases/latest Once downloaded, drag Xcodes.app to the Applications folder to install the app. Alternatively, if Homebrew is installed, then run the following command in Terminal:Usage
Once Xcodes is installed, launch the app from the Applications folder. Xcodes displays all of the available releases of Xcode. In order to download and install a release, authentication with an Apple ID is required. To do this, click the Account icon in the upper right corner of the app: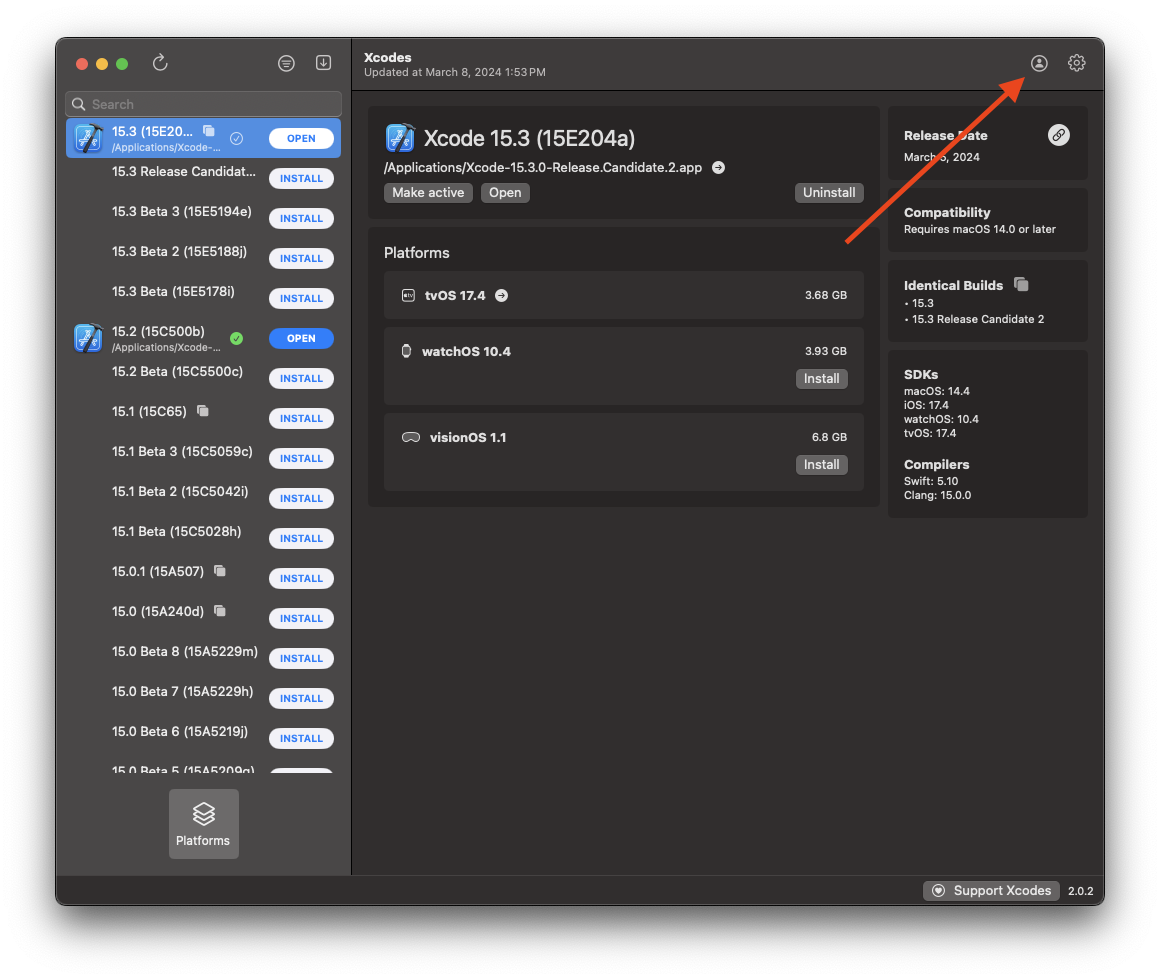
Recommended: Enable experimental unxip
The decompression (unxip) process for Xcode is typically quite lengthy. To help accommodate this, Xcodes has an experimental decompression method that speeds things up. In our testing, this has been shown to be both stable and effective. To enable this, navigate to Xcodes>Settings>Experiments in the menu bar, and then check “When unxipping, use experiment”: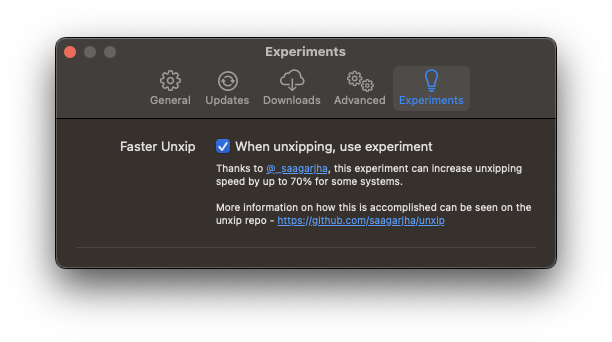
Download from Apple’s Developer Portal (Recommended)
Xcode may also be downloaded directly from Apple using a web browser. While slower than Xcodes, this method may be preferred if there are concerns around third-party software: https://developer.apple.com/download/all/?q=Xcode As with other methods, it is necessary to sign in with an Apple ID to download and install the software. Once downloaded, double-click the xip file to extract Xcode, then copy to the Applications folder to install.Download from the App Store (Not Recommended)
Xcode is officially distributed by Apple via the App Store. To install Xcode this way, visit the following link: https://apps.apple.com/us/app/xcode/id497799835?mt=12 This method is not recommended, as it requires binding the Mac to an Apple ID, which may inadvertently enable iCloud/Find My Mac. Machines with Find My Mac enabled are Activation Locked, and cannot be used by other users until the machine is unlocked by the original account. As a result, machines returned with Find My Mac enabled are subject to recovery fees.Homebrew
Homebrew is a package manager that makes installing packages from the Mac terminal quick and easy. It is generally the preferred method used to install system utilities and libraries.Prerequisites
Homebrew relies upon Xcode Command Line Tools, so Xcode must be installed. To install it via the Command Line Tools by entering the following command into Terminal:Process
Once prerequisites are installed, installing Homebrew can be done with a single line of code in the Terminal.- Open your Terminal App.
- Copy and paste the following command, and then press ENTER.
- Hit the RETURN key when prompted.
- Follow the installation process on screen.
Uninstalling Homebrew
- Open the Terminal App.
- Copy and paste the following command and then press ENTER:
Ansible
Installation Guide Ansible Docs Ansible is a largely free and open source server configuration tool. It must be installed, along with Python, on the control machine, which might be the local desktop. From there, Ansible requires SSH access to the target server — in this case the Mac Cloud. Once Ansible has gained access to the target environment via SSH, it can run provisioning scripts and the like to prepare the environment for whatever work needs to be done — be it CI or anything else.Starter Scripts
MacStadium maintains a handful of example scripts to get started.Ansible Roles
Roles are sets of tasks and files used to configure a host machine to perform a specific role (thus, the name). Ansible Role: macOS CI Ansible Role: XcodeAnsible Playbooks
Playbooks are mappings of Ansible Roles and the various host machines they are meant to configure for a given process. Ansible Playbook: macOS CI SetupPacker
Installation Guide Packer DocsPacker is an open-source tool that stores a live image of a virtual machine, which can be cloned in seconds, rather than minutes or hours. It uses JSON to define the VM template, and because it is command-line-driven, it can easily be integrated into the build pipeline. Packer is not a direct substitute for provisioning solutions. In fact, it is built to interface easily with Chef, Puppet, and Ansible for the provisioning of the base VM image.