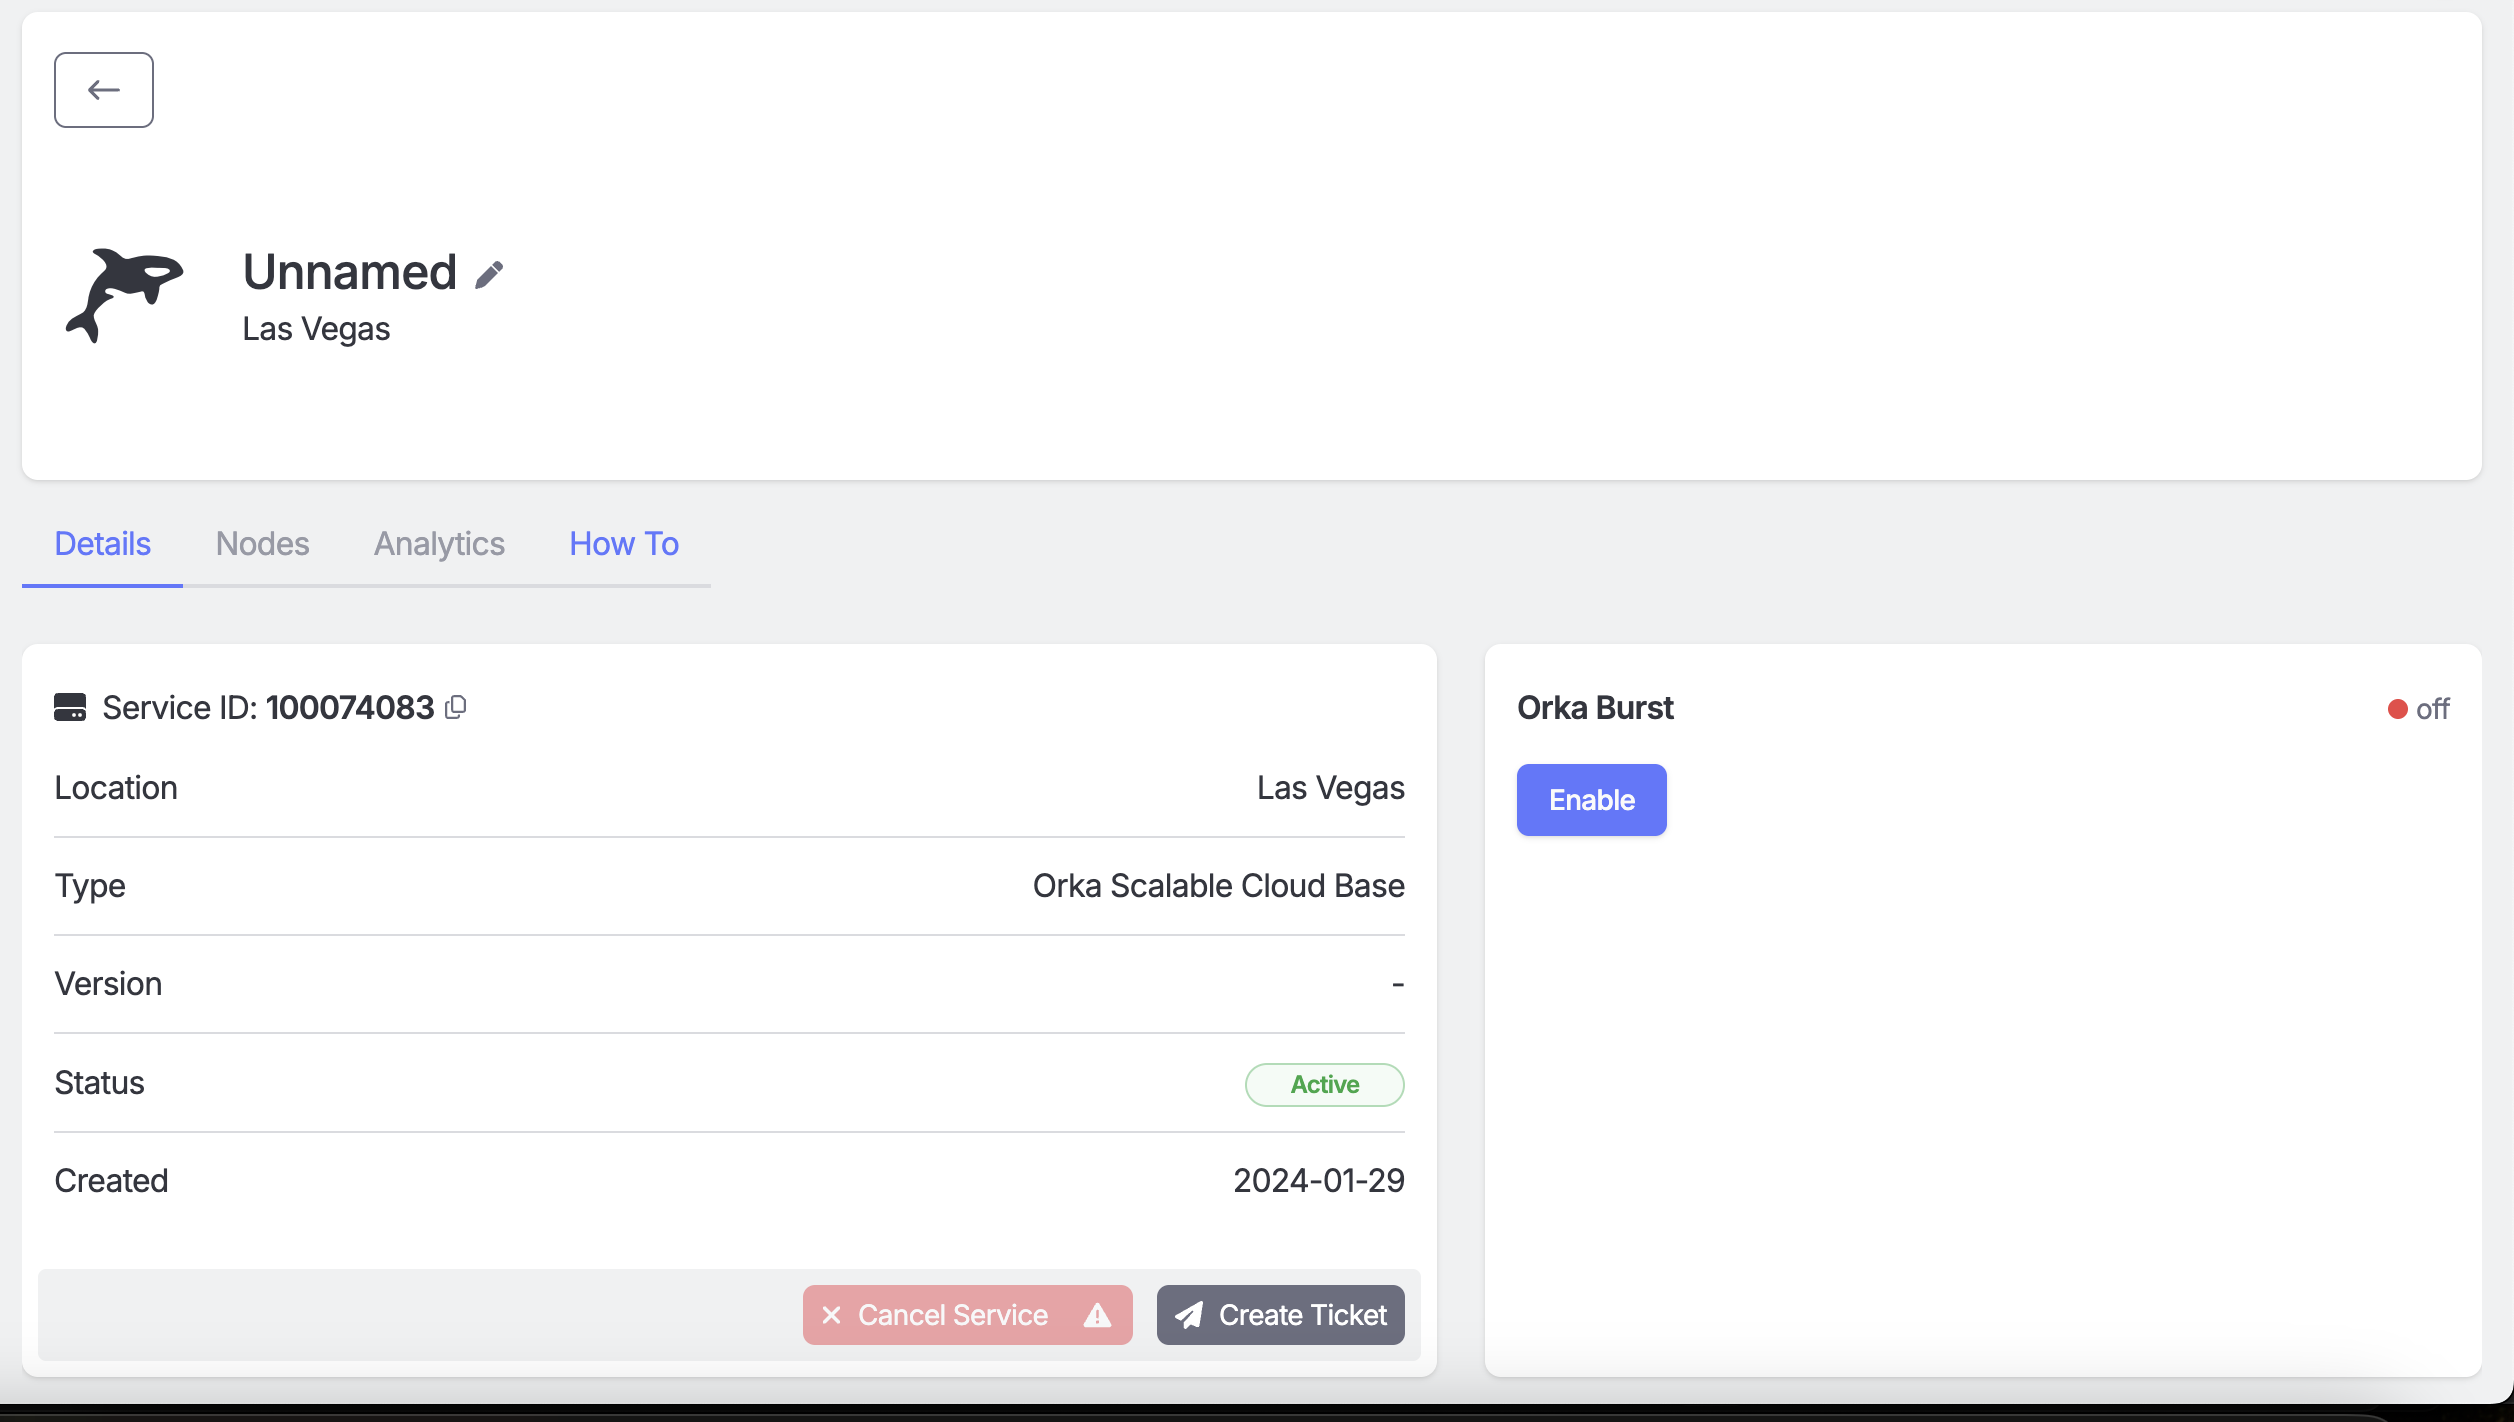
Overview
Orka Burst provides dedicated, on-demand access to elastic cluster capacity when needed. It’s designed to grow your cluster size during heavy workloads, without the commitment of annual contracts. When required, you can enable burst capacity directly from your MacStadium Admin Portal. Orka Burst requires a one-time setup maintenance window to provision and configure the burst nodes. Once configured (you’ll see which nodes are burst-enabled in your IP Plan), additional burst nodes are available within 15 minutes and billed only for the time used.Key Concepts
- A burst node is an on-demand, contractually provisioned node you can add to your cluster during high-workload periods.
- Only administrators can start and stop burst nodes via the MacStadium Admin Portal.
- Burst nodes are powered on/off manually by an admin user in the portal.
- You cannot manage burst nodes directly within the Kubernetes cluster; node management commands are restricted for security.
- Orka tags (similar to Kubernetes labels) can be used for monitoring burst nodes via Prometheus (
kube-node-labelsmetric) or other tools.
First Time Setup
- Contact your MacStadium sales team to enable Orka Burst on your cluster.
- Log in to the MacStadium Admin Portal with an admin-level account.
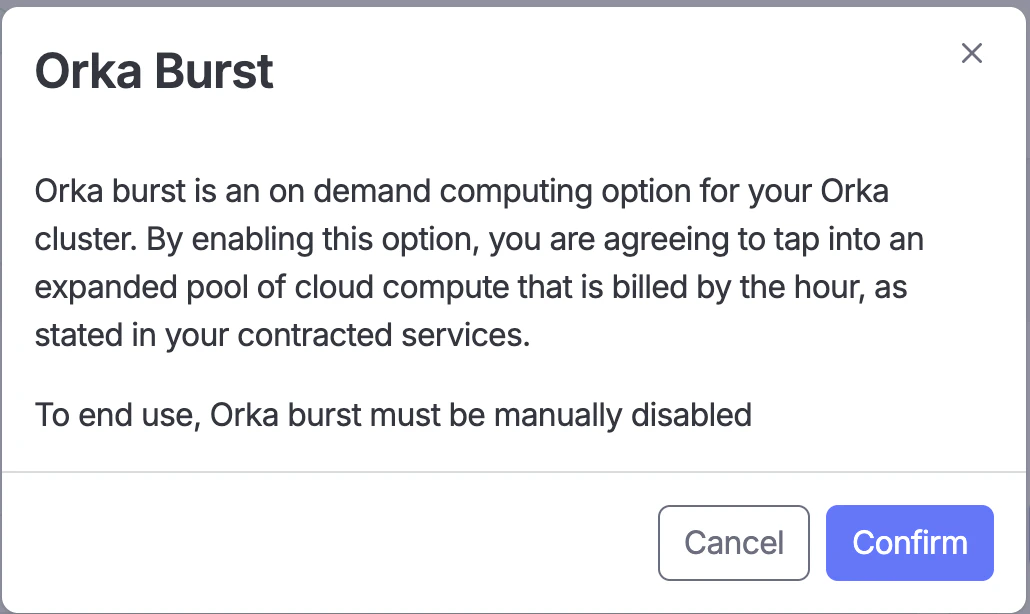
- Click the “Enable Burst” toggle and confirm to provision your burst nodes.
- Click ‘Confirm’ to accept the use of the contracted service Orka Burst.
- When all scheduled burst workloads have completed and no remaining CI jobs are scheduled on burst runners, manually drain the Orka Burst nodes and move them to a different namespace.
- After the empty Orka Burst nodes have been successfully moved to a different namespace, navigate back to the MacStadium Portal and click ‘Disable Burst’.
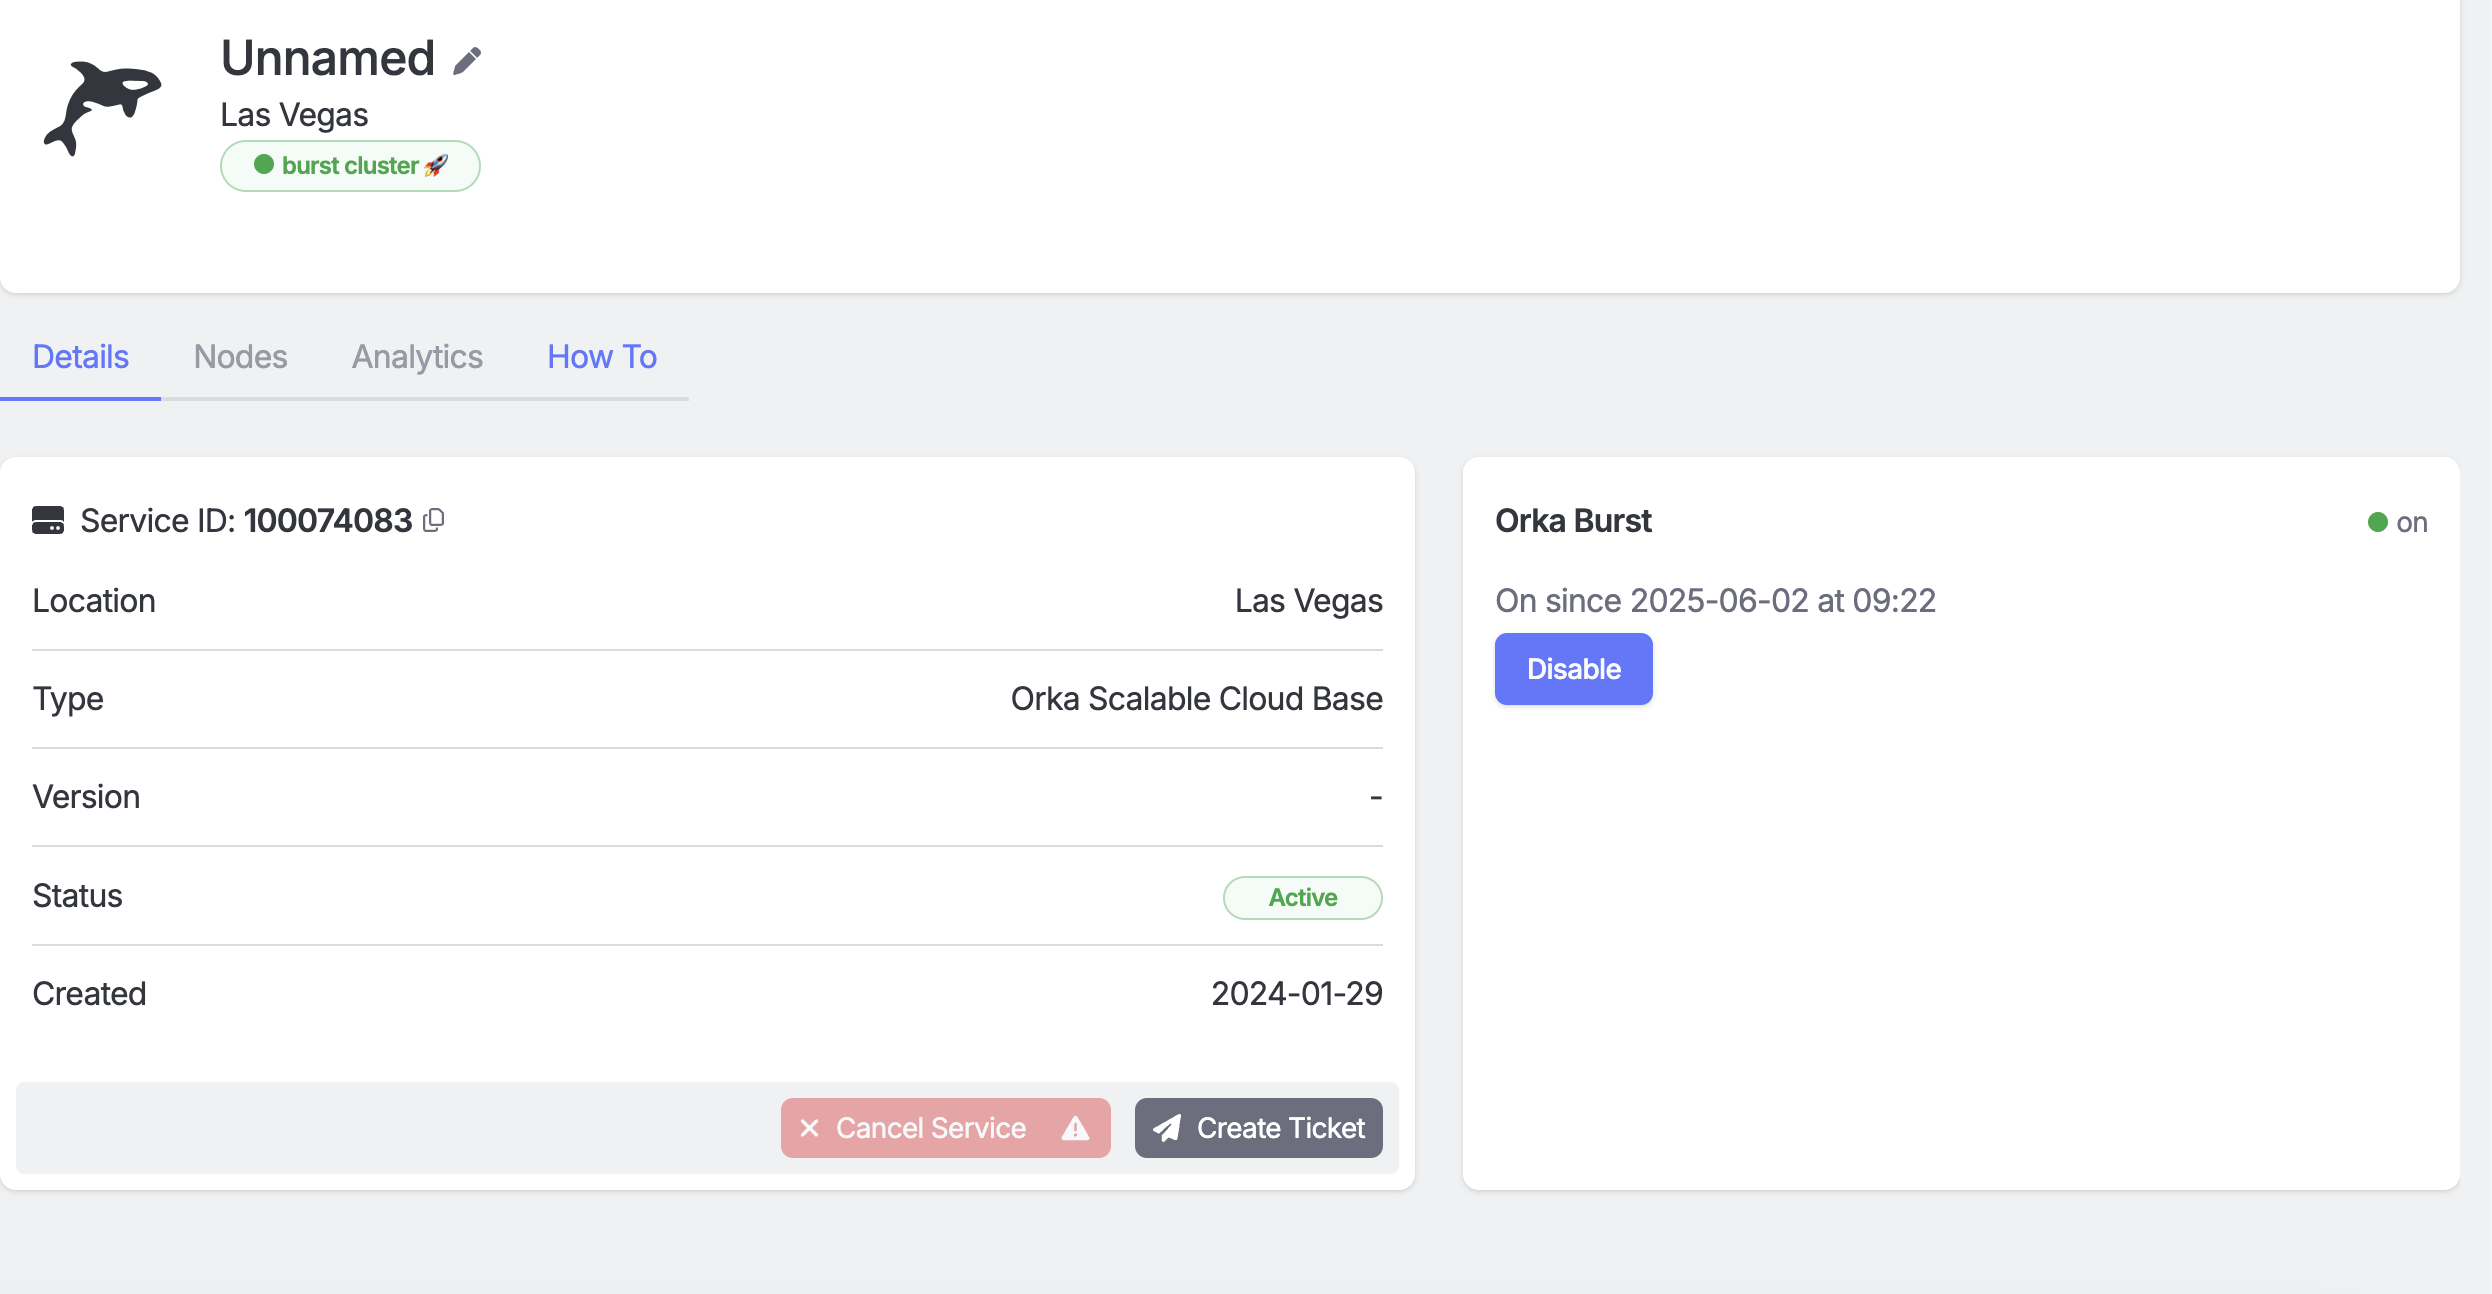
Enable/Disable Burst
Enable Orka Burst
After MacStadium support configures your burst nodes, you can turn them on via the portal. Enabling burst powers on the nodes and adds them to your cluster (this typically completes within 15 minutes).Disable Orka Burst
When Burst is disabled, the nodes are powered down and removed from the cluster. Plan to disable burst during a period of low cluster utilization, and coordinate with your engineering team to drain or move any active workloads first. If your burst nodes are in the same namespace as your normal Orka nodes, move them to a separate namespace before disabling Orka Burst. This sandboxes the node and ensures no additional workloads are scheduled on it. You are responsible for monitoring burst node usage and moving nodes when no workloads are running on them. Once your cluster has passed its peak utilization, work with your engineering team to move idle burst machines to a separate namespace.Removing Failing Workloads
- Identify the failing workload:
kubectl get <RESOURCE> --namespace=<NAMESPACE>and look for pods in CrashLoopBackoff, Failed, or Error status. - Delete the workload:
kubectl delete pod <pod-name> --namespace=<NAMESPACE>- Graceful deletion: use a
preStophook to allow pods to clean up beforeSIGTERM. - Forced deletion: add
--force --grace-period=0to the delete command.
- Graceful deletion: use a
- Confirm cleanup and reschedule your CI jobs once burst nodes are back online.
Automate burst via the Portal API
For teams that manage CI/CD infrastructure programmatically, MacStadium provides a GraphQL API athttps://portal.macstadium.com/graphql that gives you direct control over burst state. You can wire enable/disable into a pipeline trigger, a cron job, or a queue-depth-based scaler without anyone touching the portal.
This API is actively used and supported. A formal versioning and stability commitment is on the roadmap. Until then, the operations documented here are stable but the broader API surface may change.
curl, but any HTTP client works: POST to https://portal.macstadium.com/graphql with the appropriate Authorization header and JSON body.
Get an API token
You’ll need a Portal user token with read/write access. To create one:- Log in to the MacStadium Admin Portal with an admin account.
- Open the account menu and go to Users, then select the Tokens tab.
- Create a new token and set read/write permissions. Copy the token and store it as an environment variable or CI/CD secret; you’ll use it as
$TOKENin all requests below.
This token is separate from the Orka service account tokens you use with the
orka3 CLI. Service account tokens authenticate against your Orka cluster; Portal tokens authenticate against portal.macstadium.com.Find your cluster ID
The burst mutations require a clusterid, which is different from the human-readable displayId. Run this once to look it up:
displayId is the human-readable name you recognize from the portal; the id is the opaque identifier you’ll use in all subsequent requests.
Check burst status
Check
canUpdate before firing a mutation. A cluster mid-transition or in an error state will return canUpdate: false, and the mutation will fail if you don’t check first.
Enable burst
burstEnabled: true and a new burstLastTime. Burst nodes are typically available within 15 minutes.
Disable burst
Automation patterns
Pipeline trigger: Call the enable mutation at the start of a heavy CI workflow and the disable mutation in a cleanup job at the end, after completing the workload drain steps. This fits naturally as a wrapper job in GitHub Actions or GitLab CI that bookends your build runs. Off-peak scheduler: Run a cron job that disables burst during known low-utilization windows and re-enables it before peak hours. PullcanUpdate from the status query before each mutation so the job skips safely if the cluster isn’t ready to toggle.
Queue-depth scaler: Watch your CI queue depth and fire the enable mutation when pending jobs pass a threshold. If you’re already tracking runner utilization, the burst toggle is a short hop from there.
Monitoring burst consumption
burstLastTime tells you when burst state last changed. If you need to track consumption against a pre-paid credit balance, contact support@macstadium.com and your CSM can pull current usage data for your account.