Overview
Static Network Address Translation (NAT) is used to conserve IP addresses. It allows private IP networks with unregistered IP addresses to connect to the Internet. NAT translates the private (not globally unique) addresses in the internal network into legal addresses before they are forwarded to another network. Think of NAT as a one-to-one mapping of private IP addresses to public IP addresses. It allows mapping of an IP address on the internal network to an IP address that you want to make public. Once that mapping is set, then there are a list of rules that are needed to grant or deny access, which is called an Access Control List (ACL). The ACL is a list of rules that specifies which users or systems are granted or denied access to a particular object. ACLs are also installed in routers or switches, where they act as filters, managing which traffic can access the network. This document describes how to configure a Static Network Address Translation (NAT) and Access Control List (ACL) on a Cisco ASA Firewall to allow external IP addresses to access the MacStadium hosts.Prerequisites
Cisco AnyConnect Client: Connect to the VPN using Cisco AnyConnect Client, then access the firewall via SSH or Cisco ASDM.Considerations
In this document, the source IP address is the public IP that needs to be whitelisted in the firewall. The destination hosts are the MacStadium servers behind the firewall Private interface. This document demonstrates how to allow TCP port 443 (HTTPS) in the Cisco Adaptive Security Appliance (ASA) firewall from an external IP address to the subnet 10.221.188.0/23 configured in the Private-1 interface as an example.The example source IP address 76.76.21.241 is used in this document.
Install Options
Updating the Cisco Adaptive Security Appliance (ASA) can be done two different ways: Via Command Line Interface (CLI) Using a CLI allows you to write script changes in a notepad and have those changes reviewed by someone before running them. This method is good for writing scripts. Via Cisco Adaptive Security Device Manager (ASDM) Using an ASDM allows you to make line-by-line changes, while using a graphical user interface (GUI).Configuring Static Network Address Translation (NAT)
NAT via Command Line Interface (CLI)- Connect to the firewall via SSH using MacStadium credentials that are available in the IP Plan.
- When the > prompt appears, type enable
- Enter the password again.
- It should look like this:
- The privileged mode appears, as indicated by the # prompt.
- Enter the configuration mode and create an object and static NAT rule for that host:
Replace the example MacStadium NAT IP address (207.254.16.239) with an available Public IP listed in the MacStadium IP Plan.
NAT via Cisco Adaptive Security Device Manager (ASDM)
- Connect to the ASDM using the MacStadium credentials from your IP Plan.
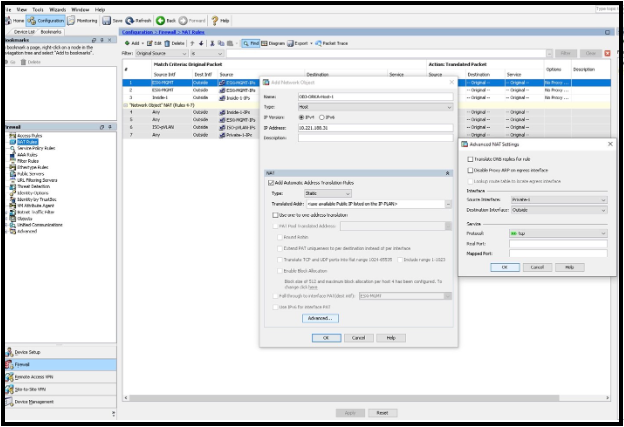
- Navigate to Configuration > Firewall > NAT Rules > +Add > Add NAT Rule.\
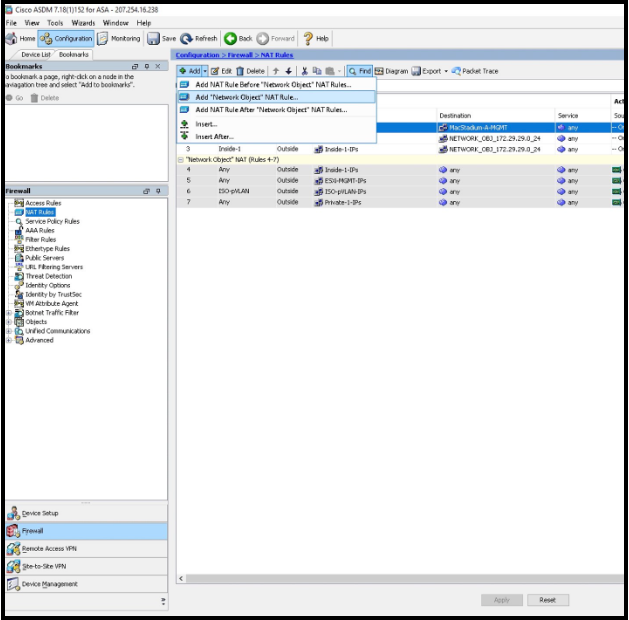
- Give the Object representing the internal MacStadium host a name (Example-Host-31).
- Confirm the Type is set as Host.
- In IP address enter the private IP address of the host (consult your IP Plan).
- In the NAT section, confirm Static is selected and enter the MacStadium Public IP address to assign the host.
- Click Advanced and set the Source Interface to Private-1 and Destination Interface to Outside.
- Confirm the Protocol is set to tcp.
- Click OK > OK > Apply.\
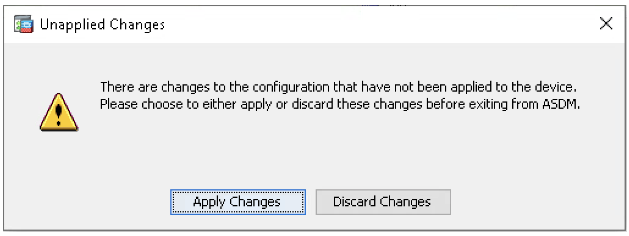
- Click Save
- Click Apply Changes\
Configuring Access Control Lists (ACLs)
ACL via Command Line Interface (CLI)
For external access to MacStadium hosts, a static NAT must be previously configured.
This guide assumes that the
Private-1-IPs object has been configured in the firewall.- Confirm that
Private-1-IPswas configured by running the following CLI command:
ciscoasa#show running-config object id Private-1-IPs - If
Private-1-IPshas not been configured, then use the following commands to create it:
- Connect to the firewall via SSH and from the command line enter the MacStadium credentials that are available in your IP Plan
- Confirm the privileged mode is enabled (indicated by the # prompt).
- Enter the configuration mode and create an Object representing the source IP address.
- Replace EXAMPLE with a name to use to identify the object and the source Public IP address (76.76.21.241) with the source IP address to whitelist on the firewall.
- Create an Access Control List to allow traffic through the Cisco ASA firewall. From the configuration mode enter the following access-list command:
To allow access to a single internal host instead of the entire Private-1 network, reference the object you created for that specific host. Example:
ciscoasa(config)#access-list Outside_access_in line 1 extended permit tcp object EXAMPLE object Example-Host-31 eq https- Apply the new access-list to the Outside interface:
The command above only needs to be entered the first time the ACL is configured.
- Exit and save the configuration:
Instead of creating an object representing a single source IP address, you can create a Network Object Group and add Network Objects to it. This is useful if you expect to allow more IP addresses in the future. For more information, see:
ACL via Cisco Adaptive Security Device Manager (ASDM)
For external access to your MacStadium hosts, a static NAT must be previously configured.- Connect to the firewall through ASDM using the MacStadium credentials that are available in your IP Plan.
- Navigate to: Configuration > Firewall.
- Click +Add and select Network Object on the right menu.
- Give the object a name.
- Confirm its type is set to Host.
- Enter the source IP address and optionally a description.\
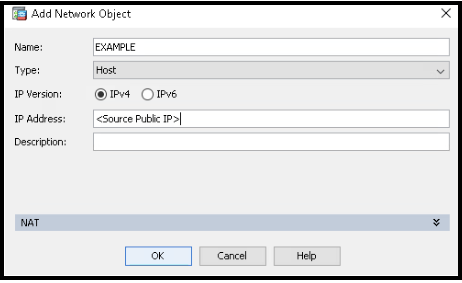
- Click OK.
- In the Access Rules section, confirm the Outside interface is selected. If rules are applied to the Outside interface, select the first rule from the top.\
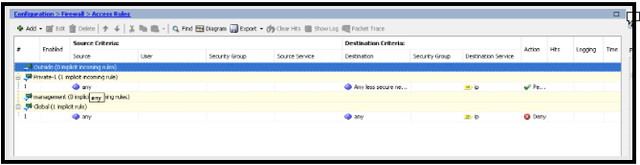
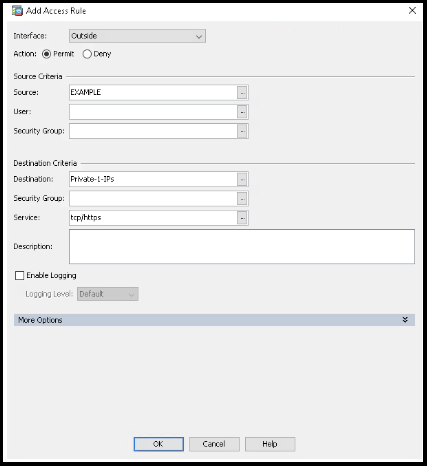
- Click +Add and select Add Access Rule.
- Confirm the Outside interface is selected, and the Action is set to Permit.
- Select the object host (or group) that was just created as the Source.
- Select the Private-1-IPs object as the Destination.
- In Service type the protocol/ports to be allowed (in this example tcp/https).
- Click OK.\
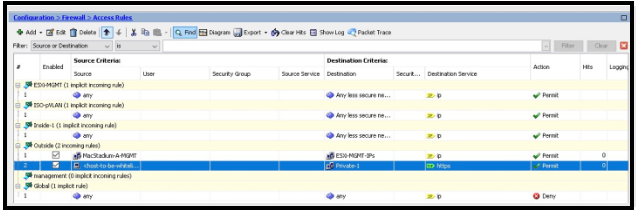
To allow access to a single internal host instead of the entire Private-1 network, reference the object created for that specific host in the Destination field.
-
Make sure the new rule is at the TOP. To move the new rule to the top, select the new rule and click the upper arrow highlighted.
- Click Apply
- Click Save
- Click Apply Changes