Creating Local User Accounts on a Cisco ASA
About
Creating local user accounts on a Cisco Adaptive Security Appliance (ASA) is an essential task for Network Administrators, and is done to secure their network resources.
Local user accounts are useful for managing user access to the ASA and to the resources behind the ASA, through the use of a VPN client, such as Cisco AnyConnect.
Overview
This document describes how to create local user accounts on the Cisco ASA, using both the command-line interface (CLI) and the Adaptive Security Device Manager (ASDM). This document is intended for those who are managing the subscribed Cisco ASA appliance and want to learn how to create local user accounts.
The details in this document are based on a Cisco ASA virtual firewall that runs ASA code version 9.14(3)18 and ASDM version 7.18.(1)152, and was created from these devices in a specific lab environment.
NOTE: The device used in this document started with a cleared (default) configuration.
WARNING: For a live network, consider the potential impact before executing any commands.
MacStadium configured a shared user account for customers to use for accessing the firewall. It was also used for authentication for the environment behind the firewall, and used a Remote Access VPN (RAVPN) client. This user account was configured with the highest access level.
Getting Started
Step 1 - Review the IP Plan information and gather the necessary computer and firewall information.
Step 2 - Create a Local User Account on the firewall to manage it.
Step 3 - Set up regular backup / restore testing.
Step 4 - Customize the firewall (for example, allowing IPs to access MacStadium via Internet).
Step 5 - (Optional) Site-to-Site configuration.
Install Options
Updating the Cisco Adaptive Security Appliance (ASA) can be done two different ways:
Via Command Line Interface (CLI)
Using a CLI allows the user to write script changes in a notepad, and have those changes reviewed by someone before running those scripts. This method is good for users writing scripts.
Via Cisco Adaptive Security Device Manager (ASDM)
Using a ASDM allows the user to make line by line changes, while using a graphical user interface (GUI).
Via Command Line Interface (CLI)
- Establish a VPN connection to the MacStadium environment.
- Connect to the Cisco ASA using SSH.
For more information, see the section Connect to the Cisco ASA using SSH.
- Use the credential documented in the IP Plan to authenticate; when prompted, enter a username and password.
- Enter global configuration mode by typing the command,
configure terminal
- Create the new user account by typing the command in the following format:
username username password password privilege priv_level
NOTES:
*The username username keyword is a string from 3 to 64 characters long. The space and question mark characters cannot be used for usernames.
*The password password keyword is a string from 3 to 127 characters long. The space and question mark characters cannot be used within the passwords.
*The privilege priv_level keyword sets the privilege level for the created user account. The priv_level is a numeric value ranging from 0 to 15.
*By default, a user account has a privilege level of 2.
*A level of 15 grants the user account the highest level of access.
An example of the CLI command is:
ciscoasa(config)# username exampleuser1 password examplepassword privilege 1
- Save the configuration with the command,
write memory
- Type the exit or end command to return to privileged mode of the ASA.
To confirm the creation of the user account, enter the command,
show running-config username
This command displays all the user accounts configured on the ASA.
ciscoasa# show running-config username username exampleuser1 password ***** pbkdf2 privilege 1 username clientuser1 password ***** pbkdf2 privilege 15 username admin password ***** pbkdf2 privilege 15 ciscoasa#
When a password is defined in the username command, the ASA creates an MD5 hash of it when it is saved for security purposes. When verifying configuration with the show running-config command, the username command does not show the actual password; it shows the encrypted password followed by the encrypted keyword.
Testing a Newly Created Account
- In privilege mode, enter the command
disable
- Enter the command
login
- At the Username prompt, enter the created username.
- At the Password prompt, enter the created password.
If the authentication is successful, then proceed to test the level of access for the user account either at the ASA or at the RAVPN client.
ciscoasa # disable ciscoasa > login Username: exampleuser1 Password: *************** ciscoasa > enablePassword: ********* Password: ***************
Unsuccessful Authentication
[ exampleuser1 ] You do NOT have Admin Rights to the console !
Password
To remove a user account, use no versionwith the username that is being removed.
Removing a User Account
- Log into the firewall with an account different from the account being removed.
- Enter global configuration mode by typing the command,
configure terminal - Enter the
no versionof the username command. - Enter the
exitorend commandto return to privilege mode. - Save the configuration with the command,
write memory - Verify the changes made with the command, show running-config username.
ciscoasa# configure terminal ciscoasa(config)# no username exampleuser1 ciscoasa(config)# end ciscoasa# write memory Building configuration... Cryptochecksum: b327981a 7a0e4ca2 ba149024 d05c9ab5 24790 bytes copied in 0.60 secs [OK] ciscoasa# show run ciscoasa# show running-config username username admin password ***** pbkdf2 privilege 15 username clientuser1 password ***** pbkdf2 privilege 15
Via Cisco Adaptive Security Device Manager (ASDM)
Creating a Local User Account with ASDM
- Open the ASDM and connect to the Cisco Adaptive Security Appliance (ASA).
- Click Configuration.

- Click Device Management.
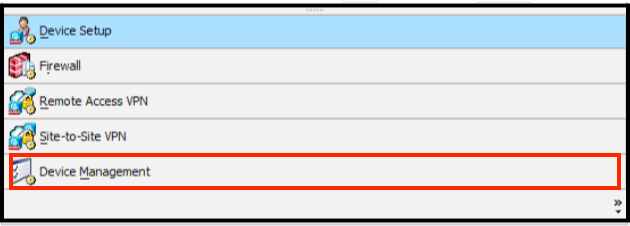
- Click Users/AAA.
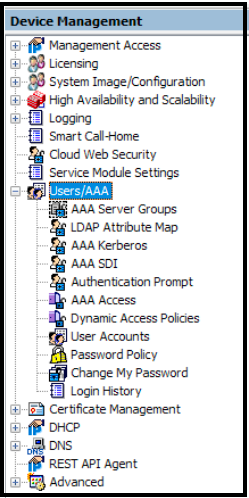
- Click Add to create a new user account.
- In the Add User Account window, confirm that Identity is selected at the left of the window and then enter the username and password for the new user account.
NOTE: Specify a Access Restriction by selecting an option in the section below.
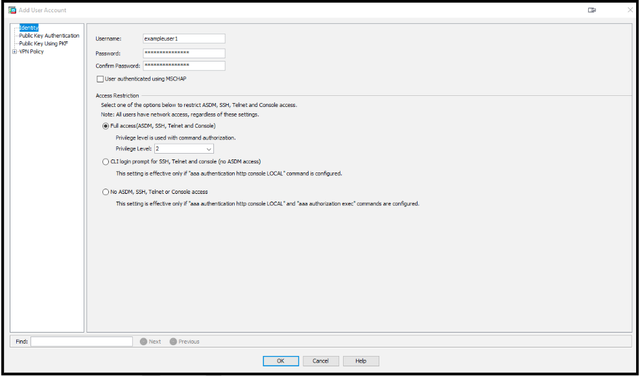
- Click OK to save the new user account.
- Click Apply located at the bottom of the ASDM.
- Click Save.
NOTE: Test the new account by logging out of the ASDM and then logging back in with the new credentials.
Removing an Account from the Local Database
- Under the User Accounts of the ASDM, select the user account to be removed.

- Click Delete.
- Click Apply.
- Click Save.
NOTE:
For information on Advanced Options for user account creations and management, see the following guides:
Connect to the Cisco ASA using SSH
- Configure aaa to use local database for ssh and console.
ciscoasa# aaa authentication ssh console LOCAL
NOTE: aaa = authentication (permitting access), authorization (specify commands when granted access), accounting (keeps track of utilization reports of users after logged in and generate accounting reports for billing)
LOCAL = local database
- Create admin username with privilege 15 (username, P@ssw0rd)
ciscoasa# username username password P@ssw0rd priv 15
NOTE: priv 15 = top privilege level (full superuser, can give different command access to different privilege levels)
- Turn on password for enable.
ciscoasa# aaa authentication enable console LOCAL
NOTE: This forces a password for the enable prompt.
- Turn on serial console authentication.
ciscoasa# aaa authentication serial console LOCAL
NOTE: This turns on user/pass for serial access.
- Save the changes.
ciscoasa# write mem
- Log out console and verify access.
ciscoasa(config)# end
ciscoasa# exit
Username: username
Logoff
Password: ********
- Generate ssh key pair.
ciscoasa# crypto key generate rsa modulus 4096
INFO: The name for the keys will be:
Keypair generation process begin. Please wait…
ciscoasa(config)#
NOTES:
*SSH is an encrypted protocol, uses RSA to generate public and private key
*4096 = block size
*rsa = encryption algorithm
- Allow access to the inside interface.
ciscoasa# ssh 0.0.0.0 0.0.0.0 inside
NOTE: This enables ssh access to the inside interface from any IPv4
- Force ssh version 2.
ciscoasa# ssh version 2
- Add timeout of 15 min to ssh.
ciscoasa# ssh timeout 15
- Verify login with ssh through 192.168.1.1 in putty.
Updated 10 months ago