Overview
The goal of this documentation is to update the Site-To-Site VPN configuration with AWS and add specific configuration details for the Cisco Adaptive Security Appliance (ASA) feature TCP State-bypass, which is required in HA VPN scenarios (HA-VPN is a regional per VPC VPN solution. HA-VPN gateways have two interfaces, each with their own public IP address).- A one-time or temporary access to the MacStadium cloud from a single virtual or physical machine is required.
- Cisco AnyConnect VPN is recommended.
- For more information, see Connecting to Your Cloud (via VPN)
Creating Stable IPSec Site-to-Site VPN
- Check the software version and model of the Cisco ASA/ASAv device of the MacStadium cloud.
- Configure the private cloud to connect to your MacStadium cloud. One or more of the following must be configured:
- Provide the public endpoint of the MacStadium cloud.
- This is the public network IP listed for the FW1-Outside network in Appendix B of the IP Plan.
- Enable policy-based routing between the private cloud and the internal private network the MacStadium cloud (default the Private-1 network).
- This is the private network host and range listed in Appendix A of the IP Plan.
- Enable inbound traffic to the private cloud.
- Provide the public endpoint of the MacStadium cloud.
- Set up the Cisco ASA/ASAv device of the MacStadium cloud. One or more of the following must be configured:
- A nat exemption rule for traffic between the two clouds.
- This allows traffic from the private cloud to the private network and the outside interface of the MacStadium cloud. By default, these are respectively the Private-1 and Outside networks listed in Appendix A of the IP Plan.
access-listrules permitting traffic from the private cloud to the public endpoint of the MacStadium cloud.- By default, this is the FW1-Outside network listed in Appendix B of the IP Plan.
- A crypto map rule that maps traffic between the two clouds.
- By default, this is the Outside network listed in Appendix A of the IP Plan.
- IPSec and IKE policies.
tunnel-grouprules that point to the private cloud that connect to the MacStadium cloud.
- Prepare these settings based on the Cisco ASA/ASAv software and model
For more information about how to configure each aspect of your Cisco firewall, see Cisco Documentation: Configuration Guides.
Helpful Links
Cisco Documentation: Navigating the Cisco ASA Series Documentation Cisco Documentation: Managing Site-to-Site VPNs: The Basics Cisco Documentation: Cisco ASA Series Syslog Messages Logging into Your Cisco FirewallNetworking Setup for Private Cloud
A one-time or temporary access must be established from a single virtual or physical machine to the MacStadium cloud. It is recommended to use Cisco AnyConnect VPN. For more information, see Connect to Your Cloud via VPN.
Creating IPSec Site-To-Site VPN between Two Clouds
- Check and document the software version and model of the Cisco ASA/ASAv device for the MacStadium cloud.
- Configure the private cloud to connect to the MacStadium cloud.
- One or more of the following might need to be configured.
- Provide the public endpoint of the MacStadium cloud.
- Usually, this is the public network IP listed for the FW1-Outside network in Appendix B of the IP Plan.
- Enable routing between the private cloud and the internal private network of the MacStadium cloud (by default, the Private-1 network).
- Usually, this is the private network host and range listed in Appendix A of the IP Plan.
- Enable inbound traffic to the private cloud.
- Provide the public endpoint of the MacStadium cloud.
- One or more of the following might need to be configured.
- Set up the Cisco ASA/ASAv device of the MacStadium cloud.
- You might need to configure one or more of the following rules:
- A NAT exemption rule for traffic between the two clouds. It might need to allow traffic from the private cloud to the private network and the outside interface of the MacStadium cloud. By default, these are respectively the Private-1 and Outside networks listed in Appendix A of the IP Plan.
- NAT exemption allows the ability to exclude traffic from being translated with NAT. One scenario where this is typically done is for a site-to-site VPN tunnel.
- Access-list rules permitting traffic from the private cloud to the public endpoint of your MacStadium cloud. By default, this is the FW1-Outside network listed in Appendix B of the IP Plan.
- A crypto map rule that maps traffic between the two clouds. Usually, this is mapped to the outside interface of the MacStadium cloud. By default, this is the Outside network listed in Appendix A of the IP Plan.
- IPSec and IKE policies.
- Tunnel-group rules that point to the private cloud to connect to the MacStadium cloud.
- The TCP State Bypass feature, which requires an access-list, class-map, policy-map, and a service-policy. This is a requirement for Site-To-Site VPN with Virtual Tunnel Interfaces only and is configured to allow asynchronous routing between separate VPN tunnels.
- A NAT exemption rule for traffic between the two clouds. It might need to allow traffic from the private cloud to the private network and the outside interface of the MacStadium cloud. By default, these are respectively the Private-1 and Outside networks listed in Appendix A of the IP Plan.
- You might need to configure one or more of the following rules:
These settings must be based on the Cisco ASA/ASAv software and model. For more information about how to configure each aspect of your Cisco firewall, see Cisco Documentation: Configuration Guides.
Networking Setup AWS
To establish a stable, persistent connection between Amazon Virtual Private Cloud (Amazon VPC) and the MacStadium private cloud, configure an IPsec Site-To-Site VPN between the two clouds. There are two VPN configuration options available, Policy-based and Route-based (VTI) VPN;- Policy-based VPN, there are two VPN tunnels where in AWS one tunnel is active (up), and one is passive (down). A monitoring service checks frequently if the active tunnel is up and, if not, brings the passive tunnel up, what ensures minimal downtime.
- Route-based (VTI) VPN, both tunnels are active at the same time and can route traffic in and out simultaneously. Also, this allows routing between MacStadium and AWS to be configured statically or dynamically with BGP. Route-based VPN is the preferred option as it offers enhanced routing and monitoring control.
Creating Site-To-Site VPN
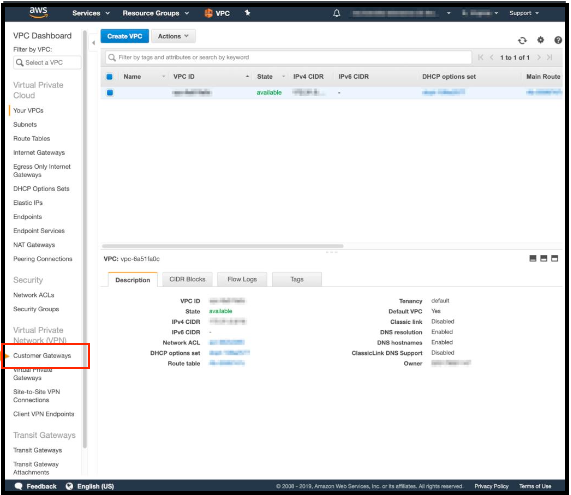
This is done from an Amazon VPC to the MacStadium private cloud.- Log into the VPC service.
- Create a customer gateway.
- Set up a virtual private gateway.
- Create the Site-To-Site VPN connection.
- Ensure that AWS allows inbound traffic.
Creating Customer Gateway
In AWS, the customer gateway represents the MacStadium endpoint of the Site-To-Site VPN connection. When you configure the customer gateway, use the networking information of the public network. By default, this is the FW1-Outside network. The networking information for this network in your IP plan.For more information about the customer gateway, see Amazon VPC Documentation: Components of Your Site-To-Site VPN.
- In the VPC service sidebar, locate the Virtual Private Network (VPN) menu and select Customer gateways.\
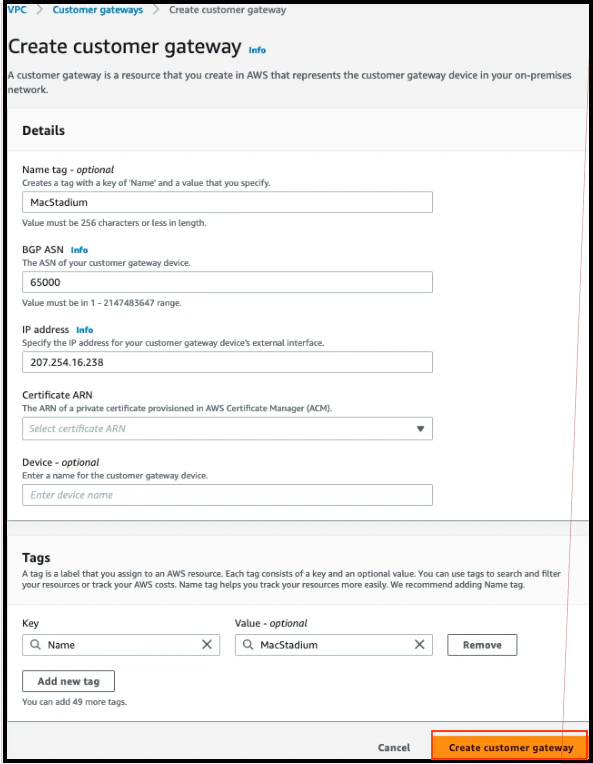
- Click Create Customer Gateway.
- Provide a Name. Set a name that is easy to remember.
- In BGP ASN, use a private ASN in the range of 64,512–65,534. This is used later as the BGP process number in the MacStadium firewall.
- In the IP Address text box, provide the IP address of the public network listed in Appendix B of the IP Plan. By default, this is the FW1-Outside network.
- Keep the other options with the default values and click Create Customer Gateway.
Setting Up Virtual Private Gateway
In AWS, the virtual private gateway represents the Amazon endpoint of the Site-To-Site VPN connection.For more information about the virtual private gateway, see Amazon VPC Documentation: Components of Your Site-To-Site VPN.
- In the VPC service sidebar, locate the Virtual Private Network (VPN) menu and select Virtual Private Gateways.
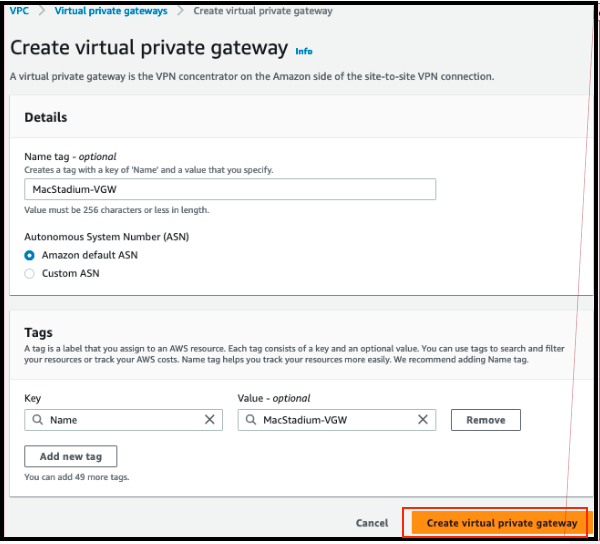
- Click Create Virtual Private Gateway.
- Provide a Name tag. Set a name that is easy to remember.
- Select Amazon default ASN and click Create Virtual Private Gateway.
- Connect to the VPN.
- After signing up, the IP Plan is sent. Review that information to configure access to the cloud environment. The recommended method of gaining access is via a Virtual Private Network (VPN), which is both easy to implement and secure.\
- After signing up, the IP Plan is sent. Review that information to configure access to the cloud environment. The recommended method of gaining access is via a Virtual Private Network (VPN), which is both easy to implement and secure.\
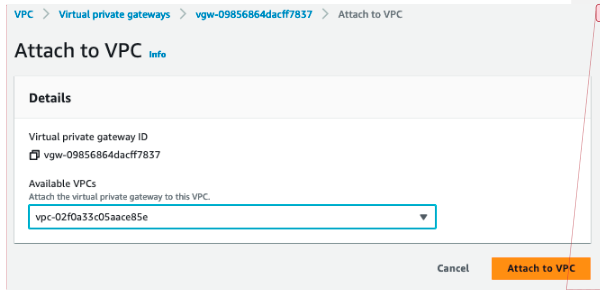
- On the Virtual Private Gateways dashboard, right-click the newly created virtual private gateway and select Attach to VPC.\
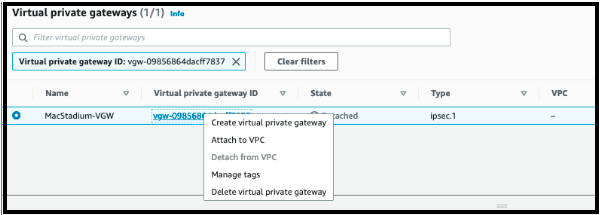
- Select the VPC to attach the Virtual Private Gateway to and click Attach to VPC.\
- Select the Propagation Enable checkbox.
- Click Save.\
Creating Site-To-Site VPN Connection
If the customer gateway and a virtual private gateway are in place, then configure the Site-To-Site VPN connection. During setup, select the customer gateway and the virtual private gateway to use, and configure that routing.Route traffic to the internal, private network. By default, this is the Private-1 network. The networking information for this network is in Appendix A of the IP Plan.
- In the VPC service sidebar, locate the Virtual Private Network menu and select Site-To-Site VPN Connections.
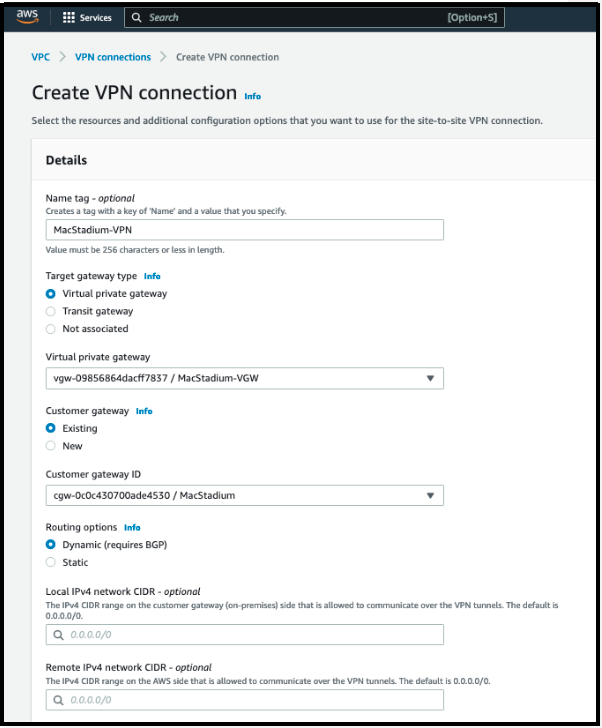
- Click Create VPN Connection.
- Provide Name tag.
- For Target Gateway Type, select Virtual Private Gateway.
- For Virtual Private Gateway, select the virtual private gateway that was created earlier.
- Select Existing customer gateway, and from the Customer Gateway ID dropdown menu, select the customer gateway that was created earlier.
- Select the Routing Options:
- Static manually specifies the destination subnets of the VPN.
- Select static routing and provide in Static IP Prefixes the CIDR notation for the private network listed in Appendix A of the IP Plan (by default, the Private-1 network). To convert the subnet mask to a CIDR notation, use a CIDR calculator. Example: 10.221.254.0/24
- Dynamic (requires BGP) and dynamically exchanges routes between AWS and MacStadium environments.
- Select dynamic routing to keep the default values and proceed to the next step.
- For more information about AWS VPN tunnel options, see: Amazon VPC Documentation.
- Static manually specifies the destination subnets of the VPN.
- Do not edit the Tunnel Options section.
- Click Create VPN Connection.\
Allowing AWS Inbound Traffic
Based on the requirements and current setup, it might be necessary to enable inbound traffic from MacStadium to AWS.For more information, see Amazon VPC Documentation: Security Groups for Your VPC and Amazon VPC Documentation: Network ACLs.
AWS VPN Configuration for Cisco ASA/ASAv
Proceed with the AWS VPN configuration for Cisco.
- Download the configuration from Amazon
- Fill in the configuration blank
Downloading Amazon Configuration
Amazon has prefilled configurations ready for download, from a variety of vendors. The default firewall vendor for MacStadium private clouds is Cisco Systems, Inc.- Verify there is a Site-To-Site VPN connection in Amazon.
- For more information about how to set up your VPN, see Setting Up the AWS Side of the Site-To-Site VPN.
- Log in to the AWS Management Console and access your VPC service, which is located in the top right corner of the screen.
- In the VPC service sidebar, locate the Virtual Private Network menu and select Site-To-Site VPN Connections.
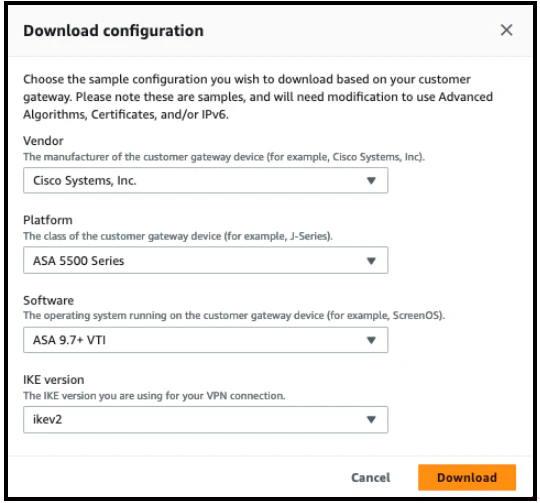
- In the list, select the newly created VPN connection and click Download Configuration.
- Vendor, select Cisco Systems, Inc.
- Platform, select ASA 5500 Series.
- Software:
- For a policy-based VPN, select ASA 9.x
- For a route-based VPN, select ASA 9.7 + VTI
If ASA 9.7 + VTI was selected, choose ikev2 as the IKE version and click Download.
Configuration Blanks
Manually replace the placeholders in the configuration file that were downloaded from Amazon (with the values for the MacStadium configuration). Policy-based VPN - ASA 9.xMake sure that the name of all configuration elements in this script are unique, not currently in use in your environment.
Configuration Parameters
| Placeholder Example | Description | More Information | Example |
|---|---|---|---|
<vpc_subnet> | The IPv4 address of the Amazon VPC (without the subnet mask bit notation). | This value can be found by logging in to the AWS Management Console and navigating to the VPC dashboard. Select the VPC and checking the Description at the bottom of the screen. | 172.31.0.0 |
<vpc_subnet_mask> | The subnet mask for the Amazon VPC. | This value can be found by logging in to the AWS Management Console, and navigating to the VPC dashboard. Select the VPC, and check the Details at the bottom of the screen. Then convert the subnet mask bit notation to the correct subnet mask (for example, the /16 notation converts to a 255.255.0.0 subnet mask). | 255.255.0.0 |
<amzn_vpn_map> | A unique name for the crypto map. If there is already a crypto maps configured, then change the mapping number. | Cisco Documentation: Configuring Crypto Maps | amzn_vpn_map |
<sla_monitor_address> | An IP address in the Amazon VPC that can serve as an SLA monitor keeping the Site-To-Site tunnel alive. | Set this to an available host in the AWS VPC. The host must reply to ICMP echo requests. | 172.31.0.5 |
<local_subnet> | The IP address for the internal private network of the MacStadium cloud as provided in Appendix A of your IP Plan. By default, this is the Private-1 network. | The IP Plan | 10.221.254.0 |
- Verify the configuration file from the AWS Management Console.
- Open the configuration file.
- Replace all placeholders with their respective values. Use Configuration parameters for reference.
- Uncomment the line:
access-list amzn-filter extended permit ip. To uncomment, remove!at the start of the line. - Uncomment the lines for object and nat configuration at the end of the config file.
- To uncomment, remove ! at the start of the line.
- Keep the following line to ensure the SLA monitor works as expected.
object network obj-SrcNet subnet 0.0.0.0 0.0.0.0
- On the following line, change 0.0.0.0 0.0.0.0 to a combination of the IP address and the subnet mask for your Amazon VPC.
- These values are in the AWS Management Console. Navigate to the VPC dashboard and select the VPC, and check the Description at the bottom of the screen.
- Convert the subnet mask bit notation to the correct subnet mask (for example, the /16 notation converts to a 255.255.0.0 subnet mask).
- For example:
- object network obj-amzn subnet 0.0.0.0 0.0.0.0
- On the following line, change inside and outside to the names of the internal private network and the outside interface of the MacStadium private cloud, respectively, as provided in Appendix A of the IP Plan. By default, these are Private-1 and Outside, respectively.
- nat (inside,outside) 1 source static obj-SrcNet obj-SrcNet destination static obj-amzn obj-amzn
- nat (Private-1,Outside) 1 source static obj-SrcNet obj-SrcNet destination static obj-amzn obj-amzn
- (Optional) Delete the remaining commented lines to clean up the file. Commented lines are indicated by ! at the beginning of the line.
- Save the changes.
Configuration Parameters for Route-based VPN - ASA 9.7 + VTI
| Placeholder Examples | Description | More Information | Example |
|---|---|---|---|
<outside_interface> | The name of the outside interface of the Cisco ASA/ASAv device as provided in Appendix A of your IP Plan. By default, the value is Outside. | The IP Plan | Outside |
<local_subnet> | The IP address for the internal private network of your MacStadium cloud as provided in Appendix A of your IP Plan. By default, this is the Private-1 network. | The IP Plan | 10.221.254.0 |
<local_subnet_mask> | The subnet mask for the internal private LAN of the MacStadium cloud as provided in Appendix A of the IP Plan. By default, this is the Private-1 network. | The IP Plan | 255.255.255.0 |
<vpc_subnet> | The IPv4 address of the Amazon VPC (without the subnet mask bit notation). | This value can be found by logging in to the AWS Management Console, and navigate to your VPC dashboard. Select the VPC and check the Description at the bottom of the screen. | 172.31.0.0 |
- Verify the configuration file from the AWS Management Console.
- Open the configuration file.
-
Replace the placeholders with their respective values. Currently, only the placeholder
<outside_interface>is available in the AWS script. Use Table 1: Configuration parameters for reference. - Change the name of the tunnel interfaces. Example:
-
Replace the network address and mask on the BGP configuration. Example: router bgp 65513 address-family ipv4 unicast network
<local_subnet>mask<local_subnet_mask> - Replace the placeholders with their respective values.
- For a route-based VPN, enable the TCP State Bypass feature to allow the outbound and inbound traffic to flow through separate VPN tunnels as follows:
| Placeholder Example | Description | More Information | Example |
|---|---|---|---|
<acl-state-bypass> | A unique name for the access control list that permits the creation of the tunnel and the traffic over it. | Cisco Documentation: Access Control Lists | acl-state-bypass |
<cm_state-bypass> | A unique name for the Class-map. | Cisco Documentation: TCP State Bypass | cm-state-bypass |
<pm-state-bypass> | A unique name for the access control list that permits the creation of the tunnel and the traffic over it. | Cisco Documentation: TCP State Bypass | pm-state-bypass |
-
Define the Access list with the source and destination networks: access-list
<acl-state-bypass>extended permit ip<local_subnet><local_subnet_mask><vpc_subnet><vpc_subnet_mask>
-
Create the Class Map to identify the traffic for which you want to disable stateful Firewall inspection:
class-map <cm-state-bypass>
-
Enter the match parameter command to specify the traffic of interest within the class map:
match access-list <acl-state-bypass>
-
Enter the policy-map name command to assign the actions to be taken in regards to the specified class map traffic:
policy-map <pm-state-bypass> class <cm-state-bypass> set connection advanced-options tcp-state-bypass
-
Enter the service-policy command in global configuration mode to activate the policy map on the targeted interface:
service-policy <pm-state-bypass> interface <private_interface>
- Save changes
Completing Cisco ASA/ASAv Configuration
To complete configuration into the Cisco ASA/ASAv, see Setting Up the MacStadium Side of the Site-To-Site VPN.Manually Enabling Route Propagation
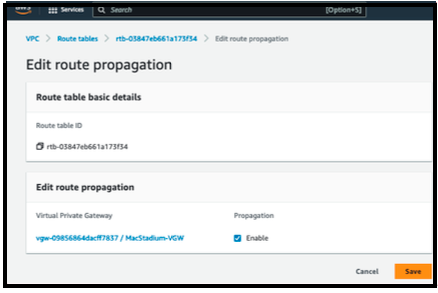
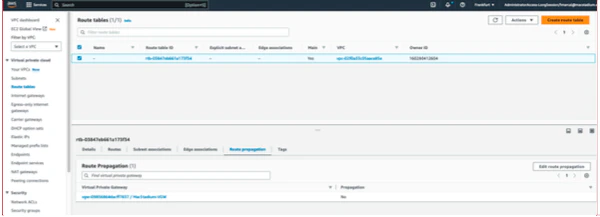
Manually enable route propagation for the virtual private gateway. For more information about VPN routing, see Amazon VPC Documentation: Site-To-Site VPN Routing Options.- In the VPC service sidebar, locate the Virtual Private Cloud menu and select Route Tables.\

- In the list of routing tables, select the main route table for your VPC.
- Select Route Propagation. If the virtual private gateway is not listed, then make sure that it is attached to the VPC.
- Click Edit route propagation.\
(Open-Source Option) OpenConnect
Why OpenConnect?
For mostly CLI users, use OpenConnect - an open-source VPN client available from the command line.Download and Install OpenConnect
If Homebrew is enabled, then runbrew install openconnect from the command line.
For Windows users, download (build) the OpenConnect package or use Cisco AnyConnect.
Cisco AnyConnect alternative
Cisco firewalls are designed to work with the Cisco AnyConnect Secure Mobility Client as a VPN client. Users who prefer a GUI VPN client or prefer running on Windows, use Cisco AnyConnect.Download AnyConnect
- Download a VPN client. The recommend VPN client for MacStadium Private Clouds is Cisco AnyConnect.
- Open MacStadium Portal > Account Menu > Files.
- Open the file and locate the VPN Server section.
- From the browser, visit
https://<YOUR_VPN_SERVER_ADDRESS_HERE>.
Firefox is required to get past the self-signed certificate blocker.
- When prompted, provide the VPN credentials from the IP Plan.
- After log in, download a licensed version of AnyConnect directly from the firewall.
Setup Process
- Log in using the username and password from the IP Plan.
- Cisco AnyConnect SecureMobility checks to see if Java is installed.
- If Java is installed, then Java is used.
- If Java is not installed, then a link for download is provided.
- Follow the installation prompts to complete the install.
- Once installation has completed:
- Select Settings
- Uncheck “Block connections to untrusted servers,” as the Cisco ASA appliance by default will be using a self signed certificate.
- From the main screen, enter the IP Address provided in the IP Plan.
- Click connect.
- Enter your username and password to confirm the connection.